
Manual
Page 2
TABLE OF CONTENTS TABLE OF CONTENTS S afety Ins tr ucti ons 3 - 4 1. HOW TO ASSEMBLE 6 Carton Contents 6 Attach Handle 6 3. G ENERA L MA IN TEN A N CE 9 Changing Bag 9 Replacing Brushroll 10 6. S ERVIC E 12 8. HOW TO OPERATE 8 Handle Release 8 Automatic Height Adjustment 8 Carrying Cleaner 8 Stair Cleaning 8 5. TROUBLESHOOTING GUIDE 11 7. WARRANTY 13 2 OWNER'S INSTRUCTIONS English pp. 1-13 Español pàg.E1-E13 Français p. VACUUM CONTROLS 7 4. F EATU RE S 5 2. F1-F13
TABLE OF CONTENTS TABLE OF CONTENTS S afety Ins tr ucti ons 3 - 4 1. HOW TO ASSEMBLE 6 Carton Contents 6 Attach Handle 6 3. G ENERA L MA IN TEN A N CE 9 Changing Bag 9 Replacing Brushroll 10 6. S ERVIC E 12 8. HOW TO OPERATE 8 Handle Release 8 Automatic Height Adjustment 8 Carrying Cleaner 8 Stair Cleaning 8 5. TROUBLESHOOTING GUIDE 11 7. WARRANTY 13 2 OWNER'S INSTRUCTIONS English pp. 1-13 Español pàg.E1-E13 Français p. VACUUM CONTROLS 7 4. F EATU RE S 5 2. F1-F13
Manual
Page 11
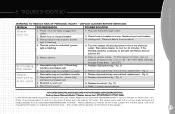
... tripped. (power light is worn. 5. Pg. 9. 1. Replace disposable bag - Replace brushroll - TROUBLESHOOTING WARNING: TO REDUCE RISK OF PERSONAL INJURY - Check fuse or breaker in this unit are to cool for an authorized HOOVER® Dealer or visit our website at www.hoover.com or call 1-877-697-5866. Pg. 9. 2. Always identify your Yellow...
... tripped. (power light is worn. 5. Pg. 9. 1. Replace disposable bag - Replace brushroll - TROUBLESHOOTING WARNING: TO REDUCE RISK OF PERSONAL INJURY - Check fuse or breaker in this unit are to cool for an authorized HOOVER® Dealer or visit our website at www.hoover.com or call 1-877-697-5866. Pg. 9. 2. Always identify your Yellow...


