Manual
Page 4
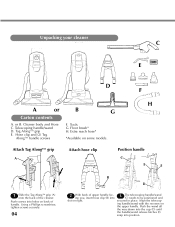
... on right. 3 The telescoping handle/wand (C) needs to be positioned and secured in place. ing you, insert hose clip (B) into slot on some models. Align the telescop- Push the wand all the way down into the cup (D) until the handle/wand ... of the cleaner. Telescoping handle/wand D. ing handle/wand with the recesses on back of handle. or B. Hose clip and (2) Tag Along™ handle screws F. Push screws into position. Attach Tag Along™ grip A Attach hose clip Position handle C E E B D 1 Slide the Tag Along™ grip (A) onto the back of upper ...
... on right. 3 The telescoping handle/wand (C) needs to be positioned and secured in place. ing you, insert hose clip (B) into slot on some models. Align the telescop- Push the wand all the way down into the cup (D) until the handle/wand ... of the cleaner. Telescoping handle/wand D. ing handle/wand with the recesses on back of handle. or B. Hose clip and (2) Tag Along™ handle screws F. Push screws into position. Attach Tag Along™ grip A Attach hose clip Position handle C E E B D 1 Slide the Tag Along™ grip (A) onto the back of upper ...
Manual
Page 5
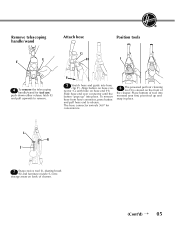
...K J 7 Snap crevice tool (J), dusting brush (K) and furniture nozzle (L) into hose clip (F). F 5 Stretch hose and guide into storage areas on back of cleaner. (Cont'd) ¡ 05 Align button on hose connector (G) with hole on hose end (H). Place bottom of tool into recessed area first, pivot tool up " ...into place. Remove telescoping handle/wand E E Attach hose G H ® Position tools I ) is stored on the front of the cleaner. To remove hose from hose connector, press button and pull hose end to remove. Slide hose end over connector until the button "pops up and snap...
...K J 7 Snap crevice tool (J), dusting brush (K) and furniture nozzle (L) into hose clip (F). F 5 Stretch hose and guide into storage areas on back of cleaner. (Cont'd) ¡ 05 Align button on hose connector (G) with hole on hose end (H). Place bottom of tool into recessed area first, pivot tool up " ...into place. Remove telescoping handle/wand E E Attach hose G H ® Position tools I ) is stored on the front of the cleaner. To remove hose from hose connector, press button and pull hose end to remove. Slide hose end over connector until the button "pops up and snap...
Manual
Page 6
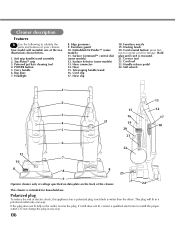
...other). This plug will resemble one of the cleaner. 24 This cleaner is intended for storage. Bag door 7. Furniture guard 10. Hose clip 18. Polarized plug To reduce the risk of your cleaner. Cord rewind button: press button to rewind cord for household use. Crevice... Furniture nozzle 19. Tag Along™ grip 3. Your model will fit in a polarized outlet only one blade is rewound. 21. Hose connector 14. Hose 15. Cleaner description Features 8 Use the following to identify the parts and features of electric shock, this appliance has a polarized plug (...
...other). This plug will resemble one of the cleaner. 24 This cleaner is intended for storage. Bag door 7. Furniture guard 10. Hose clip 18. Polarized plug To reduce the risk of your cleaner. Cord rewind button: press button to rewind cord for household use. Crevice... Furniture nozzle 19. Tag Along™ grip 3. Your model will fit in a polarized outlet only one blade is rewound. 21. Hose connector 14. Hose 15. Cleaner description Features 8 Use the following to identify the parts and features of electric shock, this appliance has a polarized plug (...


