Manual
Page 1
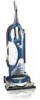
Owner's Manual ENGLISH § pp.1-12 ESPAÑOL § pág. 15-22 FRANÇAIS § p. 23-30 www.hoover.com This product was designed for easy assembly (see page 3) WindTunnel™ with V2™ Technology TurboPOWER™ by HOOVER Congratulations on your purchase!
Owner's Manual ENGLISH § pp.1-12 ESPAÑOL § pág. 15-22 FRANÇAIS § p. 23-30 www.hoover.com This product was designed for easy assembly (see page 3) WindTunnel™ with V2™ Technology TurboPOWER™ by HOOVER Congratulations on your purchase!
Manual
Page 2
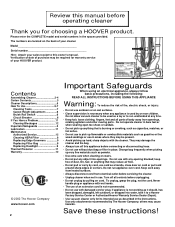
.... Change bag frequently when picking up hard, sharp objects with the cleaner. To unplug, grasp the plug, not the cord. Save these instructions! Contents Assembling Cleaner 3-4 Carton Contents 3 Cleaner Descriptions 5 How To Use 5-7 Cleaning Tools 7 Carpet Height Adjustment 6 Brush Roll Switch 6 Circuit Breaker 6 If You Have a Problem 11 Clearing Blockages 12 Important Safeguards 2 Lubrication 11 Maintenance Authorized Service 12 Cleaning HEPA Filter 8 Replacing Edge Groomers 9 Replacing Filter Bag 8 Replacing Headlight 9 Thermal Protector 11 Warranty 12...
.... Change bag frequently when picking up hard, sharp objects with the cleaner. To unplug, grasp the plug, not the cord. Save these instructions! Contents Assembling Cleaner 3-4 Carton Contents 3 Cleaner Descriptions 5 How To Use 5-7 Cleaning Tools 7 Carpet Height Adjustment 6 Brush Roll Switch 6 Circuit Breaker 6 If You Have a Problem 11 Clearing Blockages 12 Important Safeguards 2 Lubrication 11 Maintenance Authorized Service 12 Cleaning HEPA Filter 8 Replacing Edge Groomers 9 Replacing Filter Bag 8 Replacing Headlight 9 Thermal Protector 11 Warranty 12...
Manual
Page 3
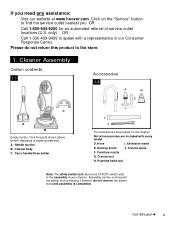
... model. Cleaner body C. Carry handle/Hose holder Accessories 1-2 E H G D F I . Dusting brush J. However, do not return this product to find the service outlet nearest you need any assistance: Visit our website at www.hoover.com. Please do not remove the switch lock until assembly is missing. Cleaner Assembly Carton contents 1-1 C A B Empty carton. Handle section B. Hose I J The accessories are included with a representative in the assembly of packing materials. Powered hand tool Note: The white switch...
... model. Cleaner body C. Carry handle/Hose holder Accessories 1-2 E H G D F I . Dusting brush J. However, do not return this product to find the service outlet nearest you need any assistance: Visit our website at www.hoover.com. Please do not remove the switch lock until assembly is missing. Cleaner Assembly Carton contents 1-1 C A B Empty carton. Handle section B. Hose I J The accessories are included with a representative in the assembly of packing materials. Powered hand tool Note: The white switch...

Manual
Page 4
... handle. 1-9 Place hose on holder. 4 Push screws into holes on handle section. Tighten screws securely with a Phillips screwdriver. 1-10 C D Pull switch lock (C) above ON/ OFF switch (D) straight out. Snap tabs on carry handle (B) into electrical outlet. Cleaner Assembly 1-3 1-4 1-5 A A B Remove cardboard (A) and four screws from handle section. Discard cardboard, but keep screws for assembly (Figs. 1-7 and 1-8). Push switch down ) before plugging into holes on back of switch...
... handle. 1-9 Place hose on holder. 4 Push screws into holes on handle section. Tighten screws securely with a Phillips screwdriver. 1-10 C D Pull switch lock (C) above ON/ OFF switch (D) straight out. Snap tabs on carry handle (B) into electrical outlet. Cleaner Assembly 1-3 1-4 1-5 A A B Remove cardboard (A) and four screws from handle section. Discard cardboard, but keep screws for assembly (Figs. 1-7 and 1-8). Push switch down ) before plugging into holes on back of switch...
Manual
Page 5
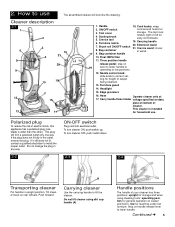
... on carpet and floors; This plug will look like the drawing. Do not change the plug in the outlet, reverse the plug. low for easy cord release. 19. Tool cover 4. Furniture nozzle 7. Brush roll ON/OFF switch 8. Extension wand 21. This cleaner is wider than the other). If the plug does not fit fully in any way. Push forward. upright for storage and when using dirt cup handle (A). operating position for household use The assembled cleaner...
... on carpet and floors; This plug will look like the drawing. Do not change the plug in the outlet, reverse the plug. low for easy cord release. 19. Tool cover 4. Furniture nozzle 7. Brush roll ON/OFF switch 8. Extension wand 21. This cleaner is wider than the other). If the plug does not fit fully in any way. Push forward. upright for storage and when using dirt cup handle (A). operating position for household use The assembled cleaner...
Manual
Page 6
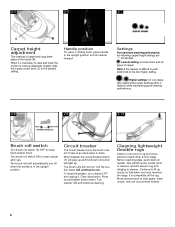
... good cleaning p e rf o rm a n c e . 2-8 2-9 2-10 D E Brush roll switch Turn brush roll switch (D) OFF to the next higher setting. Press circuit breaker button down on one end of cleaner) and will prevent rug from clinging to run. To reset the breaker, turn , but the suction motor will automatically turn off the rug. Higher settings: for bare floors and all types of carpet and rugs takes place at the nozzle (B). 2-5 2-6 2-7 C B Carpet height adjustment The cleaning of carpet...
... good cleaning p e rf o rm a n c e . 2-8 2-9 2-10 D E Brush roll switch Turn brush roll switch (D) OFF to the next higher setting. Press circuit breaker button down on one end of cleaner) and will prevent rug from clinging to run. To reset the breaker, turn , but the suction motor will automatically turn off the rug. Higher settings: for bare floors and all types of carpet and rugs takes place at the nozzle (B). 2-5 2-6 2-7 C B Carpet height adjustment The cleaning of carpet...
Manual
Page 7
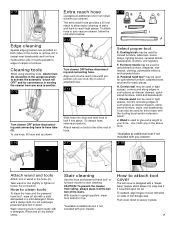
... attach tool cover The tool cover is used for stair cleaning. How to remove dirt in water. 2-11 Edge cleaning Special edge groomers are provided on both sides of carpet or furniture. Guide either side of nozzle parallel to edge of the nozzle to clean tools To clean the hose and the powered hand tool*, wipe off dirt with your vacuum cleaner, follow the instructions below. 2 - 1 3 AB Turn cleaner OFF before disconnecting and connecting hose. To use hose, lift hose...
... attach tool cover The tool cover is used for stair cleaning. How to remove dirt in water. 2-11 Edge cleaning Special edge groomers are provided on both sides of carpet or furniture. Guide either side of nozzle parallel to edge of the nozzle to clean tools To clean the hose and the powered hand tool*, wipe off dirt with your vacuum cleaner, follow the instructions below. 2 - 1 3 AB Turn cleaner OFF before disconnecting and connecting hose. To use hose, lift hose...
Manual
Page 8
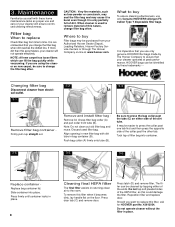
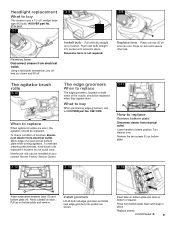
... Replace bag container lid. Press door tab (C) and remove door. Should you change filter bag often. Do not operate cleaner without the filter in returning clean air to change the filter bag often. It is only partially full of your Authorized Hoover Dealer (Depot), Leading Retailers, Hoover Factory Service Centers or through The Hoover Company on new carpet, be cleaned by these home maintenance tasks as proper use only Genuine HOOVER® Allergen Filtration Type...
... Replace bag container lid. Press door tab (C) and remove door. Should you change filter bag often. Do not operate cleaner without the filter in returning clean air to change the filter bag often. It is only partially full of your Authorized Hoover Dealer (Depot), Leading Retailers, Hoover Factory Service Centers or through The Hoover Company on new carpet, be cleaned by these home maintenance tasks as proper use only Genuine HOOVER® Allergen Filtration Type...
Manual
Page 9
... edge groomers and slide new edge groomers into slot. What to buy This cleaner uses a 12 volt, wedge base type 912 bulb, HOOVER part No. 27313107. 3-7 Remove lens - Pull old bulb straight out of a card across bottom plate while turning agitators. To check condition of the nozzle, should be replaced when they appear worn. When to replace The edge groomers, located on bottom plate into socket until...
... edge groomers and slide new edge groomers into slot. What to buy This cleaner uses a 12 volt, wedge base type 912 bulb, HOOVER part No. 27313107. 3-7 Remove lens - Pull old bulb straight out of a card across bottom plate while turning agitators. To check condition of the nozzle, should be replaced when they appear worn. When to replace The edge groomers, located on bottom plate into socket until...
Manual
Page 10
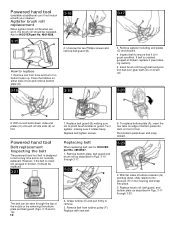
...3 H G 4. Replace with your cleaner) Agitator brush roll replacement When agitator brush roll brushes are worn, the brush roll should be replaced. 3 - 2 1 The belt can be replaced. Turn agitator, making sure not to remove. 3. Press the latches on brush roll. 3 - 2 0 A C E 6. Replace belt guard (B) making sure it so bottom faces up. Remove agitator including end plates (C) and discard. 4. Replacing belt When replacing belt, ask for HOOVER part No. 48414088. 3 - 1 5 A 3 - 1 6 B 2. Powered hand tool (available at additional cost if not included with new belt. 8.
...3 H G 4. Replace with your cleaner) Agitator brush roll replacement When agitator brush roll brushes are worn, the brush roll should be replaced. 3 - 2 1 The belt can be replaced. Turn agitator, making sure not to remove. 3. Press the latches on brush roll. 3 - 2 0 A C E 6. Replace belt guard (B) making sure it so bottom faces up. Remove agitator including end plates (C) and discard. 4. Replacing belt When replacing belt, ask for HOOVER part No. 48414088. 3 - 1 5 A 3 - 1 6 B 2. Powered hand tool (available at additional cost if not included with new belt. 8.
Manual
Page 11
...; Change filter bag. • Incorrect carpet height setting • Move nozzle control knob to tool • Continue using the check list below. Lubrication The cleaner is found by using tool applying light pressure. • Blockage in turbine channel • Remove blockage. • Broken or worn belt • Replace belt • Low cleaner suction • Check items under "Cleaner won't pick up". Other performance factors include Hose Power (ASTM Test F558), Surface Litter Cleaning, Hard Floor Cleaning, Edge Cleaning, Cleaning Width, and Air Filtration...
...; Change filter bag. • Incorrect carpet height setting • Move nozzle control knob to tool • Continue using the check list below. Lubrication The cleaner is found by using tool applying light pressure. • Blockage in turbine channel • Remove blockage. • Broken or worn belt • Replace belt • Low cleaner suction • Check items under "Cleaner won't pick up". Other performance factors include Hose Power (ASTM Test F558), Surface Litter Cleaning, Hard Floor Cleaning, Edge Cleaning, Cleaning Width, and Air Filtration...

Manual
Page 12
If a blockage occurs during tool use: Turn cleaner OFF and disconnect from electrical outlet. 1. replace bag. 4-1 A Check dirt duct 2. B. If a blockage occurs during floor cleaning: Turn cleaner OFF and disconnect from a U.S. If a blockage occurs during the warranted period. Disconnect powered hand tool from dirt duct. 4-2 Checking brush rolls 4. Replace belt turbine, brush roll, belt guard and bottom plate. only). This warranty applies when the appliance is purchased in the United States including its territories and possessions, or in...
If a blockage occurs during tool use: Turn cleaner OFF and disconnect from electrical outlet. 1. replace bag. 4-1 A Check dirt duct 2. B. If a blockage occurs during floor cleaning: Turn cleaner OFF and disconnect from a U.S. If a blockage occurs during the warranted period. Disconnect powered hand tool from dirt duct. 4-2 Checking brush rolls 4. Replace belt turbine, brush roll, belt guard and bottom plate. only). This warranty applies when the appliance is purchased in the United States including its territories and possessions, or in...
Manual
Page 14
HOOVER y son marcas registradas HOOVER et sont des marques déposées HOOVER and are registered trademarks 9-02 U8122-900 Printed in Mexico 56511-B63
HOOVER y son marcas registradas HOOVER et sont des marques déposées HOOVER and are registered trademarks 9-02 U8122-900 Printed in Mexico 56511-B63


