Manual
Page 2
... grasp the plug, not the cord. They may damage the cleaner. • Always turn off all parts of dust, lint, hair, or anything that you attach your HOOVER product. Empty cup and clean filter frequently when picking up hard, sharp objects with the cleaner. keep ... Groomers . . . . .13 Replacing Headlight 9 Thermal Protector 13 Trouble Shooting 14 Clearing Blockages 14 Warranty 15 © 2001 The Hoover Company www.hoover.com 2 Important Safeguards! Use only attachments recommended by cord, use cord as gasoline or fine wood sandings or use with your personal records...
... grasp the plug, not the cord. They may damage the cleaner. • Always turn off all parts of dust, lint, hair, or anything that you attach your HOOVER product. Empty cup and clean filter frequently when picking up hard, sharp objects with the cleaner. keep ... Groomers . . . . .13 Replacing Headlight 9 Thermal Protector 13 Trouble Shooting 14 Clearing Blockages 14 Warranty 15 © 2001 The Hoover Company www.hoover.com 2 Important Safeguards! Use only attachments recommended by cord, use cord as gasoline or fine wood sandings or use with your personal records...
Manual
Page 3
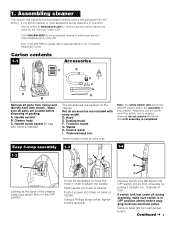
... cord into back of your cleaner. Remove label (D) from carton and identify each item shown. Make sure all parts are located before being shipped from the factory. Not all parts from self-propel button. Wands H. Assembly can be necessary to speak with every model. Crevice wand I. However,... (C) on back of the cleaner, make sure switch is in our Consumer Response Center. Easy 3-step assembly 1-3 1-4 1-2 D A Looking at www.hoover.com to find the service outlet nearest you should happen to attach the handle. Push 4 screws into holes on front of lock.
... cord into back of your cleaner. Remove label (D) from carton and identify each item shown. Make sure all parts are located before being shipped from the factory. Not all parts from self-propel button. Wands H. Assembly can be necessary to speak with every model. Crevice wand I. However,... (C) on back of the cleaner, make sure switch is in our Consumer Response Center. Easy 3-step assembly 1-3 1-4 1-2 D A Looking at www.hoover.com to find the service outlet nearest you should happen to attach the handle. Push 4 screws into holes on front of lock.
Manual
Page 7
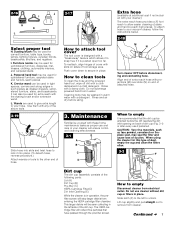
..., books, lamps, lighting fixtures, venetian blinds, baseboards, shutters, and registers. To reattach, align hinges of cover with projections (M) over slots (N) on sides of the following parts: Lid (A) Dirt Cup (B) Pre-filter (C) HEPA Cartridge Filter(D) Dirt Inlet Opening (E) While the cleaner is recommended that have passed through the pre-filter screen. Rinse...
..., books, lamps, lighting fixtures, venetian blinds, baseboards, shutters, and registers. To reattach, align hinges of cover with projections (M) over slots (N) on sides of the following parts: Lid (A) Dirt Cup (B) Pre-filter (C) HEPA Cartridge Filter(D) Dirt Inlet Opening (E) While the cleaner is recommended that have passed through the pre-filter screen. Rinse...
Manual
Page 9
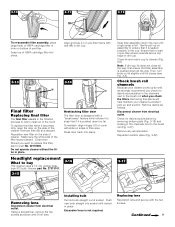
... pre-filter screen extends above top edge of the filter faces outward. Check for part No. 40110006. Replacing lens Reposition lens and secure with slots on sides of the cleaner. Continued 9 Note: If dirt cup lid does not close all ... accumulation by removing bottom plate (Fig. 3-18) and looking in the channels next to buy This cleaner uses a 12 volt, wedge base type 912 bulb, Hoover part No. 27313101. 3-15 3-16 Slide filter assembly down all the way, first ensure that it becomes dirty, open too far. Headlight replacement What to the...
... pre-filter screen extends above top edge of the filter faces outward. Check for part No. 40110006. Replacing lens Reposition lens and secure with slots on sides of the cleaner. Continued 9 Note: If dirt cup lid does not close all ... accumulation by removing bottom plate (Fig. 3-18) and looking in the channels next to buy This cleaner uses a 12 volt, wedge base type 912 bulb, Hoover part No. 27313101. 3-15 3-16 Slide filter assembly down all the way, first ensure that it becomes dirty, open too far. Headlight replacement What to the...
Manual
Page 10
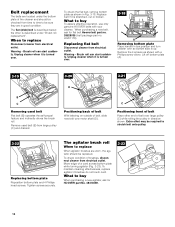
...check condition of belt Place other is stretched, cut or broken. What to buy When purchasing a new agitator, ask for flat belt Hoover belt part no. 38528035 (belt package part no. 40201170). Warning - The agitator brush roll When to replace When agitator brushes are worn, the agitator should be checked from ... be sure they are in direction shown. Belt replacement The belts are located under "Brush roll replacement". When purchasing a new belt, ask for HOOVER part No. 48414069. 3-23 10 Brush roll can start suddenly. Move edge of belt over so bottom side is up.
...check condition of belt Place other is stretched, cut or broken. What to buy When purchasing a new agitator, ask for flat belt Hoover belt part no. 38528035 (belt package part no. 40201170). Warning - The agitator brush roll When to replace When agitator brushes are worn, the agitator should be checked from ... be sure they are in direction shown. Belt replacement The belts are located under "Brush roll replacement". When purchasing a new belt, ask for HOOVER part No. 48414069. 3-23 10 Brush roll can start suddenly. Move edge of belt over so bottom side is up.
Manual
Page 11
E C Inspecting V-belt The V-belt is designed to last for HOOVER part No. 48414088. 3-28 A Installing brush roll Grasp brush roll and fit it as described in Fig. 4-1. Belt will "pop" into the rectangular slot (G) on brush ... brush roll. Then firmly pull on outside of belt), slide back of belt over and remove bottom plate (Fig. 3-18). To install new belt (with Hoover belt part no. 38528034 (belt package...
E C Inspecting V-belt The V-belt is designed to last for HOOVER part No. 48414088. 3-28 A Installing brush roll Grasp brush roll and fit it as described in Fig. 4-1. Belt will "pop" into the rectangular slot (G) on brush ... brush roll. Then firmly pull on outside of belt), slide back of belt over and remove bottom plate (Fig. 3-18). To install new belt (with Hoover belt part no. 38528034 (belt package...
Manual
Page 12
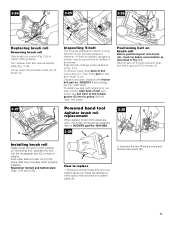
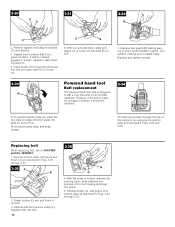
... it rotates freely. Remove belt from turbine pulley (F). 3-30 C D 3-31 3-32 B C C E 3. However, if the belt is in guard. Replacing belt When replacing belt, ask for HOOVER part No. 38528037. 1. Replace with new belt. 12 3-36 H G 4. Turn agitator, making sure not to remove. 3.
... it rotates freely. Remove belt from turbine pulley (F). 3-30 C D 3-31 3-32 B C C E 3. However, if the belt is in guard. Replacing belt When replacing belt, ask for HOOVER part No. 38528037. 1. Replace with new belt. 12 3-36 H G 4. Turn agitator, making sure not to remove. 3.
Manual
Page 13
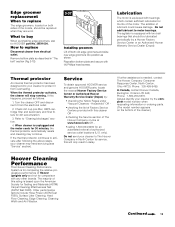
...ball bearings that should be lubricated periodically by a Hoover Factory Service Center or an Authorized Hoover Warranty Service Dealer (Depot). What to "Clearing blockages" section. 4. The addition of Hoover uprights only and not for HOOVER part No. 39511004. Check dirt cup pre-filter, ... for the life of this happens, proceed as shown. Service To obtain approved HOOVER service and genuine HOOVER parts, locate the nearest Hoover Factory Service Center or Authorized Hoover Warranty Service Dealer (Depot) by the complete model number when requesting information or ordering...
...ball bearings that should be lubricated periodically by a Hoover Factory Service Center or an Authorized Hoover Warranty Service Dealer (Depot). What to "Clearing blockages" section. 4. The addition of Hoover uprights only and not for HOOVER part No. 39511004. Check dirt cup pre-filter, ... for the life of this happens, proceed as shown. Service To obtain approved HOOVER service and genuine HOOVER parts, locate the nearest Hoover Factory Service Center or Authorized Hoover Warranty Service Dealer (Depot) by the complete model number when requesting information or ordering...

Manual
Page 14
...HEPA cartridge filter is found : A. Look into opening (C) for blockages continuing with each step until the blockage is turned over. Note: Electrical parts are enclosed in Figs. 3-28, 3-29 and 3-35. Problem: Cleaner won't run Possible cause Possible solution • Not firmly plugged ...Problem: Dirt inside the dirt cup. Remove agitator shield and remove any screws. C. The cleaner can continue to a Hoover Factory Service Center or an Authorized Hoover Warranty Service Dealer (Depot). Check fullness of the dirt cup and prevent the dirt from electrical outlet. Replace belt ...
...HEPA cartridge filter is found : A. Look into opening (C) for blockages continuing with each step until the blockage is turned over. Note: Electrical parts are enclosed in Figs. 3-28, 3-29 and 3-35. Problem: Cleaner won't run Possible cause Possible solution • Not firmly plugged ...Problem: Dirt inside the dirt cup. Remove agitator shield and remove any screws. C. The cleaner can continue to a Hoover Factory Service Center or an Authorized Hoover Warranty Service Dealer (Depot). Check fullness of the dirt cup and prevent the dirt from electrical outlet. Replace belt ...
Manual
Page 15
Appliances purchased elsewhere are questions concerning this warranty or the availability of parts only. Proof of purchase will be paid one way. Hoover Authorized Warranty Service Dealers (Depots). If further assistance is needed, or if there are covered by presenting the appliance to one of one full...pick up, delivery, or house calls; This warranty applies when the appliance is used in the U.S.A., phone 1-800-944-9200 OR visit The Hoover Company on-line at no cost to you, all labor and parts to place this warranty gives you specific legal rights, you mail your appliance to state.
Appliances purchased elsewhere are questions concerning this warranty or the availability of parts only. Proof of purchase will be paid one way. Hoover Authorized Warranty Service Dealers (Depots). If further assistance is needed, or if there are covered by presenting the appliance to one of one full...pick up, delivery, or house calls; This warranty applies when the appliance is used in the U.S.A., phone 1-800-944-9200 OR visit The Hoover Company on-line at no cost to you, all labor and parts to place this warranty gives you specific legal rights, you mail your appliance to state.


