
Manual
Page 3
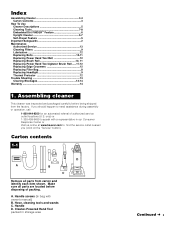
...click on the "Service" button). A. Cleaner-Powered Hand Tool packed in our Consumer Response Center or Visit us online at www.hoover.com to find the service outlet nearest you should happen to speak with owner's manual) B. Hose, cleaning tools and wands C.... 6 Upright Cleaner 5-7 Self-Propel Feature 5 Important Safeguards 2 Maintenance Authorized Service 13 Cleaning Filters 9 Lubrication 12 Replacing Belts 10-11 Replacing Power Hand Tool Belt 12 Replacing Brush Roll 10, 11 Replacing Power Hand Tool Agitator Brush Roll......11-12 Replacing Edge Groomers 12 Replacing Filter...
...click on the "Service" button). A. Cleaner-Powered Hand Tool packed in our Consumer Response Center or Visit us online at www.hoover.com to find the service outlet nearest you should happen to speak with owner's manual) B. Hose, cleaning tools and wands C.... 6 Upright Cleaner 5-7 Self-Propel Feature 5 Important Safeguards 2 Maintenance Authorized Service 13 Cleaning Filters 9 Lubrication 12 Replacing Belts 10-11 Replacing Power Hand Tool Belt 12 Replacing Brush Roll 10, 11 Replacing Power Hand Tool Agitator Brush Roll......11-12 Replacing Edge Groomers 12 Replacing Filter...
Manual
Page 10
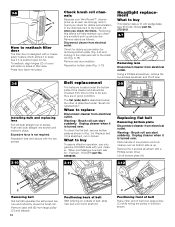
... electrical outlet. When to buy This cleaner uses a 12 volt, wedge base type 912 bulb, Hoover part No. 27313101. 3-7 Removing lens Disconnect cleaner from electrical outlet. Check for : Flat belt - Push new bulb straight into place. 3-8 Installing bulb and replacing lens Pull old bulb straight ... in place. Press door back into socket until locked in the channels next to buy To assure effective operation, use only genuine HOOVER belts with the two screws. 3-10 Check brush roll channels Because your cleaner. Removing this debris will help maintain you cleaner's excellent ...
... electrical outlet. When to buy This cleaner uses a 12 volt, wedge base type 912 bulb, Hoover part No. 27313101. 3-7 Removing lens Disconnect cleaner from electrical outlet. Check for : Flat belt - Push new bulb straight into place. 3-8 Installing bulb and replacing lens Pull old bulb straight ... in place. Press door back into socket until locked in the channels next to buy To assure effective operation, use only genuine HOOVER belts with the two screws. 3-10 Check brush roll channels Because your cleaner. Removing this debris will help maintain you cleaner's excellent ...
Manual
Page 11
... as described in Fig. 4-2. Discard used belt. Positioning belt on belt and "snap" it into position by first sliding end, opposite the belt, into the rectangular slot (G) on outside of belt), slide back of belt over pulley (C). Belt may fit loosely when properly installed. Warning - To install new belt (with HOOVER part No. 38528034. Belt will "pop" into place. Installing...
... as described in Fig. 4-2. Discard used belt. Positioning belt on belt and "snap" it into position by first sliding end, opposite the belt, into the rectangular slot (G) on outside of belt), slide back of belt over pulley (C). Belt may fit loosely when properly installed. Warning - To install new belt (with HOOVER part No. 38528034. Belt will "pop" into place. Installing...

Manual
Page 12
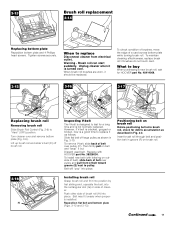
... the two Phillips screws and remove belt guard (B). Replacing belt When replacing belt, ask for HOOVER part No. 48414088. 3-19 A 2. Replace brush roll, belt guard, and bottom plate as described in Figs. 3-21 through belt and position belt over gear teeth (D) on tool. Replace belt guard (B) making sure it should ... of bottom plate into place. 5. Pivot bottom plate down , slide retainers into grooves (H) in guard. However, if the belt is not normally replaced. Powered hand tool 3-20 B Agitator brush roll replacement When agitator brush roll brushes are worn, the brush...
... the two Phillips screws and remove belt guard (B). Replacing belt When replacing belt, ask for HOOVER part No. 48414088. 3-19 A 2. Replace brush roll, belt guard, and bottom plate as described in Figs. 3-21 through belt and position belt over gear teeth (D) on tool. Replace belt guard (B) making sure it should ... of bottom plate into place. 5. Pivot bottom plate down , slide retainers into grooves (H) in guard. However, if the belt is not normally replaced. Powered hand tool 3-20 B Agitator brush roll replacement When agitator brush roll brushes are worn, the brush...

Manual
Page 13
... complete model number when requesting information or ordering parts. (The model number appears on the back of the handle.) Hoover Cleaning Performance This Hoover Cleaning Performance System is equipped with bearings that should be lubricated periodically by : • checking the Yellow Pages under...; Move carpet height control to a higher setting Problem: Cleaner won 't pick up Possible Cause Possible Solution • Broken or worn belt(s) • Replace belt(s) • Brush roll worn • Replace brush roll • Filter bag full • Change filter bag • Incorrect carpet...
... complete model number when requesting information or ordering parts. (The model number appears on the back of the handle.) Hoover Cleaning Performance This Hoover Cleaning Performance System is equipped with bearings that should be lubricated periodically by : • checking the Yellow Pages under...; Move carpet height control to a higher setting Problem: Cleaner won 't pick up Possible Cause Possible Solution • Broken or worn belt(s) • Replace belt(s) • Brush roll worn • Replace brush roll • Filter bag full • Change filter bag • Incorrect carpet...

Manual
Page 14
...in normal household use 1. Remove bottom plate, belt guard and turbine as follows: 1) Disconnect hose from dirt duct (C) by reversing procedure for blockages continuing with step 3. This warranty provides, at end of purchase. Hoover Factory Service Centers. 2. If further assistance is...; Remove blockage • Broken or worn belt • Replace belt • Low cleaner suction • Check items under bottom plate 5. remove any accumulated debris. 4-3 D If blockage occurs during the warranted period. In Canada, contact Hoover Canada, Burlington, Ontario L7R 4A8, 1-800...
...in normal household use 1. Remove bottom plate, belt guard and turbine as follows: 1) Disconnect hose from dirt duct (C) by reversing procedure for blockages continuing with step 3. This warranty provides, at end of purchase. Hoover Factory Service Centers. 2. If further assistance is...; Remove blockage • Broken or worn belt • Replace belt • Low cleaner suction • Check items under bottom plate 5. remove any accumulated debris. 4-3 D If blockage occurs during the warranted period. In Canada, contact Hoover Canada, Burlington, Ontario L7R 4A8, 1-800...

