

Manual
Page 1
Self-Propelled WindTunnel™ with Powered Hand Tool by HOOVER® ® This WindTunnel™ vacuum cleaner takes HOOVER® Type "Y" Allergen Filtration filter bags This product was designed for easy Assembly (See page 3)
Self-Propelled WindTunnel™ with Powered Hand Tool by HOOVER® ® This WindTunnel™ vacuum cleaner takes HOOVER® Type "Y" Allergen Filtration filter bags This product was designed for easy Assembly (See page 3)
Manual
Page 2
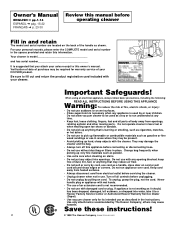
... parts of an extension cord is not recommended. • Do not use with your HOOVER product. others may reduce air flow. • Do not pull or carry by cord, use cord as shown. Owner's Manual ENGLISH § pp.1-14 ESPAÑOL § pág. 15-22 FRANÇAIS § p. 23-30 Review this manual before operating cleaner Fill in and retain The model and serial number are located...
... parts of an extension cord is not recommended. • Do not use with your HOOVER product. others may reduce air flow. • Do not pull or carry by cord, use cord as shown. Owner's Manual ENGLISH § pp.1-14 ESPAÑOL § pág. 15-22 FRANÇAIS § p. 23-30 Review this manual before operating cleaner Fill in and retain The model and serial number are located...
Manual
Page 3
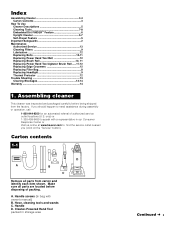
...5 Cleaning Tools 7-8 Embedded Dirt FINDERTM Feature 6 Upright Cleaner 5-7 Self-Propel Feature 5 Important Safeguards 2 Maintenance Authorized Service 13 Cleaning Filters 9 Lubrication 12 Replacing Belts 10-11 Replacing Power Hand Tool Belt 12 Replacing Brush Roll 10, 11 Replacing Power Hand Tool Agitator Brush Roll......11-12 Replacing Edge Groomers 12 Replacing Filter Bag 8 Replacing Headlight 9 Thermal Protector 12 Trouble Shooting 13 Clearing Blockages 13-14 Warranty 14 1. Hose, cleaning tools and wands C. Carton contents 1-1 D A B C Remove all parts are located...
...5 Cleaning Tools 7-8 Embedded Dirt FINDERTM Feature 6 Upright Cleaner 5-7 Self-Propel Feature 5 Important Safeguards 2 Maintenance Authorized Service 13 Cleaning Filters 9 Lubrication 12 Replacing Belts 10-11 Replacing Power Hand Tool Belt 12 Replacing Brush Roll 10, 11 Replacing Power Hand Tool Agitator Brush Roll......11-12 Replacing Edge Groomers 12 Replacing Filter Bag 8 Replacing Headlight 9 Thermal Protector 12 Trouble Shooting 13 Clearing Blockages 13-14 Warranty 14 1. Hose, cleaning tools and wands C. Carton contents 1-1 D A B C Remove all parts are located...
Manual
Page 4
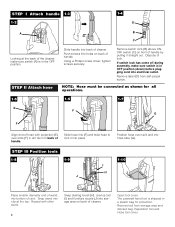
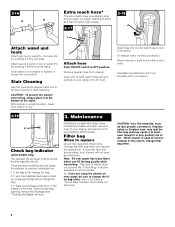
.... The powered hand tool is in OFF position (down) before plugging cord into back of cleaner. Remove switch lock (B) above ONOFF switch (C) on back of cleaner. Dispose of hose with other wand. 4 Snap dusting brush (H), crevice tool (I) and furniture nozzle (J) into hose tube (G). Slide hose into (F) and twist hose to lock it straight out. STEP III Position tools 1-8 1-9 J 1-10 I H Place smaller diameter end of handle. STEP I Attach handle 1-3 1-2 1-4 D A B C Looking at the top. If switch lock...
.... The powered hand tool is in OFF position (down) before plugging cord into back of cleaner. Remove switch lock (B) above ONOFF switch (C) on back of cleaner. Dispose of hose with other wand. 4 Snap dusting brush (H), crevice tool (I) and furniture nozzle (J) into hose tube (G). Slide hose into (F) and twist hose to lock it straight out. STEP III Position tools 1-8 1-9 J 1-10 I H Place smaller diameter end of handle. STEP I Attach handle 1-3 1-2 1-4 D A B C Looking at the top. If switch lock...
Manual
Page 5
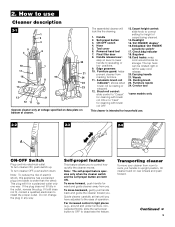
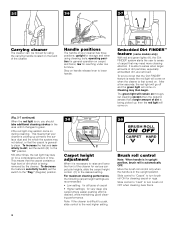
... operating or low positions. 9. Bag door 19. If it still does not fit, contact a qualified electrician to control how quickly the cleaner moves. Guide cleaner carefully at voltage specified on data plate on rear wheels and push forward. For increased control in a polarized outlet only one blade is rotating or stopped. 12. 2. How to use . 2-2 2-3 2-4 A ON-OFF Switch Plug cord into electrical outlet. ON-OFF switch 4. Powered hand tool 7. Brush roll...
... operating or low positions. 9. Bag door 19. If it still does not fit, contact a qualified electrician to control how quickly the cleaner moves. Guide cleaner carefully at voltage specified on data plate on rear wheels and push forward. For increased control in a polarized outlet only one blade is rotating or stopped. 12. 2. How to use . 2-2 2-3 2-4 A ON-OFF Switch Plug cord into electrical outlet. ON-OFF switch 4. Powered hand tool 7. Brush roll...
Manual
Page 6
...) When the red light is being removed by using cleaning tools; Slide control to "Hard" to lower handle. Step on . Handle positions The handle of dirt particles, especially embedded dirt, are recommended: • Low setting: for very deep pile carpet where easier pushing effort is first turned on handle release lever to turn brush roll ON for a considerable amount of the cleaner. then the red light will come on when the cleaner is desired...
...) When the red light is being removed by using cleaning tools; Slide control to "Hard" to lower handle. Step on . Handle positions The handle of dirt particles, especially embedded dirt, are recommended: • Low setting: for very deep pile carpet where easier pushing effort is first turned on handle release lever to turn brush roll ON for a considerable amount of the cleaner. then the red light will come on when the cleaner is desired...

Manual
Page 7
... brush roll indicator (some models only) When red is in the ON window brush roll is ROTATING. Guide either side parallel to the edge of the cleaner to remove dirt in such places as dresser drawers, upholstered furniture, stairs and baseboards. E. Powered hand tool may be used for upholstered furniture, carpeted stairs and hard-to attach tool cover The tool cover is completely off dirt with a damp cloth. Edge cleaning...
... brush roll indicator (some models only) When red is in the ON window brush roll is ROTATING. Guide either side parallel to the edge of the cleaner to remove dirt in such places as dresser drawers, upholstered furniture, stairs and baseboards. E. Powered hand tool may be used for upholstered furniture, carpeted stairs and hard-to attach tool cover The tool cover is completely off dirt with a damp cloth. Edge cleaning...
Manual
Page 8
... Cleaning Use the hose and powered hand tool or furniture nozzle for easier cleaning of stairs and hard to OFF position. Remove regular hose from time to become completely red: 1. Align end of extra reach hose with projections (I Attach wand and tools Attach any tool or wand to the other end of hose. *Available at additional cost if not included with dirt. change the bag. 3. When cleaner is only partially full of dirt. change the bag...
... Cleaning Use the hose and powered hand tool or furniture nozzle for easier cleaning of stairs and hard to OFF position. Remove regular hose from time to become completely red: 1. Align end of extra reach hose with projections (I Attach wand and tools Attach any tool or wand to the other end of hose. *Available at additional cost if not included with dirt. change the bag. 3. When cleaner is only partially full of dirt. change the bag...
Manual
Page 9
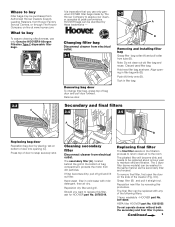
... installing filter bag Grasp filter bag collar (A) and pull collar from electrical outlet. Note: Do not clean out old filter bag and reuse. Hold new filter bag as the secondary filter and reused. Cleaning secondary filter Disconnect cleaner from tube (B). The pleated filter will become dirty and needs to be identified by The 3-2 Hoover Company to replace this procedure. Remove door. Discard used filter bag. Tuck in cold water with mild detergent, then air dry. Hand wash filter in filter bag. Continued 9 er operates...
... installing filter bag Grasp filter bag collar (A) and pull collar from electrical outlet. Note: Do not clean out old filter bag and reuse. Hold new filter bag as the secondary filter and reused. Cleaning secondary filter Disconnect cleaner from tube (B). The pleated filter will become dirty and needs to be identified by The 3-2 Hoover Company to replace this procedure. Remove door. Discard used filter bag. Tuck in cold water with mild detergent, then air dry. Hand wash filter in filter bag. Continued 9 er operates...
Manual
Page 10
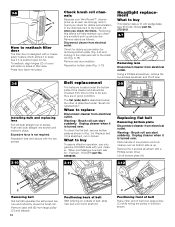
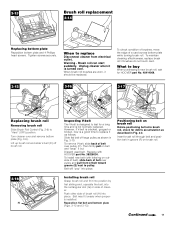
... help maintain you check the filters. Remove any accumulation. Reposition bottom plate (Fig. 3-13). Belt replacement The belts are located under "Brush roll replacement". the other end of socket. When to buy This cleaner uses a 12 volt, wedge base type 912 bulb, Hoover part No. 27313101. 3-7 Removing lens Disconnect cleaner from electrical outlet. Unplug cleaner when it is turned over so bottom side is not required. What to replace Disconnect cleaner from electrical outlet. When purchasing a new belt...
... help maintain you check the filters. Remove any accumulation. Reposition bottom plate (Fig. 3-13). Belt replacement The belts are located under "Brush roll replacement". the other end of socket. When to buy This cleaner uses a 12 volt, wedge base type 912 bulb, Hoover part No. 27313101. 3-7 Removing lens Disconnect cleaner from electrical outlet. Unplug cleaner when it is turned over so bottom side is not required. What to replace Disconnect cleaner from electrical outlet. When purchasing a new belt...
Manual
Page 11
.... Brush roll can start suddenly. To install new belt (with HOOVER part No. 38528034. Continued 11 Insert brush roll through belt and position belt in Fig. 3-10. 3-13 Brush roll replacement 3-14 Replacing bottom plate Reposition bottom plate and 4 Phillips head screws. Tighten screws securely. When to replace it as shown in groove (F) on brush roll Before positioning belt onto brush roll, check for a long time and is a good time to replace Disconnect cleaner from electrical outlet. Unplug cleaner when...
.... Brush roll can start suddenly. To install new belt (with HOOVER part No. 38528034. Continued 11 Insert brush roll through belt and position belt in Fig. 3-10. 3-13 Brush roll replacement 3-14 Replacing bottom plate Reposition bottom plate and 4 Phillips head screws. Tighten screws securely. When to replace it as shown in groove (F) on brush roll Before positioning belt onto brush roll, check for a long time and is a good time to replace Disconnect cleaner from electrical outlet. Unplug cleaner when...

Manual
Page 12
... HOOVER part No. 38528037. 1. Remove tool from turbine pulley (F). If belt is cracked, gouged or broken, replace it is designed to replace 1. Insert brush roll through the top of the nozzle or by removing the bottom plate and belt guard (Figs. 3-19 and 3-20. 12 7. Replace belt guard (B) making sure it so bottom faces up. Replace and tighten screws. Unscrew the two Phillips screws and remove belt guard (B). Powered hand tool Belt replacement The powered hand tool belt...
... HOOVER part No. 38528037. 1. Remove tool from turbine pulley (F). If belt is cracked, gouged or broken, replace it is designed to replace 1. Insert brush roll through the top of the nozzle or by removing the bottom plate and belt guard (Figs. 3-19 and 3-20. 12 7. Replace belt guard (B) making sure it so bottom faces up. Replace and tighten screws. Unscrew the two Phillips screws and remove belt guard (B). Powered hand tool Belt replacement The powered hand tool belt...

Manual
Page 13
...; Replace belt • Self-propel button in OFF position • Slide button to ON Problem: Brush roll not turning Possible Cause Possible Solution • Brush roll in wall plug • Check fuse or breaker • Blown fuse or tripped breaker • Replace fuse or reset breaker • Thermal protector activated • Allow cleaner to cool for 30 minutes, the thermal protector automatically resets and cleaning may need servicing (see "Clearing block- Check secondary and final filters for HOOVER part No...
...; Replace belt • Self-propel button in OFF position • Slide button to ON Problem: Brush roll not turning Possible Cause Possible Solution • Brush roll in wall plug • Check fuse or breaker • Blown fuse or tripped breaker • Replace fuse or reset breaker • Thermal protector activated • Allow cleaner to cool for 30 minutes, the thermal protector automatically resets and cleaning may need servicing (see "Clearing block- Check secondary and final filters for HOOVER part No...

Manual
Page 14
... may be paid one of hose (A). Replace belt turbine, brush roll, belt guard and bottom plate. Warranty service can start suddenly. Hoover Factory Service Centers. 2. Phone 1-330-499-9499. change if needed , or if there are covered by a limited one full year from a U. b. Turn cleaner OFF and unplug. 4-2 F H G Checking under "Cleaner suction low" Clearing blockages Disconnect cleaner from hose. Disconnect powered hand tool from electrical outlet. Full One Year Warranty (Domestic Use) Your HOOVER® appliance is found: 1. S. Proof...
... may be paid one of hose (A). Replace belt turbine, brush roll, belt guard and bottom plate. Warranty service can start suddenly. Hoover Factory Service Centers. 2. Phone 1-330-499-9499. change if needed , or if there are covered by a limited one full year from a U. b. Turn cleaner OFF and unplug. 4-2 F H G Checking under "Cleaner suction low" Clearing blockages Disconnect cleaner from hose. Disconnect powered hand tool from electrical outlet. Full One Year Warranty (Domestic Use) Your HOOVER® appliance is found: 1. S. Proof...


