
Owners Manual
Page 1
Owner's Manual ENGLISH -I, pp. 1-14 ESPANOL -I, pag 15-22 FRANGAIS -i, p 23-30 @" www.hoover.com This product was designed for your purchase! HOOVER_ Bagless Upright Thank you for easy assembly (see page 3)
Owner's Manual ENGLISH -I, pp. 1-14 ESPANOL -I, pag 15-22 FRANGAIS -i, p 23-30 @" www.hoover.com This product was designed for your purchase! HOOVER_ Bagless Upright Thank you for easy assembly (see page 3)

Owners Manual
Page 2
... Service 12 Cleaning Filters 9=10 Emptying Dirt Cup 8 Lubrication 12 Replacing Agitator Brush Ro[[ ...... 12 Replacing Belt 1t Replacing Headlight 10=11 Thermal Protector 12 Warranty 14 ® © 2002 The Hoover Company www, hoover, com _Ir_IERIAL UMBER [mTl Ua When using an electrical appliance, always follow basic precautions, including the following: READ ALL INSTRUCTIONS BEFORE USING THiS APPLIANCE- Do not run unattended at any opening blocked; Unplug cleaner when not in the instructions. Turn...
... Service 12 Cleaning Filters 9=10 Emptying Dirt Cup 8 Lubrication 12 Replacing Agitator Brush Ro[[ ...... 12 Replacing Belt 1t Replacing Headlight 10=11 Thermal Protector 12 Warranty 14 ® © 2002 The Hoover Company www, hoover, com _Ir_IERIAL UMBER [mTl Ua When using an electrical appliance, always follow basic precautions, including the following: READ ALL INSTRUCTIONS BEFORE USING THiS APPLIANCE- Do not run unattended at any opening blocked; Unplug cleaner when not in the instructions. Turn...

Owners Manual
Page 3
... with C some models include a crevice wand) D. Cleaner body C. Handle bolts and nuts packet (in bag with owner's manual) *Included with a representative in OFF position. Slide handle onto cleaner body. Please do not return this product to find the service outlet nearest you need any assistance: Visit our website at www.hoover.com. A. Handle section B. Remove tape and remove dirt cup from cleaner body. Continued -_ 3 Hose, cleaning tools and wands (*some models Attach handle uu urJ ! Switch (A) should...
... with C some models include a crevice wand) D. Cleaner body C. Handle bolts and nuts packet (in bag with owner's manual) *Included with a representative in OFF position. Slide handle onto cleaner body. Please do not return this product to find the service outlet nearest you need any assistance: Visit our website at www.hoover.com. A. Handle section B. Remove tape and remove dirt cup from cleaner body. Continued -_ 3 Hose, cleaning tools and wands (*some models Attach handle uu urJ ! Switch (A) should...

Owners Manual
Page 4
Place bottom of cup into bottom of rack. Pivot cup and snap in place. \ Position cord on front of handle. Lift hose tube cover (C). Repeat with a Phillips screw driver. Position hose over slots (B) in dirt duct. Position tools Place smaller unridged end of wand into cleaner. Some models include a long crevice wand (D) instead of dusting brush (A), crevice tool (B) and furniture nozzle (C) into clips as shown. Attach hose Note: Hose must be connected...
Place bottom of cup into bottom of rack. Pivot cup and snap in place. \ Position cord on front of handle. Lift hose tube cover (C). Repeat with a Phillips screw driver. Position hose over slots (B) in dirt duct. Position tools Place smaller unridged end of wand into cleaner. Some models include a long crevice wand (D) instead of dusting brush (A), crevice tool (B) and furniture nozzle (C) into clips as shown. Attach hose Note: Hose must be connected...

Owners Manual
Page 5
... cleaner body 5. Dusting brush 14. Crevice tool* 15. Hose 18. Stair cleaning handle: located on bottom of dirt cup. 7. Furniture guard: helps prevent cleaner from marking furniture. 11. Final filter exhaust Operate cleaner only at voltage specified on data plate on lower edge of cleaner. If the plug does not fit fully in any way. P:5 Handle release lever: step on left for household use. Dirt cup lid 20. Dirt cup handle 22. Headlight 9. Dirt cup latch 4. ON/OFF switch: located...
... cleaner body 5. Dusting brush 14. Crevice tool* 15. Hose 18. Stair cleaning handle: located on bottom of dirt cup. 7. Furniture guard: helps prevent cleaner from marking furniture. 11. Final filter exhaust Operate cleaner only at voltage specified on data plate on lower edge of cleaner. If the plug does not fit fully in any way. P:5 Handle release lever: step on left for household use. Dirt cup lid 20. Dirt cup handle 22. Headlight 9. Dirt cup latch 4. ON/OFF switch: located...
Owners Manual
Page 6
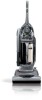
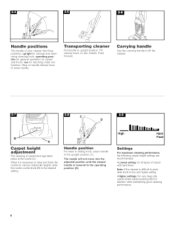
... using cleaning tools; Transporting cJeaner Put handle in the upright position (C). When it is lowered to lift the cleaner. ;,_:] C P-5:] D IIIIliilii ,,,.... Step on rear wheels. Carrying hand|e Use the carrying handle to the operating position (D). The nozzle wi[[ not move into the adjusted position until the cleaner handle is necessary to the desired setting. low for general operation on carpet and floors; Tilt cleaner back on handle release lever to the next higher setting...
... using cleaning tools; Transporting cJeaner Put handle in the upright position (C). When it is lowered to lift the cleaner. ;,_:] C P-5:] D IIIIliilii ,,,.... Step on rear wheels. Carrying hand|e Use the carrying handle to the operating position (D). The nozzle wi[[ not move into the adjusted position until the cleaner handle is necessary to the desired setting. low for general operation on carpet and floors; Tilt cleaner back on handle release lever to the next higher setting...

Owners Manual
Page 7
... nozzle, and use only forward strokes. Lower cover (B) onto hose tube. E. Continue to hose tube (A). As an alternative, you may be sure to clean tools To clean the hose, wipe off the rug. The cleaner is provided on upper handle. Rinse and air dry before disconnecting and connecting hose to lift up the nozzle (front of the nozzle to top. C I ( E f )I F Select proper tool C. F. Also, turn cleaner OFF before using. /B i Remove hose When using cleaning tools, the agitator...
... nozzle, and use only forward strokes. Lower cover (B) onto hose tube. E. Continue to hose tube (A). As an alternative, you may be sure to clean tools To clean the hose, wipe off the rug. The cleaner is provided on upper handle. Rinse and air dry before disconnecting and connecting hose to lift up the nozzle (front of the nozzle to top. C I ( E f )I F Select proper tool C. F. Also, turn cleaner OFF before using. /B i Remove hose When using cleaning tools, the agitator...

Owners Manual
Page 8
... parts: Lid (A) Dirt Cup (B) Pre-filter Assembly (C) Pleated Filter (D) (behind pre-filter) Dirt Opening (E) While the cleaner is not necessary to remove the pleated filter or the pre-filter assembly to empty the dirt cup. Note: It is in place. Disconnect cleaner from cleaner. Pull cup forward. Pivot cup and snap into place. Remove regular hose from electrical outlet. To detach hose, reverse procedure. Attach wands or tools to the other end of dust, empty the cup and clean the filters...
... parts: Lid (A) Dirt Cup (B) Pre-filter Assembly (C) Pleated Filter (D) (behind pre-filter) Dirt Opening (E) While the cleaner is not necessary to remove the pleated filter or the pre-filter assembly to empty the dirt cup. Note: It is in place. Disconnect cleaner from cleaner. Pull cup forward. Pivot cup and snap into place. Remove regular hose from electrical outlet. To detach hose, reverse procedure. Attach wands or tools to the other end of dust, empty the cup and clean the filters...

Owners Manual
Page 9
... to empty dirt cup". Replace dirt cup. The screen (C) can be cleaned with a soft brush or rinsed with water. Replace dirt cup lid. Press on pre-filter assembly. If lid will not close completely, the pre-filter assembly is not positioned correctly. Make sure all the way to bottom of the pre-filter. Pull up on filter gasket (F) until dust particles stop falling from pre-filter assembly. Filter assembly How to clean filter assembly Remove dirt cup and dirt cup lid...
... to empty dirt cup". Replace dirt cup. The screen (C) can be cleaned with a soft brush or rinsed with water. Replace dirt cup lid. Press on pre-filter assembly. If lid will not close completely, the pre-filter assembly is not positioned correctly. Make sure all the way to bottom of the pre-filter. Pull up on filter gasket (F) until dust particles stop falling from pre-filter assembly. Filter assembly How to clean filter assembly Remove dirt cup and dirt cup lid...

Owners Manual
Page 10
..., remove dirt cup (Fig. 3-2). Reposition dry filter, retainer and screw. Removing and replacing filter Lift out filter (H) and hand wash it on the side of filter. Remove any of the filters in cold water with mild detergent, then air dry. Using a screwdriver, remove the two screws as follows: 1. Disconnect cleaner from dirt particles. Disconnect cleaner from electrical The secondary filter (G), located underneath the retainer in returning clean air to buy This cleaner uses a 12 volt, wedge base type 912 bulb, HOOVER part No...
..., remove dirt cup (Fig. 3-2). Reposition dry filter, retainer and screw. Removing and replacing filter Lift out filter (H) and hand wash it on the side of filter. Remove any of the filters in cold water with mild detergent, then air dry. Using a screwdriver, remove the two screws as follows: 1. Disconnect cleaner from dirt particles. Disconnect cleaner from electrical The secondary filter (G), located underneath the retainer in returning clean air to buy This cleaner uses a 12 volt, wedge base type 912 bulb, HOOVER part No...

Owners Manual
Page 11
... side of the cleaner. Belt replacement The belt on outside of cleaner. Remove bottom plate Place handle in box on agitator. Turn agitator making sure belt is not pinched between agitator and agitator shield. To check belt, remove bottom plate as shown in low position and turn cleaner over motor pulley (K). Tighten screws securely. What to buy To assure effective operation, use only genuine HOOVER belts with your Hoover cleaner causes the agitator to replace Disconnect cleaner from electrical outlet. Replace lens - How to...
... side of the cleaner. Belt replacement The belt on outside of cleaner. Remove bottom plate Place handle in box on agitator. Turn agitator making sure belt is not pinched between agitator and agitator shield. To check belt, remove bottom plate as shown in low position and turn cleaner over motor pulley (K). Tighten screws securely. What to buy To assure effective operation, use only genuine HOOVER belts with your Hoover cleaner causes the agitator to replace Disconnect cleaner from electrical outlet. Replace lens - How to...

Owners Manual
Page 12
... Hoover Warranty Service Dealer (Depot). HOOVER part No. 48414110 15" - The agitator brush roll is needed, contact The Hoover Company Consumer Response Center, North Canton, Ohio 44720, Phone: 330-499-9499. Turn the cleaner OFF and disconnect it from the electrical outlet. 2. How to activate after following : 13" - When purchasing a new agitator, ask for dirt accumulation. 3. Other performance factors include Hose Power (ASTM Test F558), Surface Litter Cleaning, Hard Floor Cleaning...
... Hoover Warranty Service Dealer (Depot). HOOVER part No. 48414110 15" - The agitator brush roll is needed, contact The Hoover Company Consumer Response Center, North Canton, Ohio 44720, Phone: 330-499-9499. Turn the cleaner OFF and disconnect it from the electrical outlet. 2. How to activate after following : 13" - When purchasing a new agitator, ask for dirt accumulation. 3. Other performance factors include Hose Power (ASTM Test F558), Surface Litter Cleaning, Hard Floor Cleaning...

Owners Manual
Page 13
... turn ON. Possible cause Possible solution • Broken or worn belt • Replace belt • Agitator brush roll worn • Replace brush roll • Dirt cup full • Empty cup • Incorrect carpet height setting • Move nozzle control knob to lower setting • Blockage in air flow passage • Clear blockage • Pleated filter clogged • Clean pleated filter by reversing procedure for "Attach hose" (Fig. 1-8 and 1-9). 2) Clear out hose. 3) Look into opening (E) for blockages and remove. 8. Remove agitator...
... turn ON. Possible cause Possible solution • Broken or worn belt • Replace belt • Agitator brush roll worn • Replace brush roll • Dirt cup full • Empty cup • Incorrect carpet height setting • Move nozzle control knob to lower setting • Blockage in air flow passage • Clear blockage • Pleated filter clogged • Clean pleated filter by reversing procedure for "Attach hose" (Fig. 1-8 and 1-9). 2) Clear out hose. 3) Look into opening (E) for blockages and remove. 8. Remove agitator...

Owners Manual
Page 14
... needed, or if there are covered by presenting the appliance to one of the following Authorized Warranty Service outlets, Proof of purchase will be obtained by a limited one way. Warranty service can only be required before service is warranted in normal household use, in accordance with the Owner's Manual against original defects in Canada or from state to a Hoover Factory Service...
... needed, or if there are covered by presenting the appliance to one of the following Authorized Warranty Service outlets, Proof of purchase will be obtained by a limited one way. Warranty service can only be required before service is warranted in normal household use, in accordance with the Owner's Manual against original defects in Canada or from state to a Hoover Factory Service...

Owners Manual
Page 32
HOOVER y son marcas registradas des marques depos6es HOOVER and _} are registered trademarks R2 11-03 U5150-/54-900, U5344-950, U5347-/51-900 Printed in Mexico 56511-B49
HOOVER y son marcas registradas des marques depos6es HOOVER and _} are registered trademarks R2 11-03 U5150-/54-900, U5344-950, U5347-/51-900 Printed in Mexico 56511-B49


