Manual
Page 2
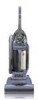
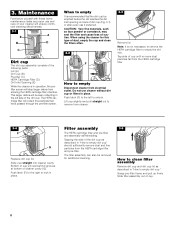
...run appliance over cord. Keep cord away from heated surfaces. • Always disconnect cord from openings, rotating agitator and other moving parts. Do not allow vacuum cleaner to pick up anything that you attach your personal records, please enter the COMPLETE model and serial ... Power Hand Tool Belt ..12 Replacing Edge Groomers 11 Replacing Headlight 10 Thermal Protector 13 Warranty 14 © 2004 The Hoover Company www.hoover.com Important Safeguards When using an electrical appliance, always follow basic precautions, including the following: READ ALL INSTRUCTIONS BEFORE USING ...
...run appliance over cord. Keep cord away from heated surfaces. • Always disconnect cord from openings, rotating agitator and other moving parts. Do not allow vacuum cleaner to pick up anything that you attach your personal records, please enter the COMPLETE model and serial ... Power Hand Tool Belt ..12 Replacing Edge Groomers 11 Replacing Headlight 10 Thermal Protector 13 Warranty 14 © 2004 The Hoover Company www.hoover.com Important Safeguards When using an electrical appliance, always follow basic precautions, including the following: READ ALL INSTRUCTIONS BEFORE USING ...
Manual
Page 3
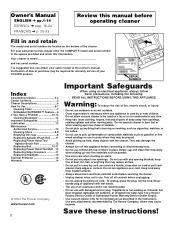
If you should happen to need assistance during assembly or operation, call: Visit us on-line at www.hoover.com to speak with a representative in the assembly of packing. Handle section B. Cleaner body C. Continued § 3 1. Hose, cleaning tools and wands (... the switch lock until assembly is missing. Assembly can be continued if the switch lock is completed. Carton contents 1-1 D A B C Remove all parts are located before being shipped from carton and identify each item shown. Assembling cleaner This cleaner was inspected and packaged carefully before disposing of your...
If you should happen to need assistance during assembly or operation, call: Visit us on-line at www.hoover.com to speak with a representative in the assembly of packing. Handle section B. Cleaner body C. Continued § 3 1. Hose, cleaning tools and wands (... the switch lock until assembly is missing. Assembly can be continued if the switch lock is completed. Carton contents 1-1 D A B C Remove all parts are located before being shipped from carton and identify each item shown. Assembling cleaner This cleaner was inspected and packaged carefully before disposing of your...
Manual
Page 8
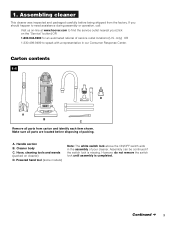
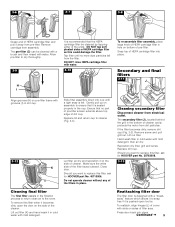
... filter. 3-4 F G Replace dirt cup lid. The HEPA cartridge filter will be emptied before the dirt reaches the dirt inlet opening on back of the following parts: Lid (A) Dirt Cup (B) Pre-filter (C) HEPA Cartridge Filter (D) Dirt Inlet Opening (E) While the cleaner is not necessary to remove the HEPA cartridge filter to empty...
... filter. 3-4 F G Replace dirt cup lid. The HEPA cartridge filter will be emptied before the dirt reaches the dirt inlet opening on back of the following parts: Lid (A) Dirt Cup (B) Pre-filter (C) HEPA Cartridge Filter (D) Dirt Inlet Opening (E) While the cleaner is not necessary to remove the HEPA cartridge filter to empty...
Manual
Page 9
...is seated properly in the filtration process to return clean air to cleaner (Fig. 3-4). Gently pull up on assembly to replace this filter, ask for HOOVER part No. 40110006. If the filter becomes dirty, remove dirt cup (Fig. 3-2). Remove screw and pull grill out. Should you want to replace this ...filter, ask for HOOVER part No. 38762008. 3-13 L Cleaning final filter The final filter assists in the cup. Lift out filter (K) and hand wash it is felt. Lift out...
...is seated properly in the filtration process to return clean air to cleaner (Fig. 3-4). Gently pull up on assembly to replace this filter, ask for HOOVER part No. 40110006. If the filter becomes dirty, remove dirt cup (Fig. 3-2). Remove screw and pull grill out. Should you want to replace this ...filter, ask for HOOVER part No. 38762008. 3-13 L Cleaning final filter The final filter assists in the cup. Lift out filter (K) and hand wash it is felt. Lift out...
Manual
Page 10
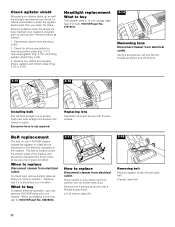
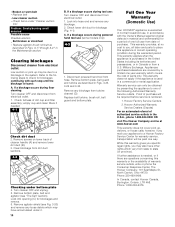
...for the effective operation of the cleaner and should be checked from time to time to replace Disconnect cleaner from electrical outlet. Check for HOOVER part No. 38528033. 3-17 A How to be sure it is important for debris accumulation under the agitator shield each time you clean the ... debris and replace shield, agitator and bottom plate (Figs. 3-20 to buy This cleaner uses a 12 volt, wedge base type 912 bulb, HOOVER part No. 27313101. 3-14 Removing lens Disconnect cleaner from electrical outlet. Replace belt if it is not required. Removing debris under the bottom plate of...
...for the effective operation of the cleaner and should be checked from time to time to replace Disconnect cleaner from electrical outlet. Check for HOOVER part No. 38528033. 3-17 A How to be sure it is important for debris accumulation under the agitator shield each time you clean the ... debris and replace shield, agitator and bottom plate (Figs. 3-20 to buy This cleaner uses a 12 volt, wedge base type 912 bulb, HOOVER part No. 27313101. 3-14 Removing lens Disconnect cleaner from electrical outlet. Replace belt if it is not required. Removing debris under the bottom plate of...
Manual
Page 11
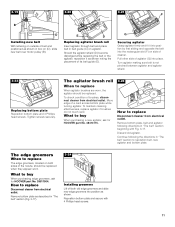
... positioned as shown noting the placement of its belt guide (E). What to buy When purchasing edge groomers, ask for HOOVER part No. 48414115. 3-23 How to buy When purchasing a new agitator, ask for HOOVER part No. 39511004. To maintain cleaning effectiveness, replace agitator if brushes do not touch card. Should the agitator shield (D) become...
... positioned as shown noting the placement of its belt guide (E). What to buy When purchasing edge groomers, ask for HOOVER part No. 48414115. 3-23 How to buy When purchasing a new agitator, ask for HOOVER part No. 39511004. To maintain cleaning effectiveness, replace agitator if brushes do not touch card. Should the agitator shield (D) become...
Manual
Page 12
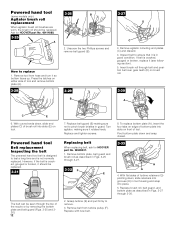
... brush roll replacement When agitator brush roll brushes are worn, the brush roll should be replaced. 3-31 The belt can be replaced. Ask for HOOVER part No. 38528037. 1. With curved ends down and snap closed. 3-33 H G 4. Powered hand tool Belt replacement Inspecting the belt The powered hand...edge of the nozzle or by removing the bottom plate and belt guard (Figs. 3-25 and 326). 12 7. Replacing belt When replacing belt, ask for HOOVER part No. 48414088. 3-25 A 3-26 B 2. Insert brush roll through the top of bottom plate into place. 5. Grasp turbine (E) and pull firmly to...
... brush roll replacement When agitator brush roll brushes are worn, the brush roll should be replaced. 3-31 The belt can be replaced. Ask for HOOVER part No. 38528037. 1. With curved ends down and snap closed. 3-33 H G 4. Powered hand tool Belt replacement Inspecting the belt The powered hand...edge of the nozzle or by removing the bottom plate and belt guard (Figs. 3-25 and 326). 12 7. Replacing belt When replacing belt, ask for HOOVER part No. 48414088. 3-25 A 3-26 B 2. Insert brush roll through the top of bottom plate into place. 5. Grasp turbine (E) and pull firmly to...
Manual
Page 13
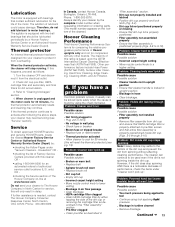
...HEPA cartridge filter by the complete model number when requesting information or ordering parts. (The model number appears on the bottom of the cleaner.) Hoover Cleaning Performance This Hoover Cleaning Performance System is a noticeable decrease of lubricant could cause damage. ...installed properly • Remove filter assembly from the electrical outlet. 2. Service To obtain approved HOOVER service and genuine HOOVER parts, locate the nearest Hoover Factory Service Center or Authorized Hoover Warranty Service Dealer (Depot) by using tool applying light pressure. • Blockage in ...
...HEPA cartridge filter by the complete model number when requesting information or ordering parts. (The model number appears on the bottom of the cleaner.) Hoover Cleaning Performance This Hoover Cleaning Performance System is a noticeable decrease of lubricant could cause damage. ...installed properly • Remove filter assembly from the electrical outlet. 2. Service To obtain approved HOOVER service and genuine HOOVER parts, locate the nearest Hoover Factory Service Center or Authorized Hoover Warranty Service Dealer (Depot) by using tool applying light pressure. • Blockage in ...
Manual
Page 14
...section). Look into hose end and remove any blockage. 2. If a blockage occurs during powered hand tool use (some models only): 4-3 D 1. Hoover Factory Service Centers 2. Refer to state (or province). Clearing blockages Disconnect cleaner from a U.S. This warranty does not apply if the appliance is needed... (C) for warranty service, transportation will be obtained by a limited one of parts only. Remove screws on -line at no cost to you, all labor and parts to a Hoover Factory Service Center for blockages and remove. 6. This warranty applies when the ...
...section). Look into hose end and remove any blockage. 2. If a blockage occurs during powered hand tool use (some models only): 4-3 D 1. Hoover Factory Service Centers 2. Refer to state (or province). Clearing blockages Disconnect cleaner from a U.S. This warranty does not apply if the appliance is needed... (C) for warranty service, transportation will be obtained by a limited one of parts only. Remove screws on -line at no cost to you, all labor and parts to a Hoover Factory Service Center for blockages and remove. 6. This warranty applies when the ...


