Manual
Page 1
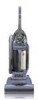
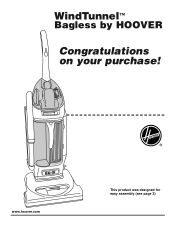
WindTunnel™ Bagless by HOOVER Congratulations on your purchase! www.hoover.com ® This product was designed for easy assembly (see page 3)
WindTunnel™ Bagless by HOOVER Congratulations on your purchase! www.hoover.com ® This product was designed for easy assembly (see page 3)
Manual
Page 2
... your HOOVER product. XXXXXXXXXXXX SERIAL NUMBER Index Assembling Cleaner 3-4 Carton Contents 3 Cleaner Descriptions 5 How To Use 5-7 Cleaning Tools 7 Embedded DirtFINDER™ Feature....6 If You Have a Problem 13-14 Clearing Blockages 14 Important Safeguards 2 Lubrication 13 Maintenance Authorized Service 13 Cleaning filters 8-9 Emptying Dirt Cup 8 Replacing Agitator Brush Roll ......11 Replacing Power Hand Tool Agitator Brush Roll 12 Replacing Belt 10-11 Replacing Power Hand Tool Belt ..12 Replacing Edge Groomers 11 Replacing Headlight 10 Thermal Protector 13 Warranty...
... your HOOVER product. XXXXXXXXXXXX SERIAL NUMBER Index Assembling Cleaner 3-4 Carton Contents 3 Cleaner Descriptions 5 How To Use 5-7 Cleaning Tools 7 Embedded DirtFINDER™ Feature....6 If You Have a Problem 13-14 Clearing Blockages 14 Important Safeguards 2 Lubrication 13 Maintenance Authorized Service 13 Cleaning filters 8-9 Emptying Dirt Cup 8 Replacing Agitator Brush Roll ......11 Replacing Power Hand Tool Agitator Brush Roll 12 Replacing Belt 10-11 Replacing Power Hand Tool Belt ..12 Replacing Edge Groomers 11 Replacing Headlight 10 Thermal Protector 13 Warranty...
Manual
Page 3
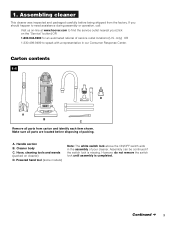
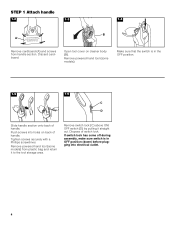
... speak with a representative in the assembly of packing. Hose, cleaning tools and wands (packed on the "Service" button) OR 1-800-944-9200 for an automated referral of service outlet locations (U.S. Powered hand tool (some models) Note: The white switch lock above the ON/OFF switch aids in our Consumer Response Center. However, do not remove the switch lock until assembly is missing. Assembling cleaner This cleaner was inspected and packaged carefully...
... speak with a representative in the assembly of packing. Hose, cleaning tools and wands (packed on the "Service" button) OR 1-800-944-9200 for an automated referral of service outlet locations (U.S. Powered hand tool (some models) Note: The white switch lock above the ON/OFF switch aids in our Consumer Response Center. However, do not remove the switch lock until assembly is missing. Assembling cleaner This cleaner was inspected and packaged carefully...
Manual
Page 4
.... OWNER'S MANUAL FOR COMPLETE INSTRUCTIONS B Remove cardboard (A) and screws from plastic bag and return it straight out. Remove powered hand tool (some models). Remove switch lock (C) above ON/ OFF switch (D) by pulling it to the tool storage area. Remove powered hand tool (some models) from handle section. Tighten screws securely with a Phillips screwdriver. If switch lock has come off during assembly, make sure switch is in OFF position (down) before plugging into holes on cleaner...
.... OWNER'S MANUAL FOR COMPLETE INSTRUCTIONS B Remove cardboard (A) and screws from plastic bag and return it straight out. Remove powered hand tool (some models). Remove switch lock (C) above ON/ OFF switch (D) by pulling it to the tool storage area. Remove powered hand tool (some models) from handle section. Tighten screws securely with a Phillips screwdriver. If switch lock has come off during assembly, make sure switch is in OFF position (down) before plugging into holes on cleaner...

Manual
Page 5
... to use . Model with Powered Hand Tool is intended 18. Tool cover 4. Hose rack (depending on lever to lower handle to correct setting for height of cleaner. Dirt cup handle 26 11. Three position handle release pedal: step on model) 6. ON-OFF switch Plug cord into electrical outlet. Step on carpet and floors; How to install the proper outlet. Handle 2. Headlight Operate cleaner only at voltage specified on data plate on rear wheels and push forward. upright for easy cord release...
... to use . Model with Powered Hand Tool is intended 18. Tool cover 4. Hose rack (depending on lever to lower handle to correct setting for height of cleaner. Dirt cup handle 26 11. Three position handle release pedal: step on model) 6. ON-OFF switch Plug cord into electrical outlet. Step on carpet and floors; How to install the proper outlet. Handle 2. Headlight Operate cleaner only at voltage specified on data plate on rear wheels and push forward. upright for easy cord release...
Manual
Page 6
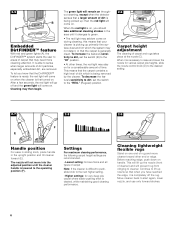
... the cleaner handle is being removed by the cleaner. To increase the feature's sensitivity to dirt, set the switch to the "REG." (Regular) position. 2-6 High Bare Floor D C Carpet height adjustment The cleaning of carpet and rugs takes place at the nozzle (C). This means that a larger amount of dirt is lowered to the operating position (F). The nozzle will come on when the cleaner is being picked up nozzle so...
... the cleaner handle is being removed by the cleaner. To increase the feature's sensitivity to dirt, set the switch to the "REG." (Regular) position. 2-6 High Bare Floor D C Carpet height adjustment The cleaning of carpet and rugs takes place at the nozzle (C). This means that a larger amount of dirt is lowered to the operating position (F). The nozzle will come on when the cleaner is being picked up nozzle so...
Manual
Page 7
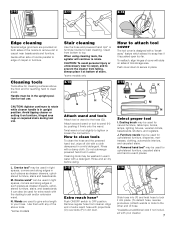
... carpeted stairs during tool use . Attach second wand or tool to OFF position. Do not submerge powered hand tool in such places as dresser drawers, upholstered furniture, stairs, and baseboards. Rinse and air dry before using cleaning tools, the agitator will continue to the hose (G). Crevice tool* may be washed in a mild detergent. Remove regular hose from bottom to secure in dirt duct. Push cover down to top. Dusting brush may be used for tool use...
... carpeted stairs during tool use . Attach second wand or tool to OFF position. Do not submerge powered hand tool in such places as dresser drawers, upholstered furniture, stairs, and baseboards. Rinse and air dry before using cleaning tools, the agitator will continue to the hose (G). Crevice tool* may be washed in a mild detergent. Remove regular hose from bottom to secure in dirt duct. Push cover down to top. Dusting brush may be used for tool use...
Manual
Page 8
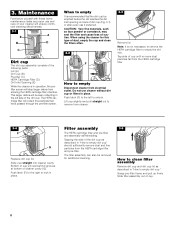
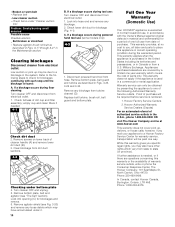
... filter assembly can also be removed for this type of suction. 3. Push latch (F) to the right to empty dirt cup." Maintenance Familiarize yourself with these home maintenance tasks as face powder or cornstarch, may seal the filter and cause loss of dust, empty the cup and clean the filters often. 3-2 F How to unlock. CAUTION: Very fine materials, such as proper use and care of your cleaner...
... filter assembly can also be removed for this type of suction. 3. Push latch (F) to the right to empty dirt cup." Maintenance Familiarize yourself with these home maintenance tasks as face powder or cornstarch, may seal the filter and cause loss of dust, empty the cup and clean the filters often. 3-2 F How to unlock. CAUTION: Very fine materials, such as proper use and care of your cleaner...
Manual
Page 9
..., remove dirt cup (Fig. 3-2). To reattach, align hinges (L) of cover with mild detergent, then air dry. Do not operate cleaner without any of the filters in the bottom of cleaner cavity, protects the motor from pre-filter. Hand wash filter in the filtration process to return clean air to snap free if it in cold water with grooves (I It is felt. Remove cartridge from electrical outlet. Should you want to replace...
..., remove dirt cup (Fig. 3-2). To reattach, align hinges (L) of cover with mild detergent, then air dry. Do not operate cleaner without any of the filters in the bottom of cleaner cavity, protects the motor from pre-filter. Hand wash filter in the filtration process to return clean air to snap free if it in cold water with grooves (I It is felt. Remove cartridge from electrical outlet. Should you want to replace...
Manual
Page 10
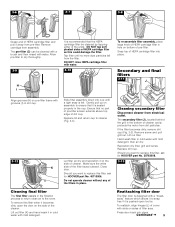
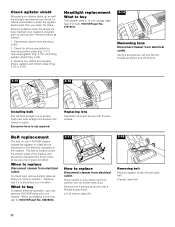
... buy This cleaner uses a 12 volt, wedge base type 912 bulb, HOOVER part No. 27313101. 3-14 Removing lens Disconnect cleaner from electrical outlet. Using a screwdriver, remove the two screws as follows: 1. Replacing lens Reposition lens and secure with a Phillips screw driver. To check belt, remove bottom plate as shown with the two screws. Replace belt if it is in low position and turn cleaner over so bottom side is up and suction. Place handle...
... buy This cleaner uses a 12 volt, wedge base type 912 bulb, HOOVER part No. 27313101. 3-14 Removing lens Disconnect cleaner from electrical outlet. Using a screwdriver, remove the two screws as follows: 1. Replacing lens Reposition lens and secure with a Phillips screw driver. To check belt, remove bottom plate as shown with the two screws. Replace belt if it is in low position and turn cleaner over so bottom side is up and suction. Place handle...
Manual
Page 11
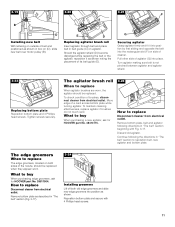
... for HOOVER part No. 48414115. 3-23 How to replace The edge groomers, located on side of cleaner. The edge groomers When to replace Disconnect cleaner from electrical outlet. Reposition bottom plate and secure with Fig. 3-17. Turn agitator making sure belt is not pinched between agitator and agitator shield. 3-22 Replacing bottom plate Reposition bottom plate and 4 Phillips head screws. To check condition of brushes, disconnect cleaner from electrical outlet. Remove bottom plate as...
... for HOOVER part No. 48414115. 3-23 How to replace The edge groomers, located on side of cleaner. The edge groomers When to replace Disconnect cleaner from electrical outlet. Reposition bottom plate and secure with Fig. 3-17. Turn agitator making sure belt is not pinched between agitator and agitator shield. 3-22 Replacing bottom plate Reposition bottom plate and 4 Phillips head screws. To check condition of brushes, disconnect cleaner from electrical outlet. Remove bottom plate as...
Manual
Page 12
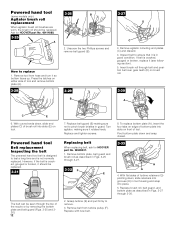
.... 2. Remove agitator including end plates (C) and discard. 4. If belt is not normally replaced. With flat sides of tool and remove bottom plate (A). 3-28 3-29 B 3-27 D C 3. Grasp turbine (E) and pull firmly to replace 1. Replace with new belt. Powered hand tool Belt replacement Inspecting the belt The powered hand tool belt is cracked, gouged or broken, it so bottom faces up. Replacing belt When replacing belt, ask for HOOVER part No. 48414088. 3-25 A 3-26 B 2. Remove bottom plate, belt guard and brush roll as described in tool housing...
.... 2. Remove agitator including end plates (C) and discard. 4. If belt is not normally replaced. With flat sides of tool and remove bottom plate (A). 3-28 3-29 B 3-27 D C 3. Grasp turbine (E) and pull firmly to replace 1. Replace with new belt. Powered hand tool Belt replacement Inspecting the belt The powered hand tool belt is cracked, gouged or broken, it so bottom faces up. Replacing belt When replacing belt, ask for HOOVER part No. 48414088. 3-25 A 3-26 B 2. Remove bottom plate, belt guard and brush roll as described in tool housing...
Manual
Page 13
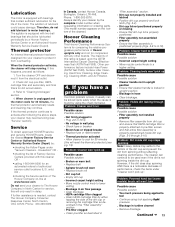
... dirt cup or removing the cartridge filter as described in wall plug • Check fuse or breaker • Blown fuse or tripped breaker • Replace fuse or reset breaker • Thermal protector activated • Allow cleaner to lower setting • Blockage in hose • Clear blockage. Service To obtain approved HOOVER service and genuine HOOVER parts, locate the nearest Hoover Factory Service Center or Authorized Hoover Warranty Service Dealer (Depot) by: • checking the Yellow Pages under "Cleaner won 't pick...
... dirt cup or removing the cartridge filter as described in wall plug • Check fuse or breaker • Blown fuse or tripped breaker • Replace fuse or reset breaker • Thermal protector activated • Allow cleaner to lower setting • Blockage in hose • Clear blockage. Service To obtain approved HOOVER service and genuine HOOVER parts, locate the nearest Hoover Factory Service Center or Authorized Hoover Warranty Service Dealer (Depot) by: • checking the Yellow Pages under "Cleaner won 't pick...
Manual
Page 14
... remove. 6. Disconnect powered hand tool from electrical outlet. Replace belt turbine, brush roll, belt guard and bottom plate. This warranty applies when the appliance is used in Figs. 3-25, 3-26 and 3-33. Hoover Factory Service Centers 2. In Canada, contact Hoover Canada, Burlington, Ontario, L7R 4A8. Phone 1-800-263-6376. • Broken or worn belt • Replace belt • Low cleaner suction • Check items under bottom plate 4. Remove agitator shield (see "The belt" section). If a blockage occurs during floor cleaning: Turn cleaner...
... remove. 6. Disconnect powered hand tool from electrical outlet. Replace belt turbine, brush roll, belt guard and bottom plate. This warranty applies when the appliance is used in Figs. 3-25, 3-26 and 3-33. Hoover Factory Service Centers 2. In Canada, contact Hoover Canada, Burlington, Ontario, L7R 4A8. Phone 1-800-263-6376. • Broken or worn belt • Replace belt • Low cleaner suction • Check items under bottom plate 4. Remove agitator shield (see "The belt" section). If a blockage occurs during floor cleaning: Turn cleaner...
Manual
Page 36
HOOVER y ®son marcas registradas HOOVER et ®sont des marques déposées HOOVER and ® are registered trademarks 3-04 U5753-/65-/67-/69-900 Printed in Mexico 56511-C19
HOOVER y ®son marcas registradas HOOVER et ®sont des marques déposées HOOVER and ® are registered trademarks 3-04 U5753-/65-/67-/69-900 Printed in Mexico 56511-C19


