Manual
Page 1
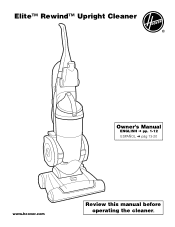
Elite™ Rewind™ Upright Cleaner ® Owner's Manual ENGLISH § pp. 1-12 ESPAÑOL § pág 13-20 www.hoover.com Review this manual before operating the cleaner.
Elite™ Rewind™ Upright Cleaner ® Owner's Manual ENGLISH § pp. 1-12 ESPAÑOL § pág 13-20 www.hoover.com Review this manual before operating the cleaner.
Manual
Page 2
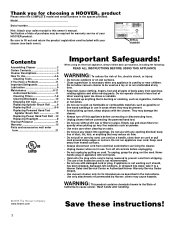
... cup and clean filters frequently when picking up hard, sharp objects with wet hands. • Hold onto the plug while cord is being rewound to this appliance before connecting or disconnecting hose. • Unplug cleaner before unplugging. • Do not unplug by cord, use as a handle, close door on cord. Thank you for warranty service of your HOOVER product. Model Serial number Hint: Attach your sales receipt to prevent cord from openings, rotating agitator and...
... cup and clean filters frequently when picking up hard, sharp objects with wet hands. • Hold onto the plug while cord is being rewound to this appliance before connecting or disconnecting hose. • Unplug cleaner before unplugging. • Do not unplug by cord, use as a handle, close door on cord. Thank you for warranty service of your HOOVER product. Model Serial number Hint: Attach your sales receipt to prevent cord from openings, rotating agitator and...
Manual
Page 3
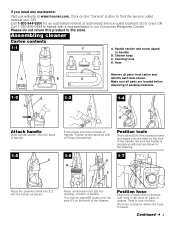
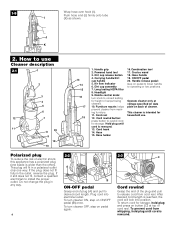
... powered hand tool snaps onto the tabs on the front of handle. The crevice wand (E) slides over slots in our Consumer Response Center. Continued § 3 Cleaner body C. The hose connector allows the hose to the store. Hose Remove all parts are located before disposing of packing materials. 1-2 A 1-3 1-4 B Attach handle Slide handle section (A) onto back of handle. 1-5 C Push screw into the holder as shown. Click on the "Service" button...
... powered hand tool snaps onto the tabs on the front of handle. The crevice wand (E) slides over slots in our Consumer Response Center. Continued § 3 Cleaner body C. The hose connector allows the hose to the store. Hose Remove all parts are located before disposing of packing materials. 1-2 A 1-3 1-4 B Attach handle Slide handle section (A) onto back of handle. 1-5 C Push screw into the holder as shown. Click on the "Service" button...
Manual
Page 4
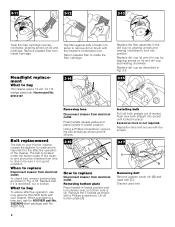
... plug until cord is rewound. 13. Powered hand tool 3. Nozzle control knob: turn knob to release cord from marking furniture. 11. Furniture nozzle: helps prevent cleaner from cord reel. Cord reel 12. Cord hook 14. ON/OFF pedal 20. Hose handle 19. To prevent cord from whipping, hold plug and press on button (C) at voltage specified on data plate on pedal to lower handle to install the proper outlet. Air flow indicator 6. Crevice wand 18. Handle release...
... plug until cord is rewound. 13. Powered hand tool 3. Nozzle control knob: turn knob to release cord from marking furniture. 11. Furniture nozzle: helps prevent cleaner from cord reel. Cord reel 12. Cord hook 14. ON/OFF pedal 20. Hose handle 19. To prevent cord from whipping, hold plug and press on button (C) at voltage specified on data plate on pedal to lower handle to install the proper outlet. Air flow indicator 6. Crevice wand 18. Handle release...
Manual
Page 5
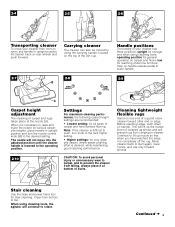
...; Higher settings: for all types of rug and move cleaner toward other end or edge. Carrying cleaner The cleaner can also be moved by using cleaning tools, the agitator will lift up nozzle so that when you have reached the edge, it at the nozzle (A). This will continue to start again, lower nozzle, and use only forward strokes. Stair cleaning Use the hose and power hand tool for general operation on handle.
...; Higher settings: for all types of rug and move cleaner toward other end or edge. Carrying cleaner The cleaner can also be moved by using cleaning tools, the agitator will lift up nozzle so that when you have reached the edge, it at the nozzle (A). This will continue to start again, lower nozzle, and use only forward strokes. Stair cleaning Use the hose and power hand tool for general operation on handle.
Manual
Page 6
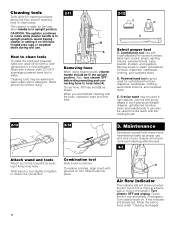
... with the tools, reposition hose end onto tube. 2-12 C D E Select proper tool C. Remove brush to tighten or loosen the connection. 2-14 3. It can also be used for extra reach with grooves on . To replace brushes, align brush with the dusting brush. 2-13 F Attach wand and tools Attach tool to rotate while cleaner handle is in water. DO NOT submerge powered hand tool in upright position. Also, turn cleaner OFF before using. 2-11 B A Removing hose When using cleaning tools, cleaner handle should be washed in such...
... with the tools, reposition hose end onto tube. 2-12 C D E Select proper tool C. Remove brush to tighten or loosen the connection. 2-14 3. It can also be used for extra reach with grooves on . To replace brushes, align brush with the dusting brush. 2-13 F Attach wand and tools Attach tool to rotate while cleaner handle is in water. DO NOT submerge powered hand tool in upright position. Also, turn cleaner OFF before using. 2-11 B A Removing hose When using cleaning tools, cleaner handle should be washed in such...
Manual
Page 7
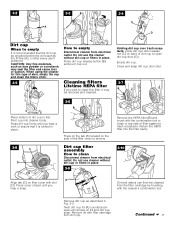
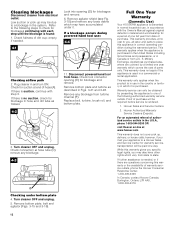
.... Press dirt cup release button (B) and pivot cup out. When using the cleaner for this filter, it is locked in place. 3-9 Remove the HEPA filter (B) and brush with the cleaner's combination tool. Press cover closed until you wish to clean this type of dirt cup to open dirt cup door (D). CAUTION: Very fine materials, such as described in first. Empty dirt cup. Dirt and debris can then be removed and cleaned. Remove lid with slot (D). Press dirt cup firmly...
.... Press dirt cup release button (B) and pivot cup out. When using the cleaner for this filter, it is locked in place. 3-9 Remove the HEPA filter (B) and brush with the cleaner's combination tool. Press cover closed until you wish to clean this type of dirt cup to open dirt cup door (D). CAUTION: Very fine materials, such as described in first. Empty dirt cup. Dirt and debris can then be removed and cleaned. Remove lid with slot (D). Press dirt cup firmly...
Manual
Page 8
... to remove dirt or brush with your Hoover cleaner causes the agitator to rotate and is in Fig. 3-5. 3-15 Belt replacement The belt on your cleaner. Replace dirt cup as shown in lowest position. Remove the 5 screws as shown and lift off bottom plate (A). Remove pleated filter from electrical outlet. The belt is stretched, cut or broken. To check belt, remove bottom plate as described in good condition. When purchasing a new belt, ask for the effective operation...
... to remove dirt or brush with your Hoover cleaner causes the agitator to rotate and is in Fig. 3-5. 3-15 Belt replacement The belt on your cleaner. Replace dirt cup as shown in lowest position. Remove the 5 screws as shown and lift off bottom plate (A). Remove pleated filter from electrical outlet. The belt is stretched, cut or broken. To check belt, remove bottom plate as described in good condition. When purchasing a new belt, ask for the effective operation...
Manual
Page 9
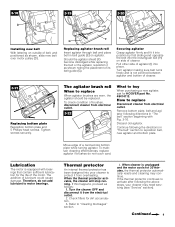
... cleaning effectiveness, replace agitator if brushes do not add lubricant to motor bearings. Thermal protector An internal thermal protector has been designed into your cleaner may continue. Check filters for HOOVER part No. 48414113. Continued 9 Securing agitator Grasp agitator firmly and fit it from electrical outlet. 3-22 What to replace Disconnect cleaner from the electrical outlet. 2. Tighten screws securely. To check condition of its belt guide (G). The addition of a card across bottom plate while turning agitator. Remove...
... cleaning effectiveness, replace agitator if brushes do not add lubricant to motor bearings. Thermal protector An internal thermal protector has been designed into your cleaner may continue. Check filters for HOOVER part No. 48414113. Continued 9 Securing agitator Grasp agitator firmly and fit it from electrical outlet. 3-22 What to replace Disconnect cleaner from the electrical outlet. 2. Tighten screws securely. To check condition of its belt guide (G). The addition of a card across bottom plate while turning agitator. Remove...
Manual
Page 10
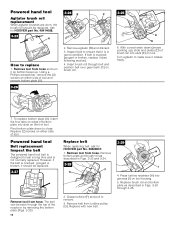
... hose and turn it (see following section). 4. Replace with new belt. Press turbine retainers (H) into grooves (I 4. Ask for HOOVER part No. 38528037. 1. Inspect belt to close. Powered hand tool Belt replacement Inspect the belt The powered hand tool belt is designed to remove. 3. However, if the belt is not normally replaced. Powered hand tool 3-24 B C Agitator brush roll replacement When agitator brushes are worn, the brush roll should be seen through the top of the nozzle or by removing the bottom plate (Figs. 3-23). 10 2. Remove agitator...
... hose and turn it (see following section). 4. Replace with new belt. Press turbine retainers (H) into grooves (I 4. Ask for HOOVER part No. 38528037. 1. Inspect belt to close. Powered hand tool Belt replacement Inspect the belt The powered hand tool belt is designed to remove. 3. However, if the belt is not normally replaced. Powered hand tool 3-24 B C Agitator brush roll replacement When agitator brushes are worn, the brush roll should be seen through the top of the nozzle or by removing the bottom plate (Figs. 3-23). 10 2. Remove agitator...
Manual
Page 11
Always identify your cleaner to Hoover in Newton, Iowa for service, this will reset the thermal protector) Problem: Cleaner/tools won't pick up Problem: Smoky Possible Cause Possible Solution • Broken or worn belt • Replace belt • Agitator brush roll worn • Replace brush roll • Dirt cup full • Empty dirt cup • Filters dirty • Clean filters • Incorrect carpet height setting • Move nozzle control knob to lower setting • Blockage in air flow passages • Clear blockage Problem: Cleaner hard to...
Always identify your cleaner to Hoover in Newton, Iowa for service, this will reset the thermal protector) Problem: Cleaner/tools won't pick up Problem: Smoky Possible Cause Possible Solution • Broken or worn belt • Replace belt • Agitator brush roll worn • Replace brush roll • Dirt cup full • Empty dirt cup • Filters dirty • Clean filters • Incorrect carpet height setting • Move nozzle control knob to lower setting • Blockage in air flow passages • Clear blockage Problem: Cleaner hard to...
Manual
Page 12
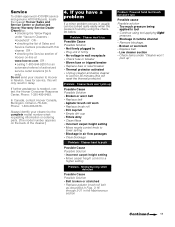
... in use , in correct operating condition during powered hand tool use: 4-4 E F 11. empty if needed , or if there are covered by presenting the appliance to a blockage in material and workmanship for blockage and remove. Hoover Authorized Warranty Service Dealers (Depots). Low suction or pick up , delivery, or house calls; Check fullness of authorized service outlets in Canada or from electrical outlet. If there is found: 1. Remove bottom plate, belt and agitator...
... in use , in correct operating condition during powered hand tool use: 4-4 E F 11. empty if needed , or if there are covered by presenting the appliance to a blockage in material and workmanship for blockage and remove. Hoover Authorized Warranty Service Dealers (Depots). Low suction or pick up , delivery, or house calls; Check fullness of authorized service outlets in Canada or from electrical outlet. If there is found: 1. Remove bottom plate, belt and agitator...

Manual
Page 21
... Primary filter Secondary filter (HEPA) Headlight bulb Agitator belt (belt part no. 38528040) Powered hand tool Combination tool Crevice wand Part No. 59157055 59157014 27313107 40201190 59157029 59157093 59157086 No. of Per Pack Packs Total 59157055 59157014 27313107 40201190 59157029 59157093 59157086 $12.00 $ 9.99 $ 2.49 $ 3.99 $18.99 $ 4.99 $ 4.99 TOTAL MERCHANDISE ADD YOUR APPLICABLE STATE TAX + SHIPPING & HANDLING + TOTAL COST $ $ 7.50 $ Replacement parts and...
... Primary filter Secondary filter (HEPA) Headlight bulb Agitator belt (belt part no. 38528040) Powered hand tool Combination tool Crevice wand Part No. 59157055 59157014 27313107 40201190 59157029 59157093 59157086 No. of Per Pack Packs Total 59157055 59157014 27313107 40201190 59157029 59157093 59157086 $12.00 $ 9.99 $ 2.49 $ 3.99 $18.99 $ 4.99 $ 4.99 TOTAL MERCHANDISE ADD YOUR APPLICABLE STATE TAX + SHIPPING & HANDLING + TOTAL COST $ $ 7.50 $ Replacement parts and...

Manual
Page 24
1-06 U5507-/09-900 HOOVER y ®son marcas registradas HOOVER and ® are registered trademarks Printed in China 59157088
1-06 U5507-/09-900 HOOVER y ®son marcas registradas HOOVER and ® are registered trademarks Printed in China 59157088


