
Owners Manual
Page 1
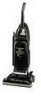
TurboPower™ Upright Vacuum Cleaner Owner's Manual English § pp. 1-14 Spanish § pág. 15-22 French § p. 23-29 Review this manual before operating cleaner. ®
TurboPower™ Upright Vacuum Cleaner Owner's Manual English § pp. 1-14 Spanish § pág. 15-22 French § p. 23-29 Review this manual before operating cleaner. ®
Owners Manual
Page 2
... retain This vacuum cleaner is suggested that may be required for selecting a HOOVER product. Save these instructions 2 Your cleaner is model and has serial number It is a combination cleaner. Index Assembling Cleaner 3-7 Cleaner Descriptions 7 Cleaning Effectiveness Per Amp Rating 14 How To Use Cleaning Tools 9-10 Upright Cleaner 13-15 If You Have a Problem 13 Important Safeguards 2 Lubrication 13 Maintenance Authotized Service 14 Replacing Agitator 12-13 Replacing Belt 11-12 Replacing Headlight 11 Replacing Filter Bag 11 Unpacking Cleaner 3 Warranty 14...
... retain This vacuum cleaner is suggested that may be required for selecting a HOOVER product. Save these instructions 2 Your cleaner is model and has serial number It is a combination cleaner. Index Assembling Cleaner 3-7 Cleaner Descriptions 7 Cleaning Effectiveness Per Amp Rating 14 How To Use Cleaning Tools 9-10 Upright Cleaner 13-15 If You Have a Problem 13 Important Safeguards 2 Lubrication 13 Maintenance Authotized Service 14 Replacing Agitator 12-13 Replacing Belt 11-12 Replacing Headlight 11 Replacing Filter Bag 11 Unpacking Cleaner 3 Warranty 14...

Owners Manual
Page 3
If you need assistance with a representative in order. FRONT Carton contents 1-1 Remove all the instruction steps in our Consumer Response Center. Lower handle C. Cord D. Bracket G. Hose and cleaning tools D AB C F G J H I . A. Upper handle B. Bag compartment F. Filter bag J. Assembling cleanerr It is intended for an automated referral of authorized service outlet locations (U.S. Handle bolt and nut packet (one extra nut included) I BACK E 3 Make sure all parts, especial small items such...
If you need assistance with a representative in order. FRONT Carton contents 1-1 Remove all the instruction steps in our Consumer Response Center. Lower handle C. Cord D. Bracket G. Hose and cleaning tools D AB C F G J H I . A. Upper handle B. Bag compartment F. Filter bag J. Assembling cleanerr It is intended for an automated referral of authorized service outlet locations (U.S. Handle bolt and nut packet (one extra nut included) I BACK E 3 Make sure all parts, especial small items such...

Owners Manual
Page 4
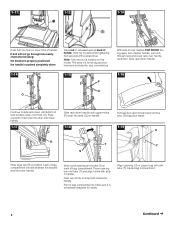
... removed during assembly. Turn handle over. Do not push handle together with side marked "UP" visible. E D Note: The small red tab (E) above the ON/OFF switch is locked in bottom of handle, with your hands on top. If it does not fall off , the tab will not work properly. Insert large rectangular end of cord (F) into place at each of assembly. Pull cord...
... removed during assembly. Turn handle over. Do not push handle together with side marked "UP" visible. E D Note: The small red tab (E) above the ON/OFF switch is locked in bottom of handle, with your hands on top. If it does not fall off , the tab will not work properly. Insert large rectangular end of cord (F) into place at each of assembly. Pull cord...
Owners Manual
Page 5
... cleaner handle, pull cord through hole easily, check the following: the bracket is properly positioned the handle is completely snapped to snap both hooks into hole on bag compartment to make sure it is pushed completely down handle until bottom of bag compartment into slots (Q) on handle. 1-18 Pull bag door latch forward and remove door. Place opening and hooks (S) on this model...
... cleaner handle, pull cord through hole easily, check the following: the bracket is properly positioned the handle is completely snapped to snap both hooks into hole on bag compartment to make sure it is pushed completely down handle until bottom of bag compartment into slots (Q) on handle. 1-18 Pull bag door latch forward and remove door. Place opening and hooks (S) on this model...

Owners Manual
Page 6
... smaller end toward bottom, snap wand into rack as shown. Position dusting brush (W) into clips on tab. Note: If tab has come off red tab (E) above ON-OFF switch by pushing down ) before plugging cord into an electrical outlet. 1-24 1-25 Place round end of paper bag are completely inside the bag compartment. Attach hose and tools 1-23 To replace bag door, insert the tabs...
... smaller end toward bottom, snap wand into rack as shown. Position dusting brush (W) into clips on tab. Note: If tab has come off red tab (E) above ON-OFF switch by pushing down ) before plugging cord into an electrical outlet. 1-24 1-25 Place round end of paper bag are completely inside the bag compartment. Attach hose and tools 1-23 To replace bag door, insert the tabs...

Owners Manual
Page 7
... tipping cleaner or setting it on lower edge of carpet being cleaned. 10. Stair cleaning handle: located on furniture, fringed area rugs or carpeted stairs during tool use. Hose door: open door to connect hose to correct setting for height of bag. 7. Bag door latch 4. Tool rack 16. Furniture nozzle 19. tion card included with your cleaner. 2 16 17 2 18 Cleaner description 1. ON/OFF switch: located on , the agitator brush roll will continue to user The assembled cleaner...
... tipping cleaner or setting it on lower edge of carpet being cleaned. 10. Stair cleaning handle: located on furniture, fringed area rugs or carpeted stairs during tool use. Hose door: open door to connect hose to correct setting for height of bag. 7. Bag door latch 4. Tool rack 16. Furniture nozzle 19. tion card included with your cleaner. 2 16 17 2 18 Cleaner description 1. ON/OFF switch: located on , the agitator brush roll will continue to user The assembled cleaner...

Owners Manual
Page 8
... cleaner (A) for other ). To turn cleaner on handle release lever to install the proper outlet. Handle positions The handle of your cleaner from room to room, put handle in the upright position. operating for storage and when using cleaning tools; A Carpet height adjust When it is lifted off , push switch down. For maximum cleaning performance the following carpet height settings are recommended. To turn cleaner off the carpet. This insures that the paper bag...
... cleaner (A) for other ). To turn cleaner on handle release lever to install the proper outlet. Handle positions The handle of your cleaner from room to room, put handle in the upright position. operating for storage and when using cleaning tools; A Carpet height adjust When it is lifted off , push switch down. For maximum cleaning performance the following carpet height settings are recommended. To turn cleaner off the carpet. This insures that the paper bag...

Owners Manual
Page 9
...to rotate. Guide either side of nozzle parallel to cleaner Turn cleaner OFF before attaching or removing hose. With handle in using your hose. With cleaner handle in upright position, open hose door and insert hose connector until locked in upright position. To remove hose, press latch on stairs. 2-14 1 2 Cleaning tools The tool set includes a hose, wand, crevice tool, furniture nozzle and dusting brush. 9 C Attach hose to edge of carpet or furniture. 2-13 Stair cleaning A stair cleaning handle has been designed for stair cleaning. Dusting brush may use . 3 4 Select...
...to rotate. Guide either side of nozzle parallel to cleaner Turn cleaner OFF before attaching or removing hose. With handle in using your hose. With cleaner handle in upright position, open hose door and insert hose connector until locked in upright position. To remove hose, press latch on stairs. 2-14 1 2 Cleaning tools The tool set includes a hose, wand, crevice tool, furniture nozzle and dusting brush. 9 C Attach hose to edge of carpet or furniture. 2-13 Stair cleaning A stair cleaning handle has been designed for stair cleaning. Dusting brush may use . 3 4 Select...

Owners Manual
Page 10
... Warranty Service Dealer (Depot). 3. Clearing obstructions To check for obstructions, first turn cleaner off dirt with your cleaner. Where to cleaner. Rinse and air dry before using tools, re-attach hose to buy For improved cleaning effectiveness and superior filtration, use Genuine HOOVER Allergen Filtration Type A disposable bags with a cloth dampened in upright position. If more dirt than this nature, change the paper bag when dirt reaches the dotted line. Remove obstruction. Maintenance The following sections are attached...
... Warranty Service Dealer (Depot). 3. Clearing obstructions To check for obstructions, first turn cleaner off dirt with your cleaner. Where to cleaner. Rinse and air dry before using tools, re-attach hose to buy For improved cleaning effectiveness and superior filtration, use Genuine HOOVER Allergen Filtration Type A disposable bags with a cloth dampened in upright position. If more dirt than this nature, change the paper bag when dirt reaches the dotted line. Remove obstruction. Maintenance The following sections are attached...

Owners Manual
Page 11
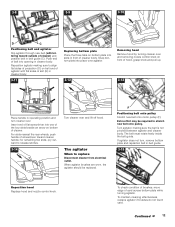
... handle in good condition. Repeat in new filter bag with Fig. 3-8.) Removing bag door Pull bag door latch forward and remove door from electrical outlet. Discard used belt Remove agitator and broken agitator belt. (If belt is not broken but is in operating position and turn cleaner over so bottom side is important for Hoover part No. 40201190. 11 How to snap all edges of the cleaner. To remove hood, refer to Figs. 3-10 to replace belt...
... handle in good condition. Repeat in new filter bag with Fig. 3-8.) Removing bag door Pull bag door latch forward and remove door from electrical outlet. Discard used belt Remove agitator and broken agitator belt. (If belt is not broken but is in operating position and turn cleaner over so bottom side is important for Hoover part No. 40201190. 11 How to snap all edges of the cleaner. To remove hood, refer to Figs. 3-10 to replace belt...
Owners Manual
Page 12
... agitator brushes are worn, the agitator should be required to replace Disconnect cleaner from electrical outlet. Extra effort may be replaced. If agitator does not turn cleaner over. Snap bottom plate into opening in belt guide (C). The agitator When to stretch new belt onto pulley. Push end of cleaner) and position belt in cleaner body. For slots nearest the rear wheels, push handle of screwdriver toward outside of belt into place over agitator. 3-12 Removing...
... agitator brushes are worn, the agitator should be required to replace Disconnect cleaner from electrical outlet. Extra effort may be replaced. If agitator does not turn cleaner over. Snap bottom plate into opening in belt guide (C). The agitator When to stretch new belt onto pulley. Push end of cleaner) and position belt in cleaner body. For slots nearest the rear wheels, push handle of screwdriver toward outside of belt into place over agitator. 3-12 Removing...
Owners Manual
Page 13
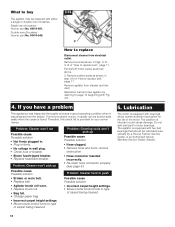
... check list is equipped with bearings which contain sufficient lubrication for your convenience. Problem: Cleaner won 't pick up Possible cause Possible solution • Broken or worn belt. • Replace belt. • Agitator brush roll worn. • Replace brush roll. • Bag full. • Change paper bag. • Incorrect carpet height settings. • Move nozzle control knob to type of the motor. The addition of carpet being cleaned. Pull belt off motor pulley as shown in good operating condition...
... check list is equipped with bearings which contain sufficient lubrication for your convenience. Problem: Cleaner won 't pick up Possible cause Possible solution • Broken or worn belt. • Replace belt. • Agitator brush roll worn. • Replace brush roll. • Bag full. • Change paper bag. • Incorrect carpet height settings. • Move nozzle control knob to type of the motor. The addition of carpet being cleaned. Pull belt off motor pulley as shown in good operating condition...

Owners Manual
Page 14
... brands. Other performance factors include Hose Power (ASTM Test F558), Surface Litter Cleaning, Hard Floor Cleaning, Edge Cleaning, Cleaning Width, and Air Filtration. 14 This warranty does not apply if the appliance is rendered. 1. Hoover Factory Service Centers. 2. Hoover cleaning performance This Hoover Cleaning Performance System is based upon The American Society for comparison with the Owner's Manual against original defects in a commercial or rental application. While this...
... brands. Other performance factors include Hose Power (ASTM Test F558), Surface Litter Cleaning, Hard Floor Cleaning, Edge Cleaning, Cleaning Width, and Air Filtration. 14 This warranty does not apply if the appliance is rendered. 1. Hoover Factory Service Centers. 2. Hoover cleaning performance This Hoover Cleaning Performance System is based upon The American Society for comparison with the Owner's Manual against original defects in a commercial or rental application. While this...


