Hoover U5361 Support and Manuals
Get Help and Manuals for this Hoover item

View All Support Options Below
Free Hoover U5361 manuals!
Problems with Hoover U5361?
Ask a Question
Free Hoover U5361 manuals!
Problems with Hoover U5361?
Ask a Question
Popular Hoover U5361 Manual Pages
Manual - Page 1

Owner's Manual
ENGLISH § pp. 1-14 ESPAÑOL § pág. 15-22 FRANÇAIS § p. 23-30
®
www.hoover.com
This product was designed for your purchase! HOOVER®
Bagless Upright
Thank you for easy assembly (see page 3)
Manual - Page 2

...Save these instructions! Do not use with the cleaner. Contents
Assembling Cleaner 3-4 How to use 5
Cleaner Description 5 Cleaning Tools 7-8 If You Have a Problem 13 Clearing Blockages 13 Important Safeguards 2 Maintenance Authorized Service 12 Cleaning Filters 9-10 Emptying Dirt Cup 8 Lubrication 12 Replacing Agitator Brush Roll ......12 Replacing Belt 11 Replacing Headlight 10...
Manual - Page 3
... at www.hoover.com. Handle section
B. Handle bolts and nuts packet (in
bag with a representative in OFF position.
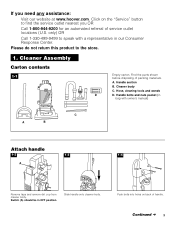
Click on back of packing materials. Cleaner Assembly
Carton contents
1-1
Empty carton. Push bolts into holes on the "Service" button to the store.
1.
A. only) OR
Call 1-330-499-9499 to speak with owner's manual)
C
A
B
Attach...
Manual - Page 4

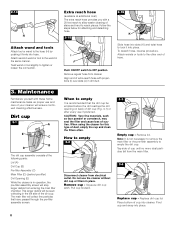
... of rack. Attach hose
1-8
A B
Align end of wand into hose tube (E). Position tools
1-11
1-12 C
1-13 D
B A
Place smaller unridged end of hose with a Phillips screw driver.
Position hose over slots (B) in dirt duct.
Hold each nut in place.
Snap wand into clip. Repeat with other wand.
Manual - Page 5

Dirt cup
cleaner body
21. Nozzle control knob: slide knob to correct setting for household use
Cleaner description
2-1 1
3
17
4
5
18
15
19
12
21
23 ...located 19. Carrying handle
22. Handle release lever: step
on handle release lever to install the proper outlet. Final filter exhaust
Operate cleaner only at voltage specified on data plate on left for storage. ...
Manual - Page 6

... cleaner.
B
A
Carpet height adjustment
The cleaning of rug and move into the adjusted position until the cleaner handle is lowered to the next higher setting.
• Higher settings: for very deep pile carpet where easier pushing effort is desired, while maintaining good cleaning performance. 2-4
2-5
2-6
Transporting cleaner
Put handle in the upright position...
Manual - Page 7

...Rinse and air dry before disconnecting and connecting hose to edge of stair cleaning handle and guide cleaner with a detergent. Lower cover (B) onto hose tube. CAUTION: To avoid personal ..., lamps, lighting fixtures, venetian blinds, baseboards, shutters, and registers. Avoid tipping cleaner or setting it on both sides of the nozzle to prevent the cleaner from falling, always place it ...
Manual - Page 8
...filter.
3-4
Disconnect cleaner from cleaner. How to the wand in operation, the pre-filter assembly screen will ensure continued cleaning effectiveness. Remove lid. Do not use if preferred. Replace cup - Replace...seen collecting in the left side of the following parts: Lid (A) Dirt Cup (B) Pre-filter Assembly (C) Main Filter (D) (behind pre-filter) Dirt Opening (E) While the cleaner is in ...
Manual - Page 9

... pre-filter assembly toward center of pre-filter.
Pull up on top of cup. The screen (C) can be cleaned with a soft brush or rinsed with water. It could damage the filter.
Be careful not to press the filter gasket below the pre-filter edge.
3-10
3-11
Slide pre-filter assembly all filter pleats are set in place. Replace dirt...
Manual - Page 10
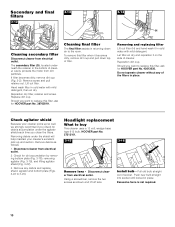
... required.
10 Reposition dirt cup. Removing and replacing filter
Lift out filter (H) and hand wash it on the side of socket. Should you clean the filters.
Check for HOOVER part No. 38765019.
Do not operate cleaner without any debris and replace shield, agitator and bottom plate (Figs. 3-22 to the room. Install bulb -
Disconnect cleaner from dirt particles.
Manual - Page 11

... motor pulley (K). Lift off bottom plate (I
How to replace
Disconnect cleaner from electrical outlet.
Pull other side of agitator (P) into the rectangular slot (O) on side of its belt guide (N).
3-22
3-23
O
P
Secure agitator Grasp agitator firmly and fit it is important for HOOVER part No. 38528033 (belt package part number 40201160).
3-18
I ).
3-19
3-20 K
3-21 L
Remove agitator...
Manual - Page 12

... or an Authorized Hoover Warranty Service Dealer (Depot).
Check secondary and final filters for 30 minutes, the thermal protector automatically resets and cleaning may need servicing
(see"Service" section).
12
What to "Clearing blockages" section.
4. Remove bottom plate, belt and agitator following the directions in "The belt" section (Fig. 3-18).
3-25
Installing groomers
Lift off...
Manual - Page 13

...not installed
properly • Ensure that pre-filter assembly and main filter are positioned properly (Figs. 3-9 to 3-10)
Problem: Cleaner hard to push Possible cause
Possible solution • Incorrect carpet height setting • Move nozzle control knob to a
higher setting
Problem: Cleaning tools won't pick up Possible cause Possible solution
• Broken or worn belt • Replace belt...
Manual - Page 14
.... Phone 1-800-263-6376.
14 This warranty provides, at no cost to you, all labor and parts to place this warranty gives you specific legal rights, you mail your appliance to a Hoover Factory Service Center for warranty service, transportation will be obtained by a limited one year warranty which may also have accumulated under bottom plate...
Hoover U5361 Reviews
We have not received any reviews for Hoover yet.