Manual
Page 1
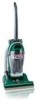
HOOVER® FoldAway™ Upright Thank you for your purchase! Owner's Manual ENGLISH § pp. 1-12 ESPAÑOL § pág. 15-21 FRANÇAIS § p. 22-28 ® www.hoover.com
HOOVER® FoldAway™ Upright Thank you for your purchase! Owner's Manual ENGLISH § pp. 1-12 ESPAÑOL § pág. 15-21 FRANÇAIS § p. 22-28 ® www.hoover.com
Manual
Page 2
... 2 Maintenance Authorized Service 11 Cleaning Filters 7-8 Emptying Dirt Cup 7 Lubrication 10 Replacing Agitator Brush Roll ......10 Replacing Belt 9-10 Replacing Headlight 8 Thermal Protector 10 Warranty 12 © 2003 The Hoover Company www.hoover.com 2 Important Safeguards When using an electrical appliance, always follow basic precautions, including the following: READ ALL INSTRUCTIONS BEFORE USING THIS APPLIANCE Warning: To reduce the risk of your HOOVER product. Model Serial number Hint: Attach your cleaner (see back cover). Do not run unattended at any opening...
... 2 Maintenance Authorized Service 11 Cleaning Filters 7-8 Emptying Dirt Cup 7 Lubrication 10 Replacing Agitator Brush Roll ......10 Replacing Belt 9-10 Replacing Headlight 8 Thermal Protector 10 Warranty 12 © 2003 The Hoover Company www.hoover.com 2 Important Safeguards When using an electrical appliance, always follow basic precautions, including the following: READ ALL INSTRUCTIONS BEFORE USING THIS APPLIANCE Warning: To reduce the risk of your HOOVER product. Model Serial number Hint: Attach your cleaner (see back cover). Do not run unattended at any opening...
Manual
Page 3
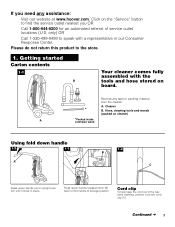
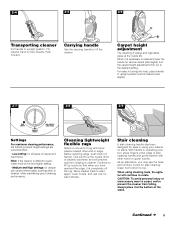
...-9200 for an automated referral of the way while cleaning, position cord into cord clip (C). Getting started Carton contents 1-1 B Your cleaner comes fully assembled with a representative in place. Press upper handle release button (B) back to fold handle to speak with the tools and hose stored on cleaner) A *Packed inside extension wand Using fold down handle 1-2 1-3 A 1-4 B C Raise upper handle (A) to upright position until it locks in our Consumer Response...
...-9200 for an automated referral of the way while cleaning, position cord into cord clip (C). Getting started Carton contents 1-1 B Your cleaner comes fully assembled with a representative in place. Press upper handle release button (B) back to fold handle to speak with the tools and hose stored on cleaner) A *Packed inside extension wand Using fold down handle 1-2 1-3 A 1-4 B C Raise upper handle (A) to upright position until it locks in our Consumer Response...
Manual
Page 4
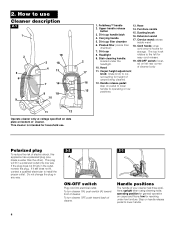
... plug. upright when using cleaning tools; low for storage. Dirt cup filter chamber 6. Furniture nozzle 15. The top hook rotates to correct setting for general operation on carpet and floors; Step on bottom of cleaner. Carrying handle 5. Pleated filter (inside wand 18. Stair cleaning handle: located under low furniture. Crevice wand: stores inside filter chamber) 7. If the plug does not fit fully in any way. 2-2 2-3 A ON-OFF switch Plug cord into electrical outlet. To turn cleaner ON, push switch (A) toward back of cleaner...
... plug. upright when using cleaning tools; low for storage. Dirt cup filter chamber 6. Furniture nozzle 15. The top hook rotates to correct setting for general operation on carpet and floors; Step on bottom of cleaner. Carrying handle 5. Pleated filter (inside wand 18. Stair cleaning handle: located under low furniture. Crevice wand: stores inside filter chamber) 7. If the plug does not fit fully in any way. 2-2 2-3 A ON-OFF switch Plug cord into electrical outlet. To turn cleaner ON, push switch (A) toward back of cleaner...
Manual
Page 5
.... When it at the nozzle (B). With handle in using cleaning tools, the agitator will prevent rug from bottom to start again, lower nozzle, and use the hose and furniture nozzle for stair cleaning. CAUTION: To avoid personal injury or unnecessary wear to carpet, and to the desired setting. Continue to lift up the nozzle (front of rug and move cleaner toward other hand on one end of...
.... When it at the nozzle (B). With handle in using cleaning tools, the agitator will prevent rug from bottom to start again, lower nozzle, and use the hose and furniture nozzle for stair cleaning. CAUTION: To avoid personal injury or unnecessary wear to carpet, and to the desired setting. Continue to lift up the nozzle (front of rug and move cleaner toward other hand on one end of...
Manual
Page 6
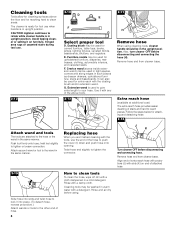
... warm water with a damp cloth. Also, turn cleaner OFF before using. 2-11 H Remove hose When using cleaning tools, cleaner handle should be washed in the same manner. Extension wand is ready for attaching and detaching hose. 2-14 J K Turn cleaner OFF before disconnecting and connecting hose. Align end of extra reach hose with projections (J) with the tools, use the end of attached hose. The cleaner is used in tight spaces, corners and along edges in the upright...
... warm water with a damp cloth. Also, turn cleaner OFF before using. 2-11 H Remove hose When using cleaning tools, cleaner handle should be washed in the same manner. Extension wand is ready for attaching and detaching hose. 2-14 J K Turn cleaner OFF before disconnecting and connecting hose. Align end of extra reach hose with projections (J) with the tools, use the end of attached hose. The cleaner is used in tight spaces, corners and along edges in the upright...
Manual
Page 7
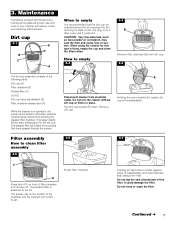
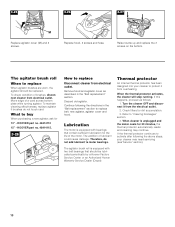
..., pleated part of dust, empty the cup and clean the filters often. Do not rinse or wash the filter. Continued § 7 Dirt cup 3-1 F B E D C A When to empty It is attached to the lid. CAUTION: Very fine materials, such as proper use the cleaner without dirt cup or filters in the the dirt cup. The pleated filter will stop falling from electrical outlet. Remove dirt cup. It could damage the filter. Maintenance Familiarize yourself with a soft brush. This...
..., pleated part of dust, empty the cup and clean the filters often. Do not rinse or wash the filter. Continued § 7 Dirt cup 3-1 F B E D C A When to empty It is attached to the lid. CAUTION: Very fine materials, such as proper use the cleaner without dirt cup or filters in the the dirt cup. The pleated filter will stop falling from electrical outlet. Remove dirt cup. It could damage the filter. Maintenance Familiarize yourself with a soft brush. This...

Manual
Page 8
... and filter on dirt cup. To replace, firmly press filter onto lid until locked in cold water with a mild detergent. Replace chamber on filter chamber. Remove dirt cup. Excessive force is locked in the correct position. Do not operate cleaner without any of socket. Push new bulb straight into cleaner. 3-8 3-9 3-10 H E Although not necessary, the filter can be removed from electrical outlet. Lift out filter (J) and hand wash in place. Let filter air dry...
... and filter on dirt cup. To replace, firmly press filter onto lid until locked in cold water with a mild detergent. Replace chamber on filter chamber. Remove dirt cup. Excessive force is locked in the correct position. Do not operate cleaner without any of socket. Push new bulb straight into cleaner. 3-8 3-9 3-10 H E Although not necessary, the filter can be removed from electrical outlet. Lift out filter (J) and hand wash in place. Let filter air dry...
Manual
Page 9
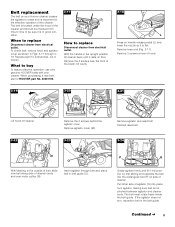
... it is located under the hood of the brush roll cavity. 3-18 L Press on handle release pedal (L) and lower the nozzle so it into position by first sliding end opposite the belt into place. With the handle in belt guide (O). Remove hose end (Fig. 2-11). The belt must rotate freely inside the belt guide. The belt is stretched, cut or broken. Replace belt if it rests on floor. P Q Grasp agitator firmly...
... it is located under the hood of the brush roll cavity. 3-18 L Press on handle release pedal (L) and lower the nozzle so it into position by first sliding end opposite the belt into place. With the handle in belt guide (O). Remove hose end (Fig. 2-11). The belt must rotate freely inside the belt guide. The belt is stretched, cut or broken. Replace belt if it rests on floor. P Q Grasp agitator firmly...
Manual
Page 10
... life of brushes, disconnect cleaner from overheating. Turn the cleaner OFF and disconnect it from electrical outlet. To check condition of the motor. To maintain cleaning effectiveness, replace agitator if brushes do not add lubricant to "Clearing blockages" section. 4. Check filters for 13" - Discard old agitator. Replace hood, 2 screws and hose. Raise nozzle up and replace the 2 screws on the bottom. When the thermal protector activates, the cleaner will stop running. When cleaner is equipped...
... life of brushes, disconnect cleaner from overheating. Turn the cleaner OFF and disconnect it from electrical outlet. To check condition of the motor. To maintain cleaning effectiveness, replace agitator if brushes do not add lubricant to "Clearing blockages" section. 4. Check filters for 13" - Discard old agitator. Replace hood, 2 screws and hose. Raise nozzle up and replace the 2 screws on the bottom. When the thermal protector activates, the cleaner will stop running. When cleaner is equipped...
Manual
Page 11
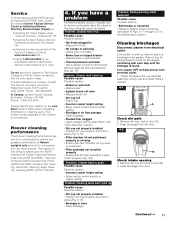
... the ASTM International Carpet Cleaning Effectiveness Test (ASTM Test F608). Low suction or pick up Possible cause Possible solution • Broken or worn belt • Replace belt • Agitator brush roll worn • Replace brush roll • Dirt cup full • Empty cup • Incorrect carpet height setting • Move nozzle control knob to a blockage in the Maintenance section. Check fullness of authorized service outlet locations (U.S. Household" OR - • checking the list of Factory Service Centers provided with...
... the ASTM International Carpet Cleaning Effectiveness Test (ASTM Test F608). Low suction or pick up Possible cause Possible solution • Broken or worn belt • Replace belt • Agitator brush roll worn • Replace brush roll • Dirt cup full • Empty cup • Incorrect carpet height setting • Move nozzle control knob to a blockage in the Maintenance section. Check fullness of authorized service outlet locations (U.S. Household" OR - • checking the list of Factory Service Centers provided with...

Manual
Page 12
.... 1. Turn cleaner OFF and unplug. 9. Warranty service can only be required before service is suction, continue with the Owner's Manual against original defects in accordance with step 8. however, if you mail your appliance to a Hoover Factory Service Center for warranty service, transportation will be obtained by a limited one of purchase. If further assistance is used in correct operating condition during the warranted period. Remove hose end...
.... 1. Turn cleaner OFF and unplug. 9. Warranty service can only be required before service is suction, continue with the Owner's Manual against original defects in accordance with step 8. however, if you mail your appliance to a Hoover Factory Service Center for warranty service, transportation will be obtained by a limited one of purchase. If further assistance is used in correct operating condition during the warranted period. Remove hose end...


