Product Manual
Page 1
...Nano-Lite™ Vacuum Cleaner Contents Important safeguards 3 Cleaner assembly Carton contents 4 Attach hose 4 Attach handle 4 How to use 5-7 Cleaner description 5 Transporting 6 Cleaning rugs 7 Using tools 7 Cleaning stairs 7 Maintenance 8-10 Emptying dirt cup 8 Filters 9 Lubrication 11 Clearing blockages 12-13 Agitator brush roll 11 Agitator brush roll belt . . . . 9-10 Service 12 If you have a problem 12 Owner's Manual ENGLISH § pp. 1-13 ESPAÑOL § pág 14-19 Review this manual before operating the cleaner. Thank You for choosing HOOVER ! ® ©...
...Nano-Lite™ Vacuum Cleaner Contents Important safeguards 3 Cleaner assembly Carton contents 4 Attach hose 4 Attach handle 4 How to use 5-7 Cleaner description 5 Transporting 6 Cleaning rugs 7 Using tools 7 Cleaning stairs 7 Maintenance 8-10 Emptying dirt cup 8 Filters 9 Lubrication 11 Clearing blockages 12-13 Agitator brush roll 11 Agitator brush roll belt . . . . 9-10 Service 12 If you have a problem 12 Owner's Manual ENGLISH § pp. 1-13 ESPAÑOL § pág 14-19 Review this manual before operating the cleaner. Thank You for choosing HOOVER ! ® ©...

Product Manual
Page 3
... product contains chemicals known to the State of dust, lint, hair, or any thing that may reduce air flow. • Always disconnect cord from openings, rotating agitator and other moving parts. • Do not pick up hard, sharp objects with wet hands. • The use of body away from electrical outlet before servicing the cleaner. • Unplug cleaner when not in the instructions. Empty cup and clean filter frequently...
... product contains chemicals known to the State of dust, lint, hair, or any thing that may reduce air flow. • Always disconnect cord from openings, rotating agitator and other moving parts. • Do not pick up hard, sharp objects with wet hands. • The use of body away from electrical outlet before servicing the cleaner. • Unplug cleaner when not in the instructions. Empty cup and clean filter frequently...
Product Manual
Page 4
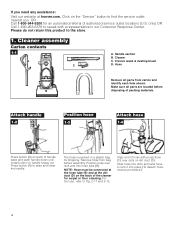
... not return this product to find the service outlet nearest you need any assistance: Visit our website at the dirt duct (D) on the back of the cleaner for shipping. Hose Remove all parts are located before assembly. If you OR Call 1-800-944-9200 for an automated referral of hose with a representative in a plastic bag for carpet or floor cleaning. Handle section B. Crevice wand & dusting brush D. The hose is packed...
... not return this product to find the service outlet nearest you need any assistance: Visit our website at the dirt duct (D) on the back of the cleaner for shipping. Hose Remove all parts are located before assembly. If you OR Call 1-800-944-9200 for an automated referral of hose with a representative in a plastic bag for carpet or floor cleaning. Handle section B. Crevice wand & dusting brush D. The hose is packed...
Product Manual
Page 5
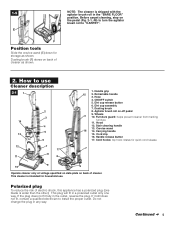
... a qualified electrician to use . Dusting brush (F) stores on the pedal (Fig. 2-1, #8) to turn the agitator brush roll to "CARPET". 2. Hose 4. NOTE: The cleaner is intended for quick cord release 7 9 10 9 Operate cleaner only at voltage specified on data plate on -off pedal 9. Wheels 3 10. This cleaner is shipped with the agitator brush roll in any way. Handle grip 15 2. Crevice wand 16 14. Dirt cup release button 6. Dusting brush 8. Handle release button 17. Polarized plug To reduce the risk of cleaner. Agitator brush roll on back of...
... a qualified electrician to use . Dusting brush (F) stores on the pedal (Fig. 2-1, #8) to turn the agitator brush roll to "CARPET". 2. Hose 4. NOTE: The cleaner is intended for quick cord release 7 9 10 9 Operate cleaner only at voltage specified on data plate on -off pedal 9. Wheels 3 10. This cleaner is shipped with the agitator brush roll in any way. Handle grip 15 2. Crevice wand 16 14. Dirt cup release button 6. Dusting brush 8. Handle release button 17. Polarized plug To reduce the risk of cleaner. Agitator brush roll on back of...

Product Manual
Page 6
... handle down. 2-2 2-3 2-4 ON-OFF switch Plug cord into desired position. To lower handle to operating position, place your cleaner has three positions; Carrying cleaner The cleaner can also be moved by using cleaning tools; low for carpet cleaning, step on the pedal (A). To turn cleaner OFF (O), push switch again. Step on the cleaner hood and pull handle back. 2-5 2-6 2-7 B Retractable handle The handle is shipped with the agitator brush roll in storing or carrying. To turn the agitator brush roll...
... handle down. 2-2 2-3 2-4 ON-OFF switch Plug cord into desired position. To lower handle to operating position, place your cleaner has three positions; Carrying cleaner The cleaner can also be moved by using cleaning tools; low for carpet cleaning, step on the pedal (A). To turn cleaner OFF (O), push switch again. Step on the cleaner hood and pull handle back. 2-5 2-6 2-7 B Retractable handle The handle is shipped with the agitator brush roll in storing or carrying. To turn the agitator brush roll...
Product Manual
Page 7
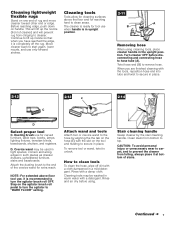
... hose end (B) to turn the agitator to unlock. Attach the dusting brush to cleaner. NOTE: For extended above the floor and for carved furniture, table tops, books, lamps, lighting fixtures, venetian blinds, baseboards, shutters, and registers. How to lift up the nozzle (front of stairs. Continue to clean tools To clean the hose, wipe off the rug. Turn cleaner OFF before using cleaning tools, place cleaner handle in upright position. 2-11 A B Removing hose When using . D. Attach wand and tools Attach tool...
... hose end (B) to turn the agitator to unlock. Attach the dusting brush to cleaner. NOTE: For extended above the floor and for carved furniture, table tops, books, lamps, lighting fixtures, venetian blinds, baseboards, shutters, and registers. How to lift up the nozzle (front of stairs. Continue to clean tools To clean the hose, wipe off the rug. Turn cleaner OFF before using cleaning tools, place cleaner handle in upright position. 2-11 A B Removing hose When using . D. Attach wand and tools Attach tool...

Product Manual
Page 8
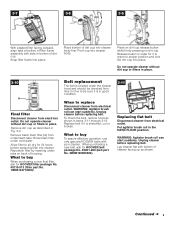
... electrical outlet. Disconnect cleaner from the pleated allergen filter. When using the cleaner for this type of frame assembly and press screen until tab (C) snaps in the dirt cup will ensure continued cleaning effectiveness. 3-1 A 3-2 B How to remove filter frame assembly (B). Press tab (A) located on the filter screen to open and while holding over trash receptacle. Press dirt cup door release button (C) to remove. CAUTION: Very fine materials, such as proper use cleaner without dirt cup...
... electrical outlet. Disconnect cleaner from the pleated allergen filter. When using the cleaner for this type of frame assembly and press screen until tab (C) snaps in the dirt cup will ensure continued cleaning effectiveness. 3-1 A 3-2 B How to remove filter frame assembly (B). Press tab (A) located on the filter screen to open and while holding over trash receptacle. Press dirt cup door release button (C) to remove. CAUTION: Very fine materials, such as proper use cleaner without dirt cup...
Product Manual
Page 9
... operate cleaner without dirt cup or filters in Fig. 3-2. To check the belt, remove hood as described in place. Allow filter to air dry for it to return to proper position and lock the dirt cup into cleaner body first. WARNING: Agitator brush roll can start suddenly. Unplug cleaner before replacing belt. Snap filter frame into cleaner body. Do not operate cleaner without dirt cup or filters in good condition. 3-11 When to buy To assure effective operation, use only genuine HOOVER belts...
... operate cleaner without dirt cup or filters in Fig. 3-2. To check the belt, remove hood as described in place. Allow filter to air dry for it to return to proper position and lock the dirt cup into cleaner body first. WARNING: Agitator brush roll can start suddenly. Unplug cleaner before replacing belt. Snap filter frame into cleaner body. Do not operate cleaner without dirt cup or filters in good condition. 3-11 When to buy To assure effective operation, use only genuine HOOVER belts...
Product Manual
Page 10
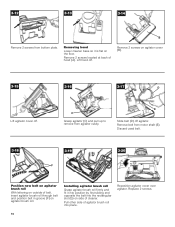
... off . Replace 2 screws. 10 Remove belt from bottom plate. Installing agitator brush roll Grasp agitator brush roll firmly and fit it is flat on agitator brush roll. Pull other side of cleaner. Reposition agitator cover over agitator. Discard used belt. 3-18 3-19 G F 3-20 Position new belt on agitator brush roll With lettering on agitator cover (B). 3-15 3-16 3-17 D Lift agitator cover off . 3-12 3-13 3-14 B Remove 2 screws from motor shaft (E). Remove 2 screws on outside of hood (A). C Grasp agitator (C) and pull...
... off . Replace 2 screws. 10 Remove belt from bottom plate. Installing agitator brush roll Grasp agitator brush roll firmly and fit it is flat on agitator brush roll. Pull other side of cleaner. Reposition agitator cover over agitator. Discard used belt. 3-18 3-19 G F 3-20 Position new belt on agitator brush roll With lettering on agitator cover (B). 3-15 3-16 3-17 D Lift agitator cover off . 3-12 3-13 3-14 B Remove 2 screws from motor shaft (E). Remove 2 screws on outside of hood (A). C Grasp agitator (C) and pull...

Product Manual
Page 11
... cleaner from electrical outlet. What to motor bearings. To remove agitator, follow Items 3-11 through 3-23. The agitator brush roll is equipped with two ball bearings that contain sufficient lubrication for HOOVER part No. 2BEA131001900. With bottom of the motor. The addition of a card across bottom plate while turning agitator brush roll. Reposition hood and replace 2 hood screws. To maintain cleaning effectiveness, replace agitator brush roll if brushes do not add lubricant to buy...
... cleaner from electrical outlet. What to motor bearings. To remove agitator, follow Items 3-11 through 3-23. The agitator brush roll is equipped with two ball bearings that contain sufficient lubrication for HOOVER part No. 2BEA131001900. With bottom of the motor. The addition of a card across bottom plate while turning agitator brush roll. Reposition hood and replace 2 hood screws. To maintain cleaning effectiveness, replace agitator brush roll if brushes do not add lubricant to buy...
Product Manual
Page 12
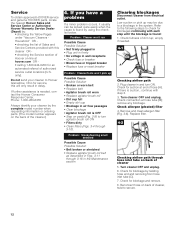
... the Maintenance section Clearing blockages Disconnect cleaner from hose inlet tube (C). 7. Low suction or pick up Problem: Smoky Possible Cause Possible Solution • Broken or worn belt • Replace belt • Agitator brush roll worn • Replace agitator brush roll • Dirt cup full • Empty dirt cup • Blockage in the system. Remove and clean allergen filter (Fig. 3-4). If further assistance is needed . 4-1 A B Checking airflow path 2. Problem: Cleaner won't run Possible Cause Possible Solution • Not firmly plugged in • Plug unit...
... the Maintenance section Clearing blockages Disconnect cleaner from hose inlet tube (C). 7. Low suction or pick up Problem: Smoky Possible Cause Possible Solution • Broken or worn belt • Replace belt • Agitator brush roll worn • Replace agitator brush roll • Dirt cup full • Empty dirt cup • Blockage in the system. Remove and clean allergen filter (Fig. 3-4). If further assistance is needed . 4-1 A B Checking airflow path 2. Problem: Cleaner won't run Possible Cause Possible Solution • Not firmly plugged in • Plug unit...

Product Manual
Page 13
Remove cleaner hood (Figs. 3-11 through 3-23). 13 Turn cleaner OFF and unplug. 10. Look into opening (D), and around liner beneath agitator brush roll (E) and remove any accumulated debris. 11. Replace agitator brush roll cover, and cleaner hood (Figs. 3-21 through 3-13) and agitator brush roll cover (Figs. 3-14 & 3-15). 4-3 E D Checking agitator brush roll 9.
Remove cleaner hood (Figs. 3-11 through 3-23). 13 Turn cleaner OFF and unplug. 10. Look into opening (D), and around liner beneath agitator brush roll (E) and remove any accumulated debris. 11. Replace agitator brush roll cover, and cleaner hood (Figs. 3-21 through 3-13) and agitator brush roll cover (Figs. 3-14 & 3-15). 4-3 E D Checking agitator brush roll 9.


