Manual
Page 1
... 6 Cleaning rugs 7 Using tools 7 Cleaning stairs 7 Maintenance 8-10 Emptying dirt cup 8 Filters 9 Lubrication 11 Clearing blockages 12-13 Agitator brush roll 11 Agitator brush roll belt . . . . 9-10 Service 12 If you have a problem 12 Warranty 13 Parts & accessories mail reorder form 27 Owner's Manual ENGLISH § pp. 1-13 ESPAÑOL... § pág 14-19 FRANÇAIS § p. 20-25 Review this manual before operating the cleaner. Thank You for choosing HOOVER ! ® © 2006 The Hoover Company
... 6 Cleaning rugs 7 Using tools 7 Cleaning stairs 7 Maintenance 8-10 Emptying dirt cup 8 Filters 9 Lubrication 11 Clearing blockages 12-13 Agitator brush roll 11 Agitator brush roll belt . . . . 9-10 Service 12 If you have a problem 12 Warranty 13 Parts & accessories mail reorder form 27 Owner's Manual ENGLISH § pp. 1-13 ESPAÑOL... § pág 14-19 FRANÇAIS § p. 20-25 Review this manual before operating the cleaner. Thank You for choosing HOOVER ! ® © 2006 The Hoover Company
Manual
Page 9
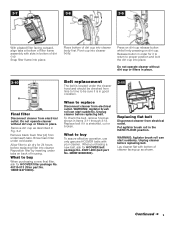
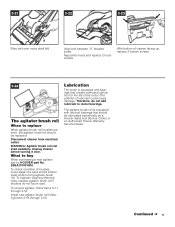
...dirt cup into place. Pivot cup into cleaner. Remove black foam filter (A) from electrical outlet. To check the belt, remove hood as shown in place. Replace belt if it is in order for HOOVER filter package No. 40110-013 (filter part No. 1BEB124710000). Put agitator brush roll in place. 3-10 A ...housing. Rinse foam filter under the cleaner hood and should be sure it to return to buy To assure effective operation, use only genuine HOOVER belts with bottom of cleaner facing up as described in bottom of dirt cup. Lay cleaner flat with your cleaner. Do not operate cleaner ...
...dirt cup into place. Pivot cup into cleaner. Remove black foam filter (A) from electrical outlet. To check the belt, remove hood as shown in place. Replace belt if it is in order for HOOVER filter package No. 40110-013 (filter part No. 1BEB124710000). Put agitator brush roll in place. 3-10 A ...housing. Rinse foam filter under the cleaner hood and should be sure it to return to buy To assure effective operation, use only genuine HOOVER belts with bottom of cleaner facing up as described in bottom of dirt cup. Lay cleaner flat with your cleaner. Do not operate cleaner ...
Manual
Page 10
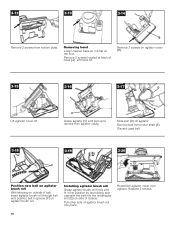
... into position by first sliding end opposite the belt into place. C Grasp agitator (C) and pull up to remove from motor shaft (E). E Slide belt (D) off . Replace 2 screws. 10 Remove belt from agitator cavity. Discard used belt. 3-18 3-19 G F 3-20 Position new belt on agitator brush roll With lettering on outside ... agitator brush roll firmly and fit it is flat on agitator brush roll. Remove 2 screws located at back of belt, insert agitator brush roll through belt and position belt in groove (F) on the floor. 3-12 3-13 3-14 B Remove 2 screws from bottom plate.
... into position by first sliding end opposite the belt into place. C Grasp agitator (C) and pull up to remove from motor shaft (E). E Slide belt (D) off . Replace 2 screws. 10 Remove belt from agitator cavity. Discard used belt. 3-18 3-19 G F 3-20 Position new belt on agitator brush roll With lettering on outside ... agitator brush roll firmly and fit it is flat on agitator brush roll. Remove 2 screws located at back of belt, insert agitator brush roll through belt and position belt in groove (F) on the floor. 3-12 3-13 3-14 B Remove 2 screws from bottom plate.
Manual
Page 11
...Disconnect cleaner from electrical outlet. Install new agitator brush roll following Items 3-19 through 3-16. Therefore, do not touch card. Align belt between "U" shaped posts. WARNING: Agitator brush roll can start suddenly. To check condition of brushes, move edge of the motor.... worn, the agitator brush roll should be replaced. The agitator brush roll is equipped with two ball bearings that contain sufficient lubrication for HOOVER part No. 2BEA131001900. What to motor bearings. Reposition hood and replace 2 hood screws. To remove agitator, follow Items 3-11 through 3-23...
...Disconnect cleaner from electrical outlet. Install new agitator brush roll following Items 3-19 through 3-16. Therefore, do not touch card. Align belt between "U" shaped posts. WARNING: Agitator brush roll can start suddenly. To check condition of brushes, move edge of the motor.... worn, the agitator brush roll should be replaced. The agitator brush roll is equipped with two ball bearings that contain sufficient lubrication for HOOVER part No. 2BEA131001900. What to motor bearings. Reposition hood and replace 2 hood screws. To remove agitator, follow Items 3-11 through 3-23...
Manual
Page 12
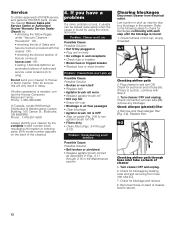
... & Warehousing, Carson Building; 100 Carson St.; Low suction or pick up Problem: Smoky Possible Cause Possible Solution • Broken or worn belt • Replace belt • Agitator brush roll worn • Replace agitator brush roll • Dirt cup full • Empty dirt cup • Blockage ...• Replace agitator brush roll belt as described in Figs. 3-11 through 3-18 in and turn agitator brush roll ON • Filters dirty • Clean filters (Figs. 3-4 through hose inlet tube on back of cleaner 5. empty if needed , contact the Hoover Consumer Response Center, Phone: 1-330...
... & Warehousing, Carson Building; 100 Carson St.; Low suction or pick up Problem: Smoky Possible Cause Possible Solution • Broken or worn belt • Replace belt • Agitator brush roll worn • Replace agitator brush roll • Dirt cup full • Empty dirt cup • Blockage ...• Replace agitator brush roll belt as described in Figs. 3-11 through 3-18 in and turn agitator brush roll ON • Filters dirty • Clean filters (Figs. 3-4 through hose inlet tube on back of cleaner 5. empty if needed , contact the Hoover Consumer Response Center, Phone: 1-330...

