
Product Manual English
Page 1
This product is VOID. © 2020 Techtronic Floor Care Technology Limited. Charlotte, NC 28262. All Rights Reserved. Distributed by, Royal Appliance Mfg. If used Commercially warranty is intended for Household use . Co. USER MANUAL AUTOMATIC CARPET CLEANER IMPORTANT: Read all instructions carefully before assembly and use only. All Rights Reserved. 961152141-R2
This product is VOID. © 2020 Techtronic Floor Care Technology Limited. Charlotte, NC 28262. All Rights Reserved. Distributed by, Royal Appliance Mfg. If used Commercially warranty is intended for Household use . Co. USER MANUAL AUTOMATIC CARPET CLEANER IMPORTANT: Read all instructions carefully before assembly and use only. All Rights Reserved. 961152141-R2

Product Manual English
Page 3
Table of Contents Safety Instructions...4 Grounding Instructions...5 What's in the Box...6 Product Guide...7 Tools and Accessories...8 Before You Begin Cleaning...9 Getting Started...10 How to Assemble Your SmartWash Pet Complete Carpet Cleaner 10 Using Your SmartWash Pet Complete Carpet Cleaner 11 Maintenance...13 Troubleshooting...21 Warranty ...23 Français...25 Español...49 3
Table of Contents Safety Instructions...4 Grounding Instructions...5 What's in the Box...6 Product Guide...7 Tools and Accessories...8 Before You Begin Cleaning...9 Getting Started...10 How to Assemble Your SmartWash Pet Complete Carpet Cleaner 10 Using Your SmartWash Pet Complete Carpet Cleaner 11 Maintenance...13 Troubleshooting...21 Warranty ...23 Français...25 Español...49 3

Product Manual English
Page 4
... may reduce air flow. Not intended for use cord as described in . Do not run appliance over floor electrical outlets. Close supervision is not working as a toy. To avoid injury or damage, keep free of this manual. Do not immerse. a door on stairs. To unplug, grasp the plug, not the cord. • Do not handle plug or appliance with any openings. • Use only as a handle, close...
... may reduce air flow. Not intended for use cord as described in . Do not run appliance over floor electrical outlets. Close supervision is not working as a toy. To avoid injury or damage, keep free of this manual. Do not immerse. a door on stairs. To unplug, grasp the plug, not the cord. • Do not handle plug or appliance with any openings. • Use only as a handle, close...

Product Manual English
Page 5
..., avoid contact with a qualified electrician or service person if you are dry. Check with carpets until they are completely dry. • Do not store extractor with this product, as a properly grounded outlet box cover (Fig. 2). The rigid ear, lug, or the like the plug (A) illustrated in place by the Canadian Electrical Code. 2 D F D G E 5 Keep children and pets away from the adapter must be...
..., avoid contact with a qualified electrician or service person if you are dry. Check with carpets until they are completely dry. • Do not store extractor with this product, as a properly grounded outlet box cover (Fig. 2). The rigid ear, lug, or the like the plug (A) illustrated in place by the Canadian Electrical Code. 2 D F D G E 5 Keep children and pets away from the adapter must be...

Product Manual English
Page 7
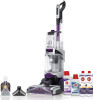
Dirty Water/Recovery Tank 5. Removable FlexForce™ PET PowerBrushes 9. Handle Release Pedal 6 13. Triggerless Handle Design & Removable Spot Chaser Pretreat Wand 1 2. Hose Connection 6. Cord Wrap 5 12. Removable Recovery Nozzle 2 7. On/Off Pedal 7 8 9 10 11 12 13 7 Solution Tank 4 10. Carry Handle 11. Getting to Know Your HOOVER® SmartWash Pet Complete 1. Filter 4. Clean Water Tank 3. Automatic Wash/ Dry LED Display 3 8.
Dirty Water/Recovery Tank 5. Removable FlexForce™ PET PowerBrushes 9. Handle Release Pedal 6 13. Triggerless Handle Design & Removable Spot Chaser Pretreat Wand 1 2. Hose Connection 6. Cord Wrap 5 12. Removable Recovery Nozzle 2 7. On/Off Pedal 7 8 9 10 11 12 13 7 Solution Tank 4 10. Carry Handle 11. Getting to Know Your HOOVER® SmartWash Pet Complete 1. Filter 4. Clean Water Tank 3. Automatic Wash/ Dry LED Display 3 8.

Product Manual English
Page 8
Accessories not included with your model may be used for unpleasant stain removal and hygienic clean-ups. CAUTION Not to be purchased separately by visiting Hoover.com 8 Stair Tool1 Crevice Tool1 Upholstery Tool1 1Tools and Accessories vary per model. The rubber nubs are for grooming a pet. Tools & Accessories: Antimicrobial PET Tool1: Antimicrobial tool that helps prevent bacteria growth and odors.
Accessories not included with your model may be used for unpleasant stain removal and hygienic clean-ups. CAUTION Not to be purchased separately by visiting Hoover.com 8 Stair Tool1 Crevice Tool1 Upholstery Tool1 1Tools and Accessories vary per model. The rubber nubs are for grooming a pet. Tools & Accessories: Antimicrobial PET Tool1: Antimicrobial tool that helps prevent bacteria growth and odors.

Product Manual English
Page 9
... of the product after use plastic or aluminum foil to be cleaned. You will drip from staining carpet. Wait ten minutes and check for color removal or bleed with a dampened white cloth. Pin up drips. Water will also see "Automatic shut-off suction at additional cost if not included with a HOOVER® spot treatment (See HOOVER® Cleaning Solutions Guide) to wood floors underneath...
... of the product after use plastic or aluminum foil to be cleaned. You will drip from staining carpet. Wait ten minutes and check for color removal or bleed with a dampened white cloth. Pin up drips. Water will also see "Automatic shut-off suction at additional cost if not included with a HOOVER® spot treatment (See HOOVER® Cleaning Solutions Guide) to wood floors underneath...

Product Manual English
Page 10
... top of the tank. Fully assemble before operating. Replace cap. 3 Align Clean Water Tank with the body of the cleaner and press FIRMLY into place. 2 Remove the cap and fill with HOOVER® Cleaning Solution to remove the Clean Water Tank. FILL THE CLEAN WATER TANK 1 Lift up to the top of tank. Getting Started With Your SmartWash Carpet Cleaner: ASSEMBLY 1 Slide the handle into place. Replace cap. 3 Place the Solution...
... top of the tank. Fully assemble before operating. Replace cap. 3 Align Clean Water Tank with the body of the cleaner and press FIRMLY into place. 2 Remove the cap and fill with HOOVER® Cleaning Solution to remove the Clean Water Tank. FILL THE CLEAN WATER TANK 1 Lift up to the top of tank. Getting Started With Your SmartWash Carpet Cleaner: ASSEMBLY 1 Slide the handle into place. Replace cap. 3 Place the Solution...

Product Manual English
Page 11
Using Your SmartWash Pet Complete Carpet Cleaner CAUTION Not to be used for grooming a pet. 1 Unwrap the power cord and plug cleaner in an electrical outlet. 3 Step on the On/Off Pedal to turn ON. 2 Step on the Handle Release Pedal to recline the cleaner to cleaning position. 11
Using Your SmartWash Pet Complete Carpet Cleaner CAUTION Not to be used for grooming a pet. 1 Unwrap the power cord and plug cleaner in an electrical outlet. 3 Step on the On/Off Pedal to turn ON. 2 Step on the Handle Release Pedal to recline the cleaner to cleaning position. 11

Product Manual English
Page 12
Using Your SmartWash Pet Complete Carpet Cleaner 4 Slowly move forward. The cleaner will automatically dispense the optimal amount of water and cleaning solution. 6 When you finish cleaning but further drying is visibly passing through 6. 12 CLEANING FLUID SEE THE HOOVER'S SOLUTIONS GUIDE insert or visit Hoover.com/cleaning-solutions. The cleaner will automatically dry your carpets. Continue in this mode until little water is required, press the DRY ONLY BUTTON. This will extract remaining water from...
Using Your SmartWash Pet Complete Carpet Cleaner 4 Slowly move forward. The cleaner will automatically dispense the optimal amount of water and cleaning solution. 6 When you finish cleaning but further drying is visibly passing through 6. 12 CLEANING FLUID SEE THE HOOVER'S SOLUTIONS GUIDE insert or visit Hoover.com/cleaning-solutions. The cleaner will automatically dry your carpets. Continue in this mode until little water is required, press the DRY ONLY BUTTON. This will extract remaining water from...

Product Manual English
Page 13
Maintenance How to maintain strong suction performance. 13 Remove Tank from electrical outlet. 3 Place on a flat surface and unlatch Dirty Water Tank lid to remove top of tank. 2 Grab the Dirty Water Tank handle and pull up to release. Keeping the filter clean is equipped with a shut off , empty the Dirty Water Tank. Auto Shut Off Float: Your carpet cleaner is critical to Empty This product contains...
Maintenance How to maintain strong suction performance. 13 Remove Tank from electrical outlet. 3 Place on a flat surface and unlatch Dirty Water Tank lid to remove top of tank. 2 Grab the Dirty Water Tank handle and pull up to release. Keeping the filter clean is equipped with a shut off , empty the Dirty Water Tank. Auto Shut Off Float: Your carpet cleaner is critical to Empty This product contains...

Product Manual English
Page 14
... and (b) place cleaner on an absorbent material (such as a towel) to soak up drips. 14 Water will drip from the brushes and underside of the product after use and may puddle. This removes residual carpet cleaning solution. Continue using dry strokes until little water is properly secured before rinsing carpet. If misplaced, poor or no suction will also see "Automatic shut-off suction at the...
... and (b) place cleaner on an absorbent material (such as a towel) to soak up drips. 14 Water will drip from the brushes and underside of the product after use and may puddle. This removes residual carpet cleaning solution. Continue using dry strokes until little water is properly secured before rinsing carpet. If misplaced, poor or no suction will also see "Automatic shut-off suction at the...

Product Manual English
Page 15
... Nozzle. 4 Position Nozzle onto foot, making sure to remove from carpet cleaner. Maintenance How to Remove and Clean Nozzle 1 To prevent possible leaking, remove and empty Clean Water Tank, Dirty Water Tank and Solution Tank. 2 With handle in the proper position for the cleaner to have proper suction. 5 Slide Nozzle forward to snap into position. 15 The Nozzle must be in upright position, lift up on the Nozzle release then pull Nozzle...
... Nozzle. 4 Position Nozzle onto foot, making sure to remove from carpet cleaner. Maintenance How to Remove and Clean Nozzle 1 To prevent possible leaking, remove and empty Clean Water Tank, Dirty Water Tank and Solution Tank. 2 With handle in the proper position for the cleaner to have proper suction. 5 Slide Nozzle forward to snap into position. 15 The Nozzle must be in upright position, lift up on the Nozzle release then pull Nozzle...

Product Manual English
Page 16
... brush. Attach the plug end to remove. B 2 Press Tab A down until brush snaps in upright position, follow "Nozzle: How to Change and Clean Brushes HOW TO REMOVE 1 To prevent possible leaking, remove Clean Water Tank, Dirty Water Tank and Solution Tank. ! Do not add lubricant to air dry thoroughly before cleaning or servicing. 3 Grab Side A and pull up to the cord. Brush roll may suddenly restart - WARNING ! Allow brushes and underside of dirt/debris...
... brush. Attach the plug end to remove. B 2 Press Tab A down until brush snaps in upright position, follow "Nozzle: How to Change and Clean Brushes HOW TO REMOVE 1 To prevent possible leaking, remove Clean Water Tank, Dirty Water Tank and Solution Tank. ! Do not add lubricant to air dry thoroughly before cleaning or servicing. 3 Grab Side A and pull up to the cord. Brush roll may suddenly restart - WARNING ! Allow brushes and underside of dirt/debris...

Product Manual English
Page 18
... cleaner at top of stairs and work up on the latch to remove tool. CAUTION Not to be used for grooming a pet. 3 Using your carpet, be sure to hose by sliding it onto the connector until it securely locks into place. Placing the handle in the upright position shuts off the FlexForce™ PET PowerBrushes. 2 Connect tool to place the handle in the upright position...
... cleaner at top of stairs and work up on the latch to remove tool. CAUTION Not to be used for grooming a pet. 3 Using your carpet, be sure to hose by sliding it onto the connector until it securely locks into place. Placing the handle in the upright position shuts off the FlexForce™ PET PowerBrushes. 2 Connect tool to place the handle in the upright position...

Product Manual English
Page 19
... front of the Spot Chaser wand to dispense Pretreat solution. 6 Wait 5-10 minutes before use. Tools and Accessories How to Use the Pretreat Wand 1 With the Spot Chaser Pretreat Wand installed into the Spot Chaser handle grip. 4 Press and release the "Wand Release" button next to the Spot Chaser Wand. REMOVING BATTERY 1 Remove battery by removing screws with a HOOVER® spot treatment. (See page 9 instructions). 3 Reinstall Pretreat Bottle by pressing...
... front of the Spot Chaser wand to dispense Pretreat solution. 6 Wait 5-10 minutes before use. Tools and Accessories How to Use the Pretreat Wand 1 With the Spot Chaser Pretreat Wand installed into the Spot Chaser handle grip. 4 Press and release the "Wand Release" button next to the Spot Chaser Wand. REMOVING BATTERY 1 Remove battery by removing screws with a HOOVER® spot treatment. (See page 9 instructions). 3 Reinstall Pretreat Bottle by pressing...

Product Manual English
Page 20
... 2 Attach hose as instructed (page 18). Do not place cleaner on page 10. Always end with HOOVER® solution according to alternate wet and dry strokes as it against Nozzle. the trigger. 3 Place handle in injury or damage. You will not rotate while handle is best to instructions on stairs or furniture, as described in the upright position. 10 Slightly press the tool switch...
... 2 Attach hose as instructed (page 18). Do not place cleaner on page 10. Always end with HOOVER® solution according to alternate wet and dry strokes as it against Nozzle. the trigger. 3 Place handle in injury or damage. You will not rotate while handle is best to instructions on stairs or furniture, as described in the upright position. 10 Slightly press the tool switch...

Product Manual English
Page 21
... product needs servicing within the warranty period, please contact Customer Service at 1-800-844-9200 prior to the store. 21 USE TROUBLESHOOTING GUIDE AS A FIRST STEP TO RESOLVE ANY PROBLEMS YOU MAY BE EXPERIENCING. Troubleshooting: This product contains no serviceable parts. Contact Us: 1-800-944-9200 If you need further assistance: If your carpet washer by the complete model number when requesting information or ordering parts. (The model number of product for model number...
... product needs servicing within the warranty period, please contact Customer Service at 1-800-844-9200 prior to the store. 21 USE TROUBLESHOOTING GUIDE AS A FIRST STEP TO RESOLVE ANY PROBLEMS YOU MAY BE EXPERIENCING. Troubleshooting: This product contains no serviceable parts. Contact Us: 1-800-944-9200 If you need further assistance: If your carpet washer by the complete model number when requesting information or ordering parts. (The model number of product for model number...

Product Manual English
Page 22
... locked in tool on securely. Batteries installed incorrectly or need to be moving in the hose & pump 1. "How to use . Blown fuse or tripped breaker POSSIBLE SOLUTION 1. Replace fuse or reset breaker in firmly. 2. Dirty Water Tank Debris Filter clogged 4. Remove and replace Dirty Water Nozzle. Drop a coin through, clear with broom handle. 1. Check for jams. 2. Air is defective 1. Pump is trapped in forward direction 1. Cleaner is on end of Carpet Cleaner Spot Chaser...
... locked in tool on securely. Batteries installed incorrectly or need to be moving in the hose & pump 1. "How to use . Blown fuse or tripped breaker POSSIBLE SOLUTION 1. Replace fuse or reset breaker in firmly. 2. Dirty Water Tank Debris Filter clogged 4. Remove and replace Dirty Water Nozzle. Drop a coin through, clear with broom handle. 1. Check for jams. 2. Air is defective 1. Pump is trapped in forward direction 1. Cleaner is on end of Carpet Cleaner Spot Chaser...

Product Manual English
Page 23
... consequential damages, disclaimers of this product at 1-800-406-2005. WARRANTY LIMITED WARRANTY FOR HOOVER® PRODUCT FIVE YEAR LIMITED WARRANTY (DOMESTIC USE) If this product. Pick-up, delivery, transportation, and house calls are either (i) repair your warranty. 23 the product if it has been subject to , belts, filters, brush rolls, blower fans, blower and vacuum tubes, and vacuum bags and straps. Damage caused by use and in Warrantor's sole discretion...
... consequential damages, disclaimers of this product at 1-800-406-2005. WARRANTY LIMITED WARRANTY FOR HOOVER® PRODUCT FIVE YEAR LIMITED WARRANTY (DOMESTIC USE) If this product. Pick-up, delivery, transportation, and house calls are either (i) repair your warranty. 23 the product if it has been subject to , belts, filters, brush rolls, blower fans, blower and vacuum tubes, and vacuum bags and straps. Damage caused by use and in Warrantor's sole discretion...


