
Manual
Page 2
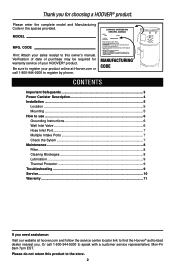
...; product. from ceiling. entre les plafond selon les cas. Manufacturing code Contents Important Safeguards 3 Power Canister Description 4 Installation...5 Location...5 Mounting...5 How to find the Hoover® authorized dealer nearest you. Please do not use ...6 Grounding Instructions 6 Wall Inlet Valve 6 Hose Inlet Port 7 ...choc electrique ne pas utiliser a l'exterieur et ne pas aspiere de matieres humides. Be sure to register your product online at Hoover.com or call 1-800-944-9200 to the store. 2 Please enter the complete model and Manufacturing Code in . Model MFG...
...; product. from ceiling. entre les plafond selon les cas. Manufacturing code Contents Important Safeguards 3 Power Canister Description 4 Installation...5 Location...5 Mounting...5 How to find the Hoover® authorized dealer nearest you. Please do not use ...6 Grounding Instructions 6 Wall Inlet Valve 6 Hose Inlet Port 7 ...choc electrique ne pas utiliser a l'exterieur et ne pas aspiere de matieres humides. Be sure to register your product online at Hoover.com or call 1-800-944-9200 to the store. 2 Please enter the complete model and Manufacturing Code in . Model MFG...
Manual
Page 5
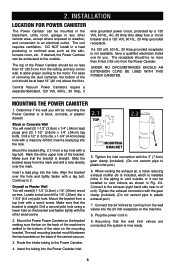
...Mounting the Power Canister 1. Align the bracket over the mark. Make sure that the bracket is not available, have a qualified electrician install one for Power Canister The Power Canister can be exhausted to plastic exhaust port.) 7. The wall mounting bracket must fit between the two...now ready. 3. Mark the other wood screw. 2. Connect to the exhaust (right hand side near to of the Power Canister should be installed to an electrical outlet. Assuming that the bracket is straight. 2. The unit requires ventilation. The top of unit). Determine if the wall you...
...Mounting the Power Canister 1. Align the bracket over the mark. Make sure that the bracket is not available, have a qualified electrician install one for Power Canister The Power Canister can be exhausted to plastic exhaust port.) 7. The wall mounting bracket must fit between the two...now ready. 3. Mark the other wood screw. 2. Connect to the exhaust (right hand side near to of the Power Canister should be installed to an electrical outlet. Assuming that the bracket is straight. 2. The unit requires ventilation. The top of unit). Determine if the wall you...
Manual
Page 6
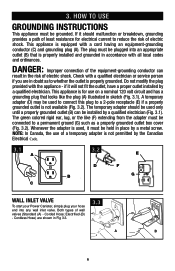
... is not permitted by a qualified electrician. DANGER: Improper connection of least resistance for use of electric shock. This appliance is properly installed and grounded in accordance with the appliance - The green colored rigid ear, lug, or the like the plug (A) illustrated in place...grounded. HOW TO USE Grounding Instructions This appliance must be held in sketch (Fig. 3.1). Corded Hose; Electrified (B) - The plug must be installed by a metal screw. Do not modify the plug provided with all local codes and ordinances. Whenever the adapter is not available (Fig. ...
... is not permitted by a qualified electrician. DANGER: Improper connection of least resistance for use of electric shock. This appliance is properly installed and grounded in accordance with the appliance - The green colored rigid ear, lug, or the like the plug (A) illustrated in place...grounded. HOW TO USE Grounding Instructions This appliance must be held in sketch (Fig. 3.1). Corded Hose; Electrified (B) - The plug must be installed by a metal screw. Do not modify the plug provided with all local codes and ordinances. Whenever the adapter is not available (Fig. ...
Manual
Page 7
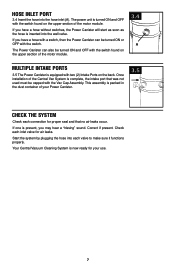
... upper section of the motor module. Correct if present. Your Central Vacuum Cleaning System is complete, the intake port that no air leaks occur. Once installation of the Central Vac System is now ready for your Power Canister. 3.5 Check the System Check each connection for air leaks. The Power Canister can...
... upper section of the motor module. Correct if present. Your Central Vacuum Cleaning System is complete, the intake port that no air leaks occur. Once installation of the Central Vac System is now ready for your Power Canister. 3.5 Check the System Check each connection for air leaks. The Power Canister can...
Manual
Page 8
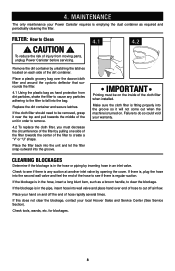
Place a plastic grocery bag over end of hose to create a "V" or "U" shape. MAINTENANCE The only maintenance your local Hoover Sales and Service Center (See Service Section). Filter: How to see if there is emptying the dust container as hand protection from moving parts, unplug ... Canister requires is regular suction. If there is, plug the hose into the second wall valve and feel the end of the cloth filter when installed. If the blockage is any particles adhering to the filter to clear the blockage. Check to Clean ! Place the filter back into the unit and...
Place a plastic grocery bag over end of hose to create a "V" or "U" shape. MAINTENANCE The only maintenance your local Hoover Sales and Service Center (See Service Section). Filter: How to see if there is emptying the dust container as hand protection from moving parts, unplug ... Canister requires is regular suction. If there is, plug the hose into the second wall valve and feel the end of the cloth filter when installed. If the blockage is any particles adhering to the filter to clear the blockage. Check to Clean ! Place the filter back into the unit and...
Manual
Page 9
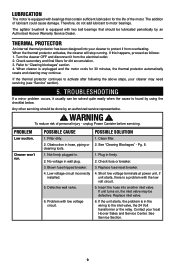
...be defective. Any other servicing should be lubricated periodically by an Authorized Hoover Warranty Service Dealer. Problem with low voltage circuit. 2. The addition of personal injury - POSSIBLE CAUSE 1. Low voltage circuit incorrectly installed. 5. unplug Power Canister before servicing. Cleaner won't run. Check... No voltage in . Insert the hose into your cleaner to activate after following the above steps, your local Hoover Sales and Service Center. Lubrication The motor is equipped with bearings that should be done by an authorized service representative. ...
...be defective. Any other servicing should be lubricated periodically by an Authorized Hoover Warranty Service Dealer. Problem with low voltage circuit. 2. The addition of personal injury - POSSIBLE CAUSE 1. Low voltage circuit incorrectly installed. 5. unplug Power Canister before servicing. Cleaner won't run. Check... No voltage in . Insert the hose into your cleaner to activate after following the above steps, your local Hoover Sales and Service Center. Lubrication The motor is equipped with bearings that should be done by an authorized service representative. ...


