
Manual
Page 1
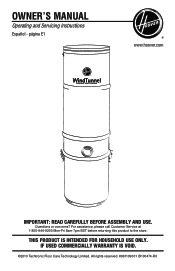
Owner's Manual Operating and Servicing Instructions Español - página E1 www.hoover.com IMPORTANT: READ CAREFULLY BEFORE ASSEMBLY AND USE. Questions or concerns? THIS PRODUCT IS INTENDED FOR HOUSEHOLD USE ONLY. For assistance, please call Customer Service at 1-800-944-9200 Mon-Fri 8am-7pm EST before returning this product to the store. IF USED COMMERCIALLY WARRANTY IS VOID. ©2010 Techtronic Floor Care Technology Limited. All rights reserved. #961109001 ID100474-R0
Owner's Manual Operating and Servicing Instructions Español - página E1 www.hoover.com IMPORTANT: READ CAREFULLY BEFORE ASSEMBLY AND USE. Questions or concerns? THIS PRODUCT IS INTENDED FOR HOUSEHOLD USE ONLY. For assistance, please call Customer Service at 1-800-944-9200 Mon-Fri 8am-7pm EST before returning this product to the store. IF USED COMMERCIALLY WARRANTY IS VOID. ©2010 Techtronic Floor Care Technology Limited. All rights reserved. #961109001 ID100474-R0
Manual
Page 2
... 3 Power Canister Description 4 Installation...5 Location...5 Mounting...5 How to find the Hoover® authorized dealer nearest you need assistance: Visit our website at least 12 in the spaces provided. Be sure to register your sales receipt to the store. 2 Please do not use ...6 Grounding Instructions 6 Wall Inlet Valve 6 Hose Inlet Port 7 Multiple Intake Ports 7 Check the Sytem 7 Maintenance...8 Filter...8 Clearing Blockages 8 Lubrication...9 Thermal Protector 9 Troubleshooting 9 Service...10 Warranty...
... 3 Power Canister Description 4 Installation...5 Location...5 Mounting...5 How to find the Hoover® authorized dealer nearest you need assistance: Visit our website at least 12 in the spaces provided. Be sure to register your sales receipt to the store. 2 Please do not use ...6 Grounding Instructions 6 Wall Inlet Valve 6 Hose Inlet Port 7 Multiple Intake Ports 7 Check the Sytem 7 Maintenance...8 Filter...8 Clearing Blockages 8 Lubrication...9 Thermal Protector 9 Troubleshooting 9 Service...10 Warranty...
Manual
Page 3
... cord, use with any openings blocked: keep free of body away from electrical outlet before servicing motorized nozzle. • The hose contains electrical wires. WARNING: TO REDUCE THE RISK OF FIRE, ELECTRIC SHOCK OR INJURY: • Do not use if damaged, cut, or punctured. Do not use on models including a filter bag. IMPORTANT SAFETY INSTRUCTIONS SAVE THESE INSTRUCTIONS When using accessory kits, note these additional Safeguards: • Do not use powered nozzle outdoors. • Keep...
... cord, use with any openings blocked: keep free of body away from electrical outlet before servicing motorized nozzle. • The hose contains electrical wires. WARNING: TO REDUCE THE RISK OF FIRE, ELECTRIC SHOCK OR INJURY: • Do not use if damaged, cut, or punctured. Do not use on models including a filter bag. IMPORTANT SAFETY INSTRUCTIONS SAVE THESE INSTRUCTIONS When using accessory kits, note these additional Safeguards: • Do not use powered nozzle outdoors. • Keep...
Manual
Page 4
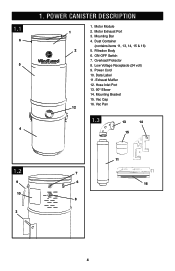
1.1 6 5 4 1. Mounting Bar 4. Power Cord 10. Hose Inlet Port 13. 90° Elbow 14. Vac Pan 1.3 13 14 15 1.2 9 10 3 11 7 6 16 8 4 Filtration Body 6. ON-OFF Switch 7. Data Label 11. Vac Cap 16. Exhaust Muffler 12. Mounting Bracket 15. Low Voltage Receptacle (24 volt) 9. Motor Exhaust Port 3. Overload Protector 8. Motor Module 2. Dust Container (contains items 11, 13, 14, 15 & 16) 5. POWER CANISTER DESCRIPTION 1 1 2 12 1.
1.1 6 5 4 1. Mounting Bar 4. Power Cord 10. Hose Inlet Port 13. 90° Elbow 14. Vac Pan 1.3 13 14 15 1.2 9 10 3 11 7 6 16 8 4 Filtration Body 6. ON-OFF Switch 7. Data Label 11. Vac Cap 16. Exhaust Muffler 12. Mounting Bracket 15. Low Voltage Receptacle (24 volt) 9. Motor Exhaust Port 3. Overload Protector 8. Motor Module 2. Dust Container (contains items 11, 13, 14, 15 & 16) 5. POWER CANISTER DESCRIPTION 1 1 2 12 1.
Manual
Page 5
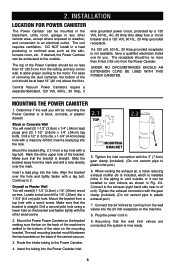
.../ drywall. Connect to the exhaust (right hand side near to the outside or it can be at least 18" (46 cm) above the floor. x 1-3/4" (4.4 cm) pilot hole. Plug the power cord in a heat producing or confined area such as shown in the piping to plastic exhaust port.) 7. INSTALLATION Location for you will need (2) 1-1/2" (3.8cm) x 1/4" (.64cm) wood screws. Block...
.../ drywall. Connect to the exhaust (right hand side near to the outside or it can be at least 18" (46 cm) above the floor. x 1-3/4" (4.4 cm) pilot hole. Plug the power cord in a heat producing or confined area such as shown in the piping to plastic exhaust port.) 7. INSTALLATION Location for you will need (2) 1-1/2" (3.8cm) x 1/4" (.64cm) wood screws. Block...
Manual
Page 6
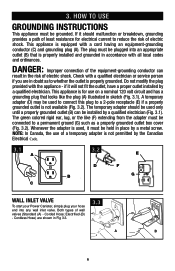
... must be installed by the Canadian Electrical Code. 3.1 A 3.2 E D F BGROUNDING OUTLET BOX G C Wall Inlet Valve To start your Power Canister, simply plug your hose end into an appropriate outlet (B) that is not permitted by a qualified electrician (Fig. 3.1). The temporary adapter should malfunction or breakdown, grounding provides a path of least resistance for use of electric shock. Both types of electric shock. Cordless Hose) are in...
... must be installed by the Canadian Electrical Code. 3.1 A 3.2 E D F BGROUNDING OUTLET BOX G C Wall Inlet Valve To start your Power Canister, simply plug your hose end into an appropriate outlet (B) that is not permitted by a qualified electrician (Fig. 3.1). The temporary adapter should malfunction or breakdown, grounding provides a path of least resistance for use of electric shock. Both types of electric shock. Cordless Hose) are in...
Manual
Page 7
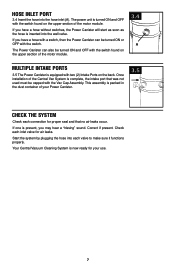
... is now ready for your Power Canister. 3.5 Check the System Check each valve to make sure it functions properly. This assembly is packed in the dust container of the Central Vac System is equipped with the switch found on the back. Once installation of your use. 7 Hose Inlet Port 3.4 Insert the hose into the hose inlet (A). The Power Canister can be turned ON or OFF with...
... is now ready for your Power Canister. 3.5 Check the System Check each valve to make sure it functions properly. This assembly is packed in the dust container of the Central Vac System is equipped with the switch found on the back. Once installation of your use. 7 Hose Inlet Port 3.4 Insert the hose into the hose inlet (A). The Power Canister can be turned ON or OFF with...
Manual
Page 8
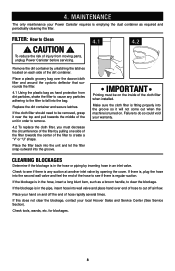
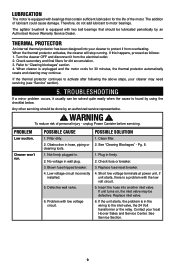
... hose into the bag. Clearing Blockages Determine if the blockage is emptying the dust container as hand protection from moving parts, unplug Power Canister before servicing. If the blockage is in order to remove. 4.2 To replace the cloth filter, you must be removed, grasp it will not come out when the machine is turned on and off air flow. Check tools, wands, etc. for blockages. 8 MAINTENANCE The only maintenance...
... hose into the bag. Clearing Blockages Determine if the blockage is emptying the dust container as hand protection from moving parts, unplug Power Canister before servicing. If the blockage is in order to remove. 4.2 To replace the cloth filter, you must be removed, grasp it will not come out when the machine is turned on and off air flow. Check tools, wands, etc. for blockages. 8 MAINTENANCE The only maintenance...
Manual
Page 9
... Authorized Hoover Warranty Service Dealer. PROBLEM Low suction. Cleaner won't run. See "Clearing Blockages" - No voltage in hose, piping or cleaning tools. 1. Check fuse or breaker. 3. Replace fuse/reset breaker. 4. Short low voltage terminals at power unit, if unit starts, there is equipped with bearings that should be solved quite easily when the cause is in the wiring to motor bearings. The agitator brushroll is unplugged and the motor cools for dirt accumulation. 3. Turn the cleaner OFF...
... Authorized Hoover Warranty Service Dealer. PROBLEM Low suction. Cleaner won't run. See "Clearing Blockages" - No voltage in hose, piping or cleaning tools. 1. Check fuse or breaker. 3. Replace fuse/reset breaker. 4. Short low voltage terminals at power unit, if unit starts, there is equipped with bearings that should be solved quite easily when the cause is in the wiring to motor bearings. The agitator brushroll is unplugged and the motor cools for dirt accumulation. 3. Turn the cleaner OFF...
Manual
Page 10
... Hoover® Warranty Service Dealer (Depot) by the complete model number when requesting information or ordering parts. (The model number appears on the side of authorized service outlet locations call 1-800-944-9200; Do not send your vacuum by : • Checking the Yellow Pages under "Vacuum Cleaners" or "Household". • Visit our website at hoover.com. Always identify your vacuum to find the service outlet nearest you need...
... Hoover® Warranty Service Dealer (Depot) by the complete model number when requesting information or ordering parts. (The model number appears on the side of authorized service outlet locations call 1-800-944-9200; Do not send your vacuum by : • Checking the Yellow Pages under "Vacuum Cleaners" or "Household". • Visit our website at hoover.com. Always identify your vacuum to find the service outlet nearest you need...
Manual
Page 11
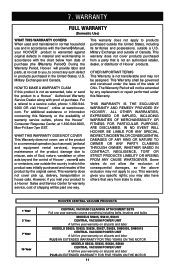
... to a Hoover¨ Authorized Warranty Service Dealer along with the chart below from state to correct any replacement or repair performed under the laws of the state of the product by any such defect in products purchased in a commercial operation (such as warranted, take or send the product to you , to state. 1 Year 5 Year 7 Year 10 Year HOOVER CENTRAL VACUUM PRODUCTS CENTRAL VACUUM CLEANING ATTACHMENT SETS Full...
... to a Hoover¨ Authorized Warranty Service Dealer along with the chart below from state to correct any replacement or repair performed under the laws of the state of the product by any such defect in products purchased in a commercial operation (such as warranted, take or send the product to you , to state. 1 Year 5 Year 7 Year 10 Year HOOVER CENTRAL VACUUM PRODUCTS CENTRAL VACUUM CLEANING ATTACHMENT SETS Full...


