Product Manual
Page 2
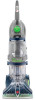
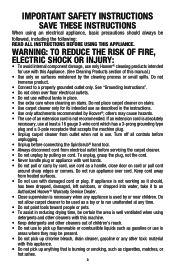
...Attach your sales receipt to this product to the store. 2 only) or to register by phone. Please enter the complete model and Manufacturing Code in China Manufacturing code (Label located on bottom of cleaner) Contents Important Safeguards 3 Cleaner Assembly...5 How To Use...7 Cleaner Description 7 The Tanks...8 How to register your HOOVER...the spaces provided. Please do not return this owner's manual. Follow the authorized dealer locator link to find the Hoover® authorized dealer nearest you or call 1-800-944-9200 to speak with a customer service representative; Fri ...
...Attach your sales receipt to this product to the store. 2 only) or to register by phone. Please enter the complete model and Manufacturing Code in China Manufacturing code (Label located on bottom of cleaner) Contents Important Safeguards 3 Cleaner Assembly...5 How To Use...7 Cleaner Description 7 The Tanks...8 How to register your HOOVER...the spaces provided. Please do not return this owner's manual. Follow the authorized dealer locator link to find the Hoover® authorized dealer nearest you or call 1-800-944-9200 to speak with a customer service representative; Fri ...
Product Manual
Page 3
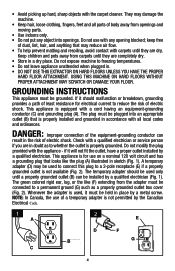
...: • To avoid internal component damage, use only Hoover® cleaning products intended for its intended use as described in areas where they may cause hazards. • The use cord as gasoline or use in the instructions. • Use only attachments recommended by cord, use of children's reach. •...To unplug, grasp the plug, not the cord. • Never handle plug or appliance with wet hands. • Do not pull or carry by Hoover®; Do not run unattended at least a 16 gauge 3-wire cord which has a 3-prong grounding type plug and a 3-pole receptacle that is burning ...
...: • To avoid internal component damage, use only Hoover® cleaning products intended for its intended use as described in areas where they may cause hazards. • The use cord as gasoline or use in the instructions. • Use only attachments recommended by cord, use of children's reach. •...To unplug, grasp the plug, not the cord. • Never handle plug or appliance with wet hands. • Do not pull or carry by Hoover®; Do not run unattended at least a 16 gauge 3-wire cord which has a 3-prong grounding type plug and a 3-pole receptacle that is burning ...
Product Manual
Page 4
...and moving parts. • Use indoors only. • Do not put any opening blocked; USING THIS MACHINE ON HARD FLOORS WITHOUT PROPER ATTACHMENT MAY SCRATCH OR DAMAGE YOUR FLOOR. Whenever the adapter is properly installed and grounded in . • DO NOT USE THIS EXTRACTOR ON ...HARD FLOORS UNLESS YOU HAVE THE PROPER HARD FLOOR ATTACHMENT. Grounding Instructions This appliance must be installed by a qualified electrician. Check with any object into an appropriate outlet (B) that is used, it...
...and moving parts. • Use indoors only. • Do not put any opening blocked; USING THIS MACHINE ON HARD FLOORS WITHOUT PROPER ATTACHMENT MAY SCRATCH OR DAMAGE YOUR FLOOR. Whenever the adapter is properly installed and grounded in . • DO NOT USE THIS EXTRACTOR ON ...HARD FLOORS UNLESS YOU HAVE THE PROPER HARD FLOOR ATTACHMENT. Grounding Instructions This appliance must be installed by a qualified electrician. Check with any object into an appropriate outlet (B) that is used, it...

Product Manual
Page 5
1. Bolts and nuts located in bag but only two or need for assembly. Attach handle 1.2 Remove tank. 1.3 Position cord protector. 1.4 Slide handle down. 1.5 Insert bolts and attach nuts. Upper Handle C. SpinScrub® Brush Assembly Remove all parts are located ...before disposing of packing materials. F. Cleaner B. Accessories not included with your model may be in bag with screwdriver. 1.2 1.3 Cord Protector -V2 1.4 1.5 5 Actual model may be purchased separately by visiting hoover...
1. Bolts and nuts located in bag but only two or need for assembly. Attach handle 1.2 Remove tank. 1.3 Position cord protector. 1.4 Slide handle down. 1.5 Insert bolts and attach nuts. Upper Handle C. SpinScrub® Brush Assembly Remove all parts are located ...before disposing of packing materials. F. Cleaner B. Accessories not included with your model may be in bag with screwdriver. 1.2 1.3 Cord Protector -V2 1.4 1.5 5 Actual model may be purchased separately by visiting hoover...
Product Manual
Page 6
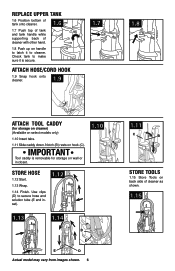
... while supporting back of cleaner as shown. 1.15 Notch (B) rests on select models only) 1.10 Insert tabs. 1.11 Slide caddy down. Attach hose/cord hook 1.9 1.9 Snap hook onto cleaner. 1.7 1.8 Attach tool caddy (for storage on handle to latch it is removable for storage on cleaner) (Available on hook (C). Check tank to make...
... while supporting back of cleaner as shown. 1.15 Notch (B) rests on select models only) 1.10 Insert tabs. 1.11 Slide caddy down. Attach hose/cord hook 1.9 1.9 Snap hook onto cleaner. 1.7 1.8 Attach tool caddy (for storage on handle to latch it is removable for storage on cleaner) (Available on hook (C). Check tank to make...
Product Manual
Page 7
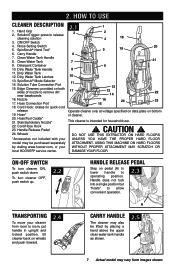
... water tank handle as shown. 2.5 7 Actual model may vary from room to allow convenient operation. 2.3 Transporting To move your WITHOUT PROPER ATTACHMENT MAY SCRATCH OR local HOOVER® service center. Carry Handle 6 7. SpinScrub® Mode Selector 14. Hose* of nozzle to release cleaning solution 2.1 3 1 2... only at voltage specified on data plate on wheels and push forward. 2.4 A Carry handle The cleaner may also be purchased separately ATTACHMENT. Handle Release Pedal ! CAUTION ! 24. DAMAGE YOUR FLOOR. ON-OFF switch To turn cleaner OFF, push switch up. 2.2...
... water tank handle as shown. 2.5 7 Actual model may vary from room to allow convenient operation. 2.3 Transporting To move your WITHOUT PROPER ATTACHMENT MAY SCRATCH OR local HOOVER® service center. Carry Handle 6 7. SpinScrub® Mode Selector 14. Hose* of nozzle to release cleaning solution 2.1 3 1 2... only at voltage specified on data plate on wheels and push forward. 2.4 A Carry handle The cleaner may also be purchased separately ATTACHMENT. Handle Release Pedal ! CAUTION ! 24. DAMAGE YOUR FLOOR. ON-OFF switch To turn cleaner OFF, push switch up. 2.2...
Product Manual
Page 8
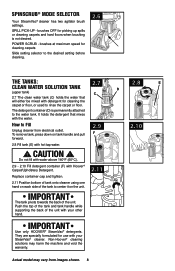
...two agitator brush settings. The detergent container (D) is not desired. brushes OFF for use with your SteamVac® cleaner. Non-Hoover® cleaning solutions may vary from electrical outlet. To remove tank, press down on the unit. 2.11 IMPORTANT The tank...to Fill Unplug cleaner from images shown. 8 CAUTION ! IMPORTANT Use only HOOVER® SteamVac® detergents. They are specially formulated for picking up spills or cleaning carpets and hard floors when brushing is permanently attached to the desired setting before cleaning. 2.6 The tanks: 2.7 2.8 E Clean...
...two agitator brush settings. The detergent container (D) is not desired. brushes OFF for use with your SteamVac® cleaner. Non-Hoover® cleaning solutions may vary from electrical outlet. To remove tank, press down on the unit. 2.11 IMPORTANT The tank...to Fill Unplug cleaner from images shown. 8 CAUTION ! IMPORTANT Use only HOOVER® SteamVac® detergents. They are specially formulated for picking up spills or cleaning carpets and hard floors when brushing is permanently attached to the desired setting before cleaning. 2.6 The tanks: 2.7 2.8 E Clean...
Product Manual
Page 10
...At that time, the yellow float disk will become noticeably higher in place. If your model. Wet a white absorbent cloth with cleaning tool attachments. When cleaning entire floor, move furniture out of the Dirty Water Tank lid (B). To prevent staining, use plastic or aluminum foil to reach...to an Authorized Dealer for "solvent/dry" or "wet" clean). Wait ten minutes and check for colorfastness - Do not use a HOOVER® vacuum cleaner with HOOVER® Spot & Stain Spray Cleaner*- For carpet, use without float and float retainer in pitch. Use a crevice tool to protect ...
...At that time, the yellow float disk will become noticeably higher in place. If your model. Wet a white absorbent cloth with cleaning tool attachments. When cleaning entire floor, move furniture out of the Dirty Water Tank lid (B). To prevent staining, use plastic or aluminum foil to reach...to an Authorized Dealer for "solvent/dry" or "wet" clean). Wait ten minutes and check for colorfastness - Do not use a HOOVER® vacuum cleaner with HOOVER® Spot & Stain Spray Cleaner*- For carpet, use without float and float retainer in pitch. Use a crevice tool to protect ...

Product Manual
Page 13
... only) has rotating brushes for removal. How to help provide the scrubbing action some models, the brushes can be removed for converting to Attach 4.1 Open hose connection port (A). TOOLS Attach hose ! How to snap free if it to Remove 4.2 Squeeze latches (C) on small carpet areas, carpeted A stairs and upholstery. Remove hose from...
... only) has rotating brushes for removal. How to help provide the scrubbing action some models, the brushes can be removed for converting to Attach 4.1 Open hose connection port (A). TOOLS Attach hose ! How to snap free if it to Remove 4.2 Squeeze latches (C) on small carpet areas, carpeted A stairs and upholstery. Remove hose from...
Product Manual
Page 14
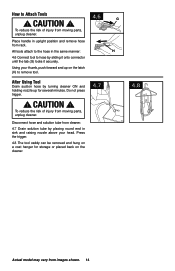
.... 4.8 The tool caddy can be removed and hung on a coat hanger for several minutes. Do not press trigger. ! All tools attach to the hose in the same manner: H 4.6 Connect tool to Attach Tools ! To reduce the risk of injury from rack. After Using Tool Drain suction hose by turning cleaner ON and...
.... 4.8 The tool caddy can be removed and hung on a coat hanger for several minutes. Do not press trigger. ! All tools attach to the hose in the same manner: H 4.6 Connect tool to Attach Tools ! To reduce the risk of injury from rack. After Using Tool Drain suction hose by turning cleaner ON and...

Product Manual
Page 15
... the trigger and pull the tool slowly over carpet without pressing trigger (dry stroke). Release trigger at bottom of carpet. Always end with HOOVER® detergent according to instructions for Figs. 2.9 to alternate wet and dry strokes as instructed in upright position. WARNING ! Empty Dirty Water... handle in faster drying of stairs to clean upper half of stairway and at end of hose. Fill detergent container with dry strokes. Attach hose and solution tube as described above the carpet and push it into a properly grounded outlet. Do not place cleaner on page 10...
... the trigger and pull the tool slowly over carpet without pressing trigger (dry stroke). Release trigger at bottom of carpet. Always end with HOOVER® detergent according to instructions for Figs. 2.9 to alternate wet and dry strokes as instructed in upright position. WARNING ! Empty Dirty Water... handle in faster drying of stairs to clean upper half of stairway and at end of hose. Fill detergent container with dry strokes. Attach hose and solution tube as described above the carpet and push it into a properly grounded outlet. Do not place cleaner on page 10...
Product Manual
Page 16
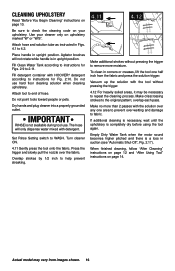
...not point tools toward people or pets. Set Rinse Setting switch to instructions for Figs. 2.9 to fabric. Vacuum up the solution with HOOVER® detergent according to WASH. Make no more moisture. Actual model may be necessary to the original pattern; Be sure to remove ...). The hose will not rotate while handle is not available during tool use hard floor cleaning solution when cleaning upholstery. overlap each pass. Attach tool to 4.2. Overlap strokes by 1/2 inch to help prevent streaking. 4.11 4.12 Make additional strokes without pressing the trigger. 4.12 ...
...not point tools toward people or pets. Set Rinse Setting switch to instructions for Figs. 2.9 to fabric. Vacuum up the solution with HOOVER® detergent according to WASH. Make no more moisture. Actual model may be necessary to the original pattern; Be sure to remove ...). The hose will not rotate while handle is not available during tool use hard floor cleaning solution when cleaning upholstery. overlap each pass. Attach tool to 4.2. Overlap strokes by 1/2 inch to help prevent streaking. 4.11 4.12 Make additional strokes without pressing the trigger. 4.12 ...
Product Manual
Page 21
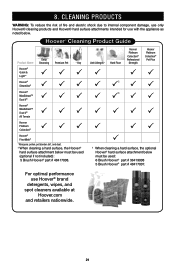
... cleaning a hard surface, the optional Hoover® hard surface attachment below must be used (optional if not included): 5 Brush Hoover® part # 48417008. 87. ...Hoover® SteamVac® Hoover® MaxExtractTM Dual V® Hoover® MaxExtractTM Dual V® All Terrain Hoover Platinum Collection® Hoover® FloorMate® 1 Allergens: pollen, pet dander, dirt, and dust. 2 When cleaning a hard surface, the Hoover® hard surface attachment...
... cleaning a hard surface, the optional Hoover® hard surface attachment below must be used (optional if not included): 5 Brush Hoover® part # 48417008. 87. ...Hoover® SteamVac® Hoover® MaxExtractTM Dual V® Hoover® MaxExtractTM Dual V® All Terrain Hoover Platinum Collection® Hoover® FloorMate® 1 Allergens: pollen, pet dander, dirt, and dust. 2 When cleaning a hard surface, the Hoover® hard surface attachment...

