Product Manual
Page 3
Table of Contents Safety Instructions...4 Carton Contents...6 Product Guide...7 Tools and Accessories...8 Before You Begin Cleaning...9 Getting Started...10 How to Assemble Your SmartWash™ Carpet Cleaner 10 Using your SmartWash™ Carpet Cleaner 11 Maintenance...13 Hoover® Professional Series Solution Guide 20 Troubleshooting...21 Warranty ...23 French...25 Spanish...49 3
Table of Contents Safety Instructions...4 Carton Contents...6 Product Guide...7 Tools and Accessories...8 Before You Begin Cleaning...9 Getting Started...10 How to Assemble Your SmartWash™ Carpet Cleaner 10 Using your SmartWash™ Carpet Cleaner 11 Maintenance...13 Hoover® Professional Series Solution Guide 20 Troubleshooting...21 Warranty ...23 French...25 Spanish...49 3
Product Manual
Page 4
... use without filters and tanks in . WARNING: This product contains chemicals known to the State of California to pick up anything that is necessary when used as it to a service center prior to prevent the cleaner from openings and moving parts. • Turn off all parts of vacuum canister. • Do not leave appliance when plugged in place. • Do not clean over cord. See Grounding Instructions...
... use without filters and tanks in . WARNING: This product contains chemicals known to the State of California to pick up anything that is necessary when used as it to a service center prior to prevent the cleaner from openings and moving parts. • Turn off all parts of vacuum canister. • Do not leave appliance when plugged in place. • Do not clean over cord. See Grounding Instructions...

Product Manual
Page 5
... the Canadian Electrical Code. 2 D D G E F CAUTION: TO REDUCE THE RISK OF DAMAGE: • Avoid picking up drips. 5 Using this plug to a 2-pole receptacle (E) if a properly grounded outlet is equipped with solution in tanks. • With brushes and brush roll on, do not leave the product on wood and laminate surfaces and remove to a hard surface and (b) place unit on hard floors may...
... the Canadian Electrical Code. 2 D D G E F CAUTION: TO REDUCE THE RISK OF DAMAGE: • Avoid picking up drips. 5 Using this plug to a 2-pole receptacle (E) if a properly grounded outlet is equipped with solution in tanks. • With brushes and brush roll on, do not leave the product on wood and laminate surfaces and remove to a hard surface and (b) place unit on hard floors may...

Product Manual
Page 6
Carpet Cleaner Solution Tank Water Tank Upper Handle Accessory Hose *Tools and Accessories vary per model. Accessories not included with your model may be purchased separately by visiting Hoover.com 6 FlexForce™ PowerBrushes 2-in the Box? What's in -1 Antimicrobial Tool* Mesh Tool Storage Bag Sample Bottle of Cleaning Solution
Carpet Cleaner Solution Tank Water Tank Upper Handle Accessory Hose *Tools and Accessories vary per model. Accessories not included with your model may be purchased separately by visiting Hoover.com 6 FlexForce™ PowerBrushes 2-in the Box? What's in -1 Antimicrobial Tool* Mesh Tool Storage Bag Sample Bottle of Cleaning Solution

Product Manual
Page 7
Removable FlexDuo™ PowerBrushes 3 9. Cord Wrap 12. Solution Tank 4 10. On/Off Pedal 6 7 8 9 10 11 12 13 7 Filter 4. Automatic Wash/ Dry LED Display 8. Hose Connection 6. Handle release Pedal 5 13. Dirty Water/Recovery Tank 5. Removable Recovery Nozzle 2 7. Clean Water Tank 3. Getting to Know Your Hoover® SmartWash™ 1. Carry Handle 11. Triggerless Handle Design 1 2.
Removable FlexDuo™ PowerBrushes 3 9. Cord Wrap 12. Solution Tank 4 10. On/Off Pedal 6 7 8 9 10 11 12 13 7 Filter 4. Automatic Wash/ Dry LED Display 8. Hose Connection 6. Handle release Pedal 5 13. Dirty Water/Recovery Tank 5. Removable Recovery Nozzle 2 7. Clean Water Tank 3. Getting to Know Your Hoover® SmartWash™ 1. Carry Handle 11. Triggerless Handle Design 1 2.

Product Manual
Page 9
... Cleaning: Pretreating: Vacuum carpet and upholstery thoroughly with a Hoover spot treatment (see Hoover Cleaning Solution Guide, pg. 18) to help loosen and remove even the most stubborn stains. Gently rub surface with your Hoover carpet cleaner only if upholstery fabric is properly secured before cleaning. ! NOTE: To avoid damage to protect wood or metal surfaces from staining carpet. Do not clean over floor electrical outlets. This removes residual carpet cleaning...
... Cleaning: Pretreating: Vacuum carpet and upholstery thoroughly with a Hoover spot treatment (see Hoover Cleaning Solution Guide, pg. 18) to help loosen and remove even the most stubborn stains. Gently rub surface with your Hoover carpet cleaner only if upholstery fabric is properly secured before cleaning. ! NOTE: To avoid damage to protect wood or metal surfaces from staining carpet. Do not clean over floor electrical outlets. This removes residual carpet cleaning...
Product Manual
Page 10
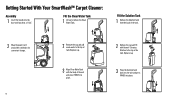
... place. Replace cap. 3 Place the Solution Tank back into the unit and press FIRMLY into place. 2 Remove the cap and fill with the body of the unit. 2 Wrap the power cord around the cord hooks for convenient storage. 10 2 Remove the cap and add warm water to remove the Clean Water Tank. Getting Started With Your SmartWash™ Carpet Cleaner: Assembly 1 Insert the handle into the...
... place. Replace cap. 3 Place the Solution Tank back into the unit and press FIRMLY into place. 2 Remove the cap and fill with the body of the unit. 2 Wrap the power cord around the cord hooks for convenient storage. 10 2 Remove the cap and add warm water to remove the Clean Water Tank. Getting Started With Your SmartWash™ Carpet Cleaner: Assembly 1 Insert the handle into the...

Product Manual
Page 11
Using Your SmartWash™ Carpet Cleaner 1 Unwrap the power cord and plug unit in an electrical outlet. 3 Step on the Power Pedal to turn ON. 2 Step on the Handle Release Pedal to recline the unit for cleaning position. 11
Using Your SmartWash™ Carpet Cleaner 1 Unwrap the power cord and plug unit in an electrical outlet. 3 Step on the Power Pedal to turn ON. 2 Step on the Handle Release Pedal to recline the unit for cleaning position. 11

Product Manual
Page 12
... extract remaining water from your carpets by extracting the water. 7 For best results, Hoover recommends rinsing the carpet with clean water only, remove the Solution Tank and then repeat steps 4 through the nozzle. 5 Slowly pull backward. The Dry Only mode will automatically dry your carpets. To Rinse with clean water only. This will automatically dispense the optimal amount of water and cleaning solution. 6 When your carpet. Using Your SmartWash™ Carpet Cleaner 4 Slowly...
... extract remaining water from your carpets by extracting the water. 7 For best results, Hoover recommends rinsing the carpet with clean water only, remove the Solution Tank and then repeat steps 4 through the nozzle. 5 Slowly pull backward. The Dry Only mode will automatically dry your carpets. To Rinse with clean water only. This will automatically dispense the optimal amount of water and cleaning solution. 6 When your carpet. Using Your SmartWash™ Carpet Cleaner 4 Slowly...

Product Manual
Page 13
... within your dirty water tank. Remove Tank from electrical outlet. 2 Grab the Dirty Water Tank handle and pull up to air dry. Maintenance How to Empty 1 Turn the cleaner off and unplug from carpet cleaner base at an angle. 3 Place on a flat surface and unlatch Dirty Water Tank lid to remove top of tank. 4 Empty tank, rinse, wipe filter clean and allow to release. When the dirty...
... within your dirty water tank. Remove Tank from electrical outlet. 2 Grab the Dirty Water Tank handle and pull up to air dry. Maintenance How to Empty 1 Turn the cleaner off and unplug from carpet cleaner base at an angle. 3 Place on a flat surface and unlatch Dirty Water Tank lid to remove top of tank. 4 Empty tank, rinse, wipe filter clean and allow to release. When the dirty...
Product Manual
Page 14
... Dirty Water Tank: For full suction it is important that the Dirty Water Tank Lid is a loss in place. Continue using dry strokes until little water is properly secured before cleaning. Avoid saturating carpet. Water will drip from the brushes and underside of the product after use and may puddle. Notices ! For heavily soiled areas, repeat. For best results, Hoover recommends rinsing carpet with water...
... Dirty Water Tank: For full suction it is important that the Dirty Water Tank Lid is a loss in place. Continue using dry strokes until little water is properly secured before cleaning. Avoid saturating carpet. Water will drip from the brushes and underside of the product after use and may puddle. Notices ! For heavily soiled areas, repeat. For best results, Hoover recommends rinsing carpet with water...

Product Manual
Page 15
... the tabs at the top of injury from carpet cleaner. To reduce the risk of the Nozzle with the notches inside the foot. 5 Slide Nozzle forward to have proper suction. 15 CAUTION ! Maintenance How to Remove and Clean Nozzle 1 To prevent possible leaking, remove and empty Clean Water Tank, Dirty Water Tank and Solution Tank. 2 With handle in the proper position for the unit...
... the tabs at the top of injury from carpet cleaner. To reduce the risk of the Nozzle with the notches inside the foot. 5 Slide Nozzle forward to have proper suction. 15 CAUTION ! Maintenance How to Remove and Clean Nozzle 1 To prevent possible leaking, remove and empty Clean Water Tank, Dirty Water Tank and Solution Tank. 2 With handle in the proper position for the unit...

Product Manual
Page 16
... risk of carpet cleaner to air dry thoroughly before servicing. HOW TO REPLACE 1 At an angle, align side B on the A other brush. 4 The brushes can be cleaned under running water. Replace on a carpeted or wood surface. Therefore, do not add lubricant to motor bearings or brushrolls. Maintenance How to Change and Clean Brushes HOW TO REMOVE 1 To prevent possible leaking, remove Clean Water Tank, Dirty Water Tank and Solution Tank. 2 With handle in place...
... risk of carpet cleaner to air dry thoroughly before servicing. HOW TO REPLACE 1 At an angle, align side B on the A other brush. 4 The brushes can be cleaned under running water. Replace on a carpeted or wood surface. Therefore, do not add lubricant to motor bearings or brushrolls. Maintenance How to Change and Clean Brushes HOW TO REMOVE 1 To prevent possible leaking, remove Clean Water Tank, Dirty Water Tank and Solution Tank. 2 With handle in place...

Product Manual
Page 17
... TO REMOVE HOSE 1 Press trigger on your cleaner only on end of injury from unit. 2 Close the Hose Port Door back into Hose Solution Port Read "Before You Begin Cleaning" instructions. CAUTION ! Make sure to close door to remove hose and solution connection from moving parts, unplug before servicing. 17 Tools and Accessories HOW TO ATTACH HOSE 1 Open Hose Connection Port. Use your upholstery. Press button on upholstery...
... TO REMOVE HOSE 1 Press trigger on your cleaner only on end of injury from unit. 2 Close the Hose Port Door back into Hose Solution Port Read "Before You Begin Cleaning" instructions. CAUTION ! Make sure to close door to remove hose and solution connection from moving parts, unplug before servicing. 17 Tools and Accessories HOW TO ATTACH HOSE 1 Open Hose Connection Port. Use your upholstery. Press button on upholstery...
Product Manual
Page 18
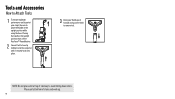
Place unit at top of stairs and work up on the latch to remove tool. Tools and Accessories How to Attach Tools 1 To ensure maximum performance and to protect your carpet, be sure to place the handle in the upright position shuts off the FlexForce™ PowerBrushes. 2 Connect tool to hose by sliding it onto the connector until it securely locks into place. 3 Using your thumb, push forward and up . 18 NOTE: Do not place unit at bottom of stairway to avoid falling down stairs. Placing the handle in the upright position while using the hose.
Place unit at top of stairs and work up on the latch to remove tool. Tools and Accessories How to Attach Tools 1 To ensure maximum performance and to protect your carpet, be sure to place the handle in the upright position shuts off the FlexForce™ PowerBrushes. 2 Connect tool to hose by sliding it onto the connector until it securely locks into place. 3 Using your thumb, push forward and up . 18 NOTE: Do not place unit at bottom of stairway to avoid falling down stairs. Placing the handle in the upright position while using the hose.

Product Manual
Page 19
... will not rotate while handle is best to prevent the cleaner from falling, always place cleaner at the bottom of stairs or on floor. Tools and Accessories Cleaning Carpeted Stairs and Upholstery 1 Read "Before you Begin Cleaning" instruction on page 9. 2 Attached hose as instructed (page 18). 9 Pre-spray the area by ½ inch to help prevent streaking. 6 Attach tool to end of hose. 7 Dry hands and plug cleaner into area...
... will not rotate while handle is best to prevent the cleaner from falling, always place cleaner at the bottom of stairs or on floor. Tools and Accessories Cleaning Carpeted Stairs and Upholstery 1 Read "Before you Begin Cleaning" instruction on page 9. 2 Attached hose as instructed (page 18). 9 Pre-spray the area by ½ inch to help prevent streaking. 6 Attach tool to end of hose. 7 Dry hands and plug cleaner into area...

Product Manual
Page 20
... treatment between cleaning your Carpet Cleaner + Spot Treatment + Solutions. Hoover® Cleaning Solution Guide Use only Hoover cleaning solutions to prevent potential harm to complement your Hoover carpet cleaner and the specific condition of Detergents and Spot Treatments to your carpet cleaner and keep Detergent on hand and store with your carpet cleaner. To prevent project interruption, keep your warranty. EXPERT CLEAN™ SPOT TREATMENT GEL Professional grade targeted gel removes tough stains...
... treatment between cleaning your Carpet Cleaner + Spot Treatment + Solutions. Hoover® Cleaning Solution Guide Use only Hoover cleaning solutions to prevent potential harm to complement your Hoover carpet cleaner and the specific condition of Detergents and Spot Treatments to your carpet cleaner and keep Detergent on hand and store with your carpet cleaner. To prevent project interruption, keep your warranty. EXPERT CLEAN™ SPOT TREATMENT GEL Professional grade targeted gel removes tough stains...

Product Manual
Page 22
... carpet washer is not working as noted. Always identify your product needs servicing within the warranty period, please contact Customer Service at 1-800-944-9200 for further instruction before cleaning or servicing. USE TROUBLESHOOTING GUIDE AS A FIRST STEP TO RESOLVE ANY PROBLEMS YOU MAY BE EXPERIENCING. Need Help? Please do not return this cleaner to internal component damage, use only Hoover cleaning products intended for model number. If appliance is located on the data plate...
... carpet washer is not working as noted. Always identify your product needs servicing within the warranty period, please contact Customer Service at 1-800-944-9200 for further instruction before cleaning or servicing. USE TROUBLESHOOTING GUIDE AS A FIRST STEP TO RESOLVE ANY PROBLEMS YOU MAY BE EXPERIENCING. Need Help? Please do not return this cleaner to internal component damage, use only Hoover cleaning products intended for model number. If appliance is located on the data plate...

Product Manual
Page 23
PROBLEM Cleaner won't run Low suction Hose Nozzle stops spraying liquid during use Accessory Tool will not rotate in upright position. No voltage in cleaner blown 4. Fuse in wall plug 2. Remove tool and clear blockage. 3. Dirty Water Tank Debris Filter clogged 4. Remove and replace Recovery Nozzle. Blockage in upright position 2. Check for jams. 2. Turn on correctly 7. Aim downward & squeeze trigger. 1. Call for up to the floor and hold the trigger for service: 1-800-944-9200. 2. Ensure unit is...
PROBLEM Cleaner won't run Low suction Hose Nozzle stops spraying liquid during use Accessory Tool will not rotate in upright position. No voltage in cleaner blown 4. Fuse in wall plug 2. Remove tool and clear blockage. 3. Dirty Water Tank Debris Filter clogged 4. Remove and replace Recovery Nozzle. Blockage in upright position 2. Check for jams. 2. Turn on correctly 7. Aim downward & squeeze trigger. 1. Call for up to the floor and hold the trigger for service: 1-800-944-9200. 2. Ensure unit is...

Product Manual
Page 24
... WARRANTY (DOMESTIC USE) WHAT THIS WARRANTY COVERS When used and maintained in normal household use of the product in a commercial operation (such as maid, janitorial and equipment rental services), filter, brushroll and belt, improper maintenance of shipping will be paid one nearest you by any such defect in products purchased in the U.S.A., phone: 1-800-944-9200 OR visit Hoover® online at www.hoover.com. you specific...
... WARRANTY (DOMESTIC USE) WHAT THIS WARRANTY COVERS When used and maintained in normal household use of the product in a commercial operation (such as maid, janitorial and equipment rental services), filter, brushroll and belt, improper maintenance of shipping will be paid one nearest you by any such defect in products purchased in the U.S.A., phone: 1-800-944-9200 OR visit Hoover® online at www.hoover.com. you specific...


