
Product Manual
Page 1
All Rights Reserved. IMPORTANT: READ CAREFULLY BEFORE ASSEMBLY AND USE. REPLACEMENT PARTS: Filter: 440012835 Charger: 440010414 ©2018 Techtronic Floor Care Technology Limited. CORDLESS VACUUM USER MANUAL This product is void. If used commercially the warranty is intended for household use only.
All Rights Reserved. IMPORTANT: READ CAREFULLY BEFORE ASSEMBLY AND USE. REPLACEMENT PARTS: Filter: 440012835 Charger: 440010414 ©2018 Techtronic Floor Care Technology Limited. CORDLESS VACUUM USER MANUAL This product is void. If used commercially the warranty is intended for household use only.
Product Manual
Page 3
... know your Hoover® IMPULSE™ Cordless Vacuum...6 What's in the Box? ...7 Assembly...8 Mounting the Wall Bracket...9 Charging your IMPULSE™...10 The Hoover® Dashboard...11 Quick Start ...12 Using your Vacuum...13 Using your Vacuum as a Handheld...14 Using your Vacuum to Clean Up High...15 Maintenance: Emptying the Dirt Cup...16 Maintenance: Cleaning the Filters, Dirt Cup...
... know your Hoover® IMPULSE™ Cordless Vacuum...6 What's in the Box? ...7 Assembly...8 Mounting the Wall Bracket...9 Charging your IMPULSE™...10 The Hoover® Dashboard...11 Quick Start ...12 Using your Vacuum...13 Using your Vacuum as a Handheld...14 Using your Vacuum to Clean Up High...15 Maintenance: Emptying the Dirt Cup...16 Maintenance: Cleaning the Filters, Dirt Cup...

Product Manual
Page 4
Use only Hoover® recommended attachments and products. • Do not use charger with wet hands. &#.... • Do not pull or carry charger by cord, use with any routine cleaning or maintenance. 4 Do not place vacuum on cord. Do not expose appliance to fire or excessive temperature. The batteries can explode in a fire. ... left outdoors, or dropped into any object into openings. See battery disposal section for use without Dirt Cup and/or Filters in place. • Turn power switch off before removing or installing brush roll. • Always turn off this ...
Use only Hoover® recommended attachments and products. • Do not use charger with wet hands. &#.... • Do not pull or carry charger by cord, use with any routine cleaning or maintenance. 4 Do not place vacuum on cord. Do not expose appliance to fire or excessive temperature. The batteries can explode in a fire. ... left outdoors, or dropped into any object into openings. See battery disposal section for use without Dirt Cup and/or Filters in place. • Turn power switch off before removing or installing brush roll. • Always turn off this ...
Product Manual
Page 6
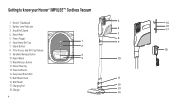
Easy Empty Dirt Cup 8 1 9 7. Reach Wand 4 10 11. Wand Release Button 12. Wall Mount 17. Boost Mode 6 16 17 7 5. Empty Button 2 8. Handheld Release Button HARD BOOST FLOOR MODE 3 10. Powered Nozzle 14. Easy Clean Brush Roll 15. Charger 13 14 6 Swivel Steering 13. Brush Roll Speed 4. Charging Port 12 18. Power Trigger 6. Filter Access and Dirt Cup Release 18 9. Wall Mount Hook 11 16. Getting to know your Hoover® IMPULSE™ Cordless Vacuum 1. Battery Level Indicator 3. Hoover® Dashboard 5 15 2.
Easy Empty Dirt Cup 8 1 9 7. Reach Wand 4 10 11. Wand Release Button 12. Wall Mount 17. Boost Mode 6 16 17 7 5. Empty Button 2 8. Handheld Release Button HARD BOOST FLOOR MODE 3 10. Powered Nozzle 14. Easy Clean Brush Roll 15. Charger 13 14 6 Swivel Steering 13. Brush Roll Speed 4. Charging Port 12 18. Power Trigger 6. Filter Access and Dirt Cup Release 18 9. Wall Mount Hook 11 16. Getting to know your Hoover® IMPULSE™ Cordless Vacuum 1. Battery Level Indicator 3. Hoover® Dashboard 5 15 2.
Product Manual
Page 17
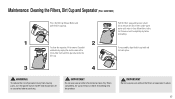
Allow filters to dry for up to remove. IMPORTANT Do not use vacuum without the filters or separator in place. 17 Maintenance: Cleaning the Filters, Dirt Cup and Separator (Filter: 440012835) Press the Dirt Cup Release Button and pull the dirt cup away. Clean dirt and debris by wiping the metal screen...
Allow filters to dry for up to remove. IMPORTANT Do not use vacuum without the filters or separator in place. 17 Maintenance: Cleaning the Filters, Dirt Cup and Separator (Filter: 440012835) Press the Dirt Cup Release Button and pull the dirt cup away. Clean dirt and debris by wiping the metal screen...

Product Manual
Page 19
.... 1. Review dirt cup removal and replacement. (see page 17) 3. Remove filter and clean. (see page 17) 3. Turn off to remove debris. (see page 18) 1. Charge battery. (see page 16) 2. Let the vacuum cool for 30 minutes and retry. Turn product off the unit and then disconnect... CAUSE 1. WARNING To reduce the risk of personal injury from vacuum Vacuum tools won't pick up Poor suction Vacuum running warm Vacuum won't turn the power switch to continuing use. Remove filter and clean. (see page 17) 2. Rinsable filter and/or separator not installed completely. 4. Reinstall dirt cup, ...
.... 1. Review dirt cup removal and replacement. (see page 17) 3. Remove filter and clean. (see page 17) 3. Turn off to remove debris. (see page 18) 1. Charge battery. (see page 16) 2. Let the vacuum cool for 30 minutes and retry. Turn product off the unit and then disconnect... CAUSE 1. WARNING To reduce the risk of personal injury from vacuum Vacuum tools won't pick up Poor suction Vacuum running warm Vacuum won't turn the power switch to continuing use. Remove filter and clean. (see page 17) 2. Rinsable filter and/or separator not installed completely. 4. Reinstall dirt cup, ...


