
Product Manual
Page 1
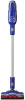
REPLACEMENT PARTS: Filter: 440012835 Charger: 440010414 ©2018 Techtronic Floor Care Technology Limited. IMPORTANT: READ CAREFULLY BEFORE ASSEMBLY AND USE. If used commercially the warranty is intended for household use only. All Rights Reserved. CORDLESS VACUUM USER MANUAL This product is void.
REPLACEMENT PARTS: Filter: 440012835 Charger: 440010414 ©2018 Techtronic Floor Care Technology Limited. IMPORTANT: READ CAREFULLY BEFORE ASSEMBLY AND USE. If used commercially the warranty is intended for household use only. All Rights Reserved. CORDLESS VACUUM USER MANUAL This product is void.

Product Manual
Page 2
Make it official. Get cleaning confidence for complete details. 2 Welcome to 2 years with the Hoover limited warranty. See warranty for up to Hoover® ownership. Register your vacuum by: Visiting Hoover.com or Hoover.ca Calling 888 679-2121 IT'S GUARANTEED.
Make it official. Get cleaning confidence for complete details. 2 Welcome to 2 years with the Hoover limited warranty. See warranty for up to Hoover® ownership. Register your vacuum by: Visiting Hoover.com or Hoover.ca Calling 888 679-2121 IT'S GUARANTEED.
Product Manual
Page 3
... Instructions...4 Getting to know your Hoover® IMPULSE™ Cordless Vacuum...6 What's in the Box? ...7 Assembly...8 Mounting the Wall Bracket...9 Charging your IMPULSE™...10 The Hoover® Dashboard...11 Quick Start ...12 Using your Vacuum...13 Using your Vacuum as a Handheld...14 Using your Vacuum to Clean Up High...15 Maintenance: Emptying the Dirt Cup...16 Maintenance: Cleaning the Filters, Dirt Cup and Separator ...17 Maintenance: Removing and Replacing the Brush Roll...18 Troubleshooting ...19 How to Order Accessories...20 Service & Warranty...
... Instructions...4 Getting to know your Hoover® IMPULSE™ Cordless Vacuum...6 What's in the Box? ...7 Assembly...8 Mounting the Wall Bracket...9 Charging your IMPULSE™...10 The Hoover® Dashboard...11 Quick Start ...12 Using your Vacuum...13 Using your Vacuum as a Handheld...14 Using your Vacuum to Clean Up High...15 Maintenance: Emptying the Dirt Cup...16 Maintenance: Cleaning the Filters, Dirt Cup and Separator ...17 Maintenance: Removing and Replacing the Brush Roll...18 Troubleshooting ...19 How to Order Accessories...20 Service & Warranty...

Product Manual
Page 4
... Hoover® recommended attachments and products. • Do not use charger with any openings. • Use only as described in this appliance before removing or installing brush roll. • Always turn off this manual. Do not run appliance over cord. Do not place vacuum on stairs or furniture, as it is burning or smoking, such as cigarettes, matches, or hot ashes. • Do not use without Dirt Cup...
... Hoover® recommended attachments and products. • Do not use charger with any openings. • Use only as described in this appliance before removing or installing brush roll. • Always turn off this manual. Do not run appliance over cord. Do not place vacuum on stairs or furniture, as it is burning or smoking, such as cigarettes, matches, or hot ashes. • Do not use without Dirt Cup...
Product Manual
Page 5
... (Hoover Model #440010414) supplied by a qualified repair person using only identical replacement parts. Keep away from battery cells can occur under extreme conditions. BATTERY DISPOSAL WARNING: RISK OF EXPLOSION OR EXPOSURE TO TOXIC MATERIAL. The EPA certified RBRC Battery Recycling Seal on the skin wash quickly with clean water continuously for information on invites accidents. • Do not use and care. WASH HANDS...
... (Hoover Model #440010414) supplied by a qualified repair person using only identical replacement parts. Keep away from battery cells can occur under extreme conditions. BATTERY DISPOSAL WARNING: RISK OF EXPLOSION OR EXPOSURE TO TOXIC MATERIAL. The EPA certified RBRC Battery Recycling Seal on the skin wash quickly with clean water continuously for information on invites accidents. • Do not use and care. WASH HANDS...
Product Manual
Page 6
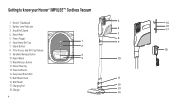
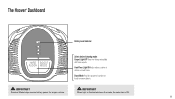
Hoover® Dashboard 5 15 2. Easy Empty Dirt Cup 8 1 9 7. Filter Access and Dirt Cup Release 18 9. Reach Wand 4 10 11. Easy Clean Brush Roll 15. Powered Nozzle 14. Charger 13 14 6 Boost Mode 6 16 17 7 5. Wand Release Button 12. Empty Button 2 8. Wall Mount Hook 11 16. Handheld Release Button HARD BOOST FLOOR MODE 3 10. Brush Roll Speed 4. Charging Port 12 18. Power Trigger 6. Getting to know your Hoover® IMPULSE™ Cordless Vacuum 1. Battery Level Indicator 3. Swivel Steering 13. Wall Mount 17.
Hoover® Dashboard 5 15 2. Easy Empty Dirt Cup 8 1 9 7. Filter Access and Dirt Cup Release 18 9. Reach Wand 4 10 11. Easy Clean Brush Roll 15. Powered Nozzle 14. Charger 13 14 6 Boost Mode 6 16 17 7 5. Wand Release Button 12. Empty Button 2 8. Wall Mount Hook 11 16. Handheld Release Button HARD BOOST FLOOR MODE 3 10. Brush Roll Speed 4. Charging Port 12 18. Power Trigger 6. Getting to know your Hoover® IMPULSE™ Cordless Vacuum 1. Battery Level Indicator 3. Swivel Steering 13. Wall Mount 17.

Product Manual
Page 7
CONTENTS VARY DEPENDING ON THE MODEL PURCHASED. Unit Model BH53000 BH53010CDI BH53020 Crevice Tool ü ü ü Dusting Brush ü ü ü Upholstery Tool Pet Upholstery Tool ü ü All models come with a Handheld, Powered Nozzle, Reach Wand, Charger and Wall Mount. 7 What's in the Box?
CONTENTS VARY DEPENDING ON THE MODEL PURCHASED. Unit Model BH53000 BH53010CDI BH53020 Crevice Tool ü ü ü Dusting Brush ü ü ü Upholstery Tool Pet Upholstery Tool ü ü All models come with a Handheld, Powered Nozzle, Reach Wand, Charger and Wall Mount. 7 What's in the Box?
Product Manual
Page 8
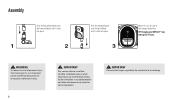
...;oor in a suitable location so it clicks into place. 3 HARD BOOST FLOOR MODE Before first use be stepped on. IMPORTANT Use only the charger supplied by the manufacturer to OFF and disconnect all accessories before servicing. 8 IMPORTANT This vacuum cleaner is not free standing. WARNING To reduce the risk of personal injury from moving parts, turn the power switch to recharge.
...;oor in a suitable location so it clicks into place. 3 HARD BOOST FLOOR MODE Before first use be stepped on. IMPORTANT Use only the charger supplied by the manufacturer to OFF and disconnect all accessories before servicing. 8 IMPORTANT This vacuum cleaner is not free standing. WARNING To reduce the risk of personal injury from moving parts, turn the power switch to recharge.
Product Manual
Page 9
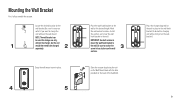
...wall. Mounting the Wall Bracket First, fully assemble the vacuum. Mark the wall anchor locations. IMPORTANT: Use both screws to mount the wall hook bracket to anchor the screw into a stud or use only, without the charger, but the unit 1 would then need to be used for charging unit while storing it is ...near an outlet if you want to the wall. Place the charger plug end for the unit in place in the wall hook bracket (if desired for storage use the wall 3 anchors. Install the anchors and screw ...
...wall. Mounting the Wall Bracket First, fully assemble the vacuum. Mark the wall anchor locations. IMPORTANT: Use both screws to mount the wall hook bracket to anchor the screw into a stud or use only, without the charger, but the unit 1 would then need to be used for charging unit while storing it is ...near an outlet if you want to the wall. Place the charger plug end for the unit in place in the wall hook bracket (if desired for storage use the wall 3 anchors. Install the anchors and screw ...
Product Manual
Page 10
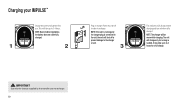
... turn off in charger. Charging your IMPULSE™ Charge the battery fully before first use. NOTE: If the unit is running and the charger plug is connected to the unit, the unit will shut off to prevent damage to 3-4 hours for as long as needed. It may take up to the charger or unit. 3 HARD BOOST FLOOR...
... turn off in charger. Charging your IMPULSE™ Charge the battery fully before first use. NOTE: If the unit is running and the charger plug is connected to the unit, the unit will shut off to prevent damage to 3-4 hours for as long as needed. It may take up to the charger or unit. 3 HARD BOOST FLOOR...
Product Manual
Page 11
IMPORTANT Standard Mode helps reserve battery power for hard to remove debris. Boost Mode: Provides powerful suction for longer runtime. IMPORTANT When light is illuminated above the mode, the selection is ON. 11 Hard Floor: Light ON Helps reduce scatter of debris on hard floors. The Hoover® Dashboard Battery Level Indicator HARD BOOST FLOOR MODE Select desired cleaning mode: Carpet: Light OFF Great for lifting embedded dirt from carpets.
IMPORTANT Standard Mode helps reserve battery power for hard to remove debris. Boost Mode: Provides powerful suction for longer runtime. IMPORTANT When light is illuminated above the mode, the selection is ON. 11 Hard Floor: Light ON Helps reduce scatter of debris on hard floors. The Hoover® Dashboard Battery Level Indicator HARD BOOST FLOOR MODE Select desired cleaning mode: Carpet: Light OFF Great for lifting embedded dirt from carpets.

Product Manual
Page 13
... all accessories before servicing. 13 NOTE: When power is getting low, recharge the battery. 4 HARD BOOST FLOOR MODE WARNING Never leave the vacuum cleaner in use, the Hoover® Dashboard will illuminate. 1 Select modes by pressing the buttons on the dashboard. Refer to page 11 for an extended period of personal injury from moving parts, turn the power switch to turn the vacuum ON. When the...
... all accessories before servicing. 13 NOTE: When power is getting low, recharge the battery. 4 HARD BOOST FLOOR MODE WARNING Never leave the vacuum cleaner in use, the Hoover® Dashboard will illuminate. 1 Select modes by pressing the buttons on the dashboard. Refer to page 11 for an extended period of personal injury from moving parts, turn the power switch to turn the vacuum ON. When the...
Product Manual
Page 14
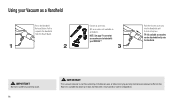
... models). Pull to be used for grooming a pet. 14 IMPORTANT This vacuum cleaner is not free standing. NOTE: See page 7 to see what accessories are included with your Vacuum as a Handheld Press the Handheld Release Button. In between uses or when carrying out any maintenance always lie flat on the floor in a suitable location so it clicks into place. Using your IMPULSE...
... models). Pull to be used for grooming a pet. 14 IMPORTANT This vacuum cleaner is not free standing. NOTE: See page 7 to see what accessories are included with your Vacuum as a Handheld Press the Handheld Release Button. In between uses or when carrying out any maintenance always lie flat on the floor in a suitable location so it clicks into place. Using your IMPULSE...
Product Manual
Page 15
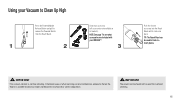
... models). IMPORTANT The power nozzle should not be used for overhead cleaning. 15 TIP: The Reach Wand can be used for hard-toreach places. IMPORTANT This vacuum cleaner is not free standing. Using your IMPULSE™. 3 Push the chosen accessory into place. NOTE: See page 7 to see what accessories are included with your Vacuum to Clean Up High Press the Powered Nozzle Release Button and pull to remove the Powered Nozzle...
... models). IMPORTANT The power nozzle should not be used for overhead cleaning. 15 TIP: The Reach Wand can be used for hard-toreach places. IMPORTANT This vacuum cleaner is not free standing. Using your IMPULSE™. 3 Push the chosen accessory into place. NOTE: See page 7 to see what accessories are included with your Vacuum to Clean Up High Press the Powered Nozzle Release Button and pull to remove the Powered Nozzle...
Product Manual
Page 16
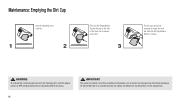
... vacuum cleaner is not free standing. In between uses or when carrying out any maintenance always lie flat on the floor in a suitable location so it does not become a trip hazard or can be stepped on the side of personal injury from moving parts, turn the power switch to empty the trash bin. Tap the dirt cup on . Push the Dirt Cup Release Button...
... vacuum cleaner is not free standing. In between uses or when carrying out any maintenance always lie flat on the floor in a suitable location so it does not become a trip hazard or can be stepped on the side of personal injury from moving parts, turn the power switch to empty the trash bin. Tap the dirt cup on . Push the Dirt Cup Release Button...
Product Manual
Page 17
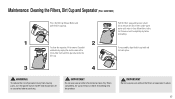
... disconnect all accessories before servicing. Dry filters completely, for 24 hours or until water is clear. IMPORTANT Do not use vacuum without the filters or separator in place. 17 Rinse filters under warm water until completely dry before reinstalling into the product. Maintenance: Cleaning the Filters, Dirt Cup and Separator (Filter: 440012835) Press the Dirt Cup Release Button and pull the dirt cup away. Allow filters...
... disconnect all accessories before servicing. Dry filters completely, for 24 hours or until water is clear. IMPORTANT Do not use vacuum without the filters or separator in place. 17 Rinse filters under warm water until completely dry before reinstalling into the product. Maintenance: Cleaning the Filters, Dirt Cup and Separator (Filter: 440012835) Press the Dirt Cup Release Button and pull the dirt cup away. Allow filters...
Product Manual
Page 18
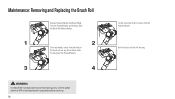
Turn the Powered Nozzle upside down. Slide the Brush Roll Release Button. 1 2 Clear any threads or hair from both ends of the brush roll and any dirt or debris inside the housing of the Powered Nozzle. 3 4 WARNING To reduce the risk of personal injury from moving parts, turn the power switch to OFF and disconnect all accessories before servicing. 18 Lift the end of brush roll to remove from Reach Wand. Re-fit the brush roll into the housing. Maintenance: Removing and Replacing the Brush Roll Remove Powered Nozzle from the Powered Nozzle.
Turn the Powered Nozzle upside down. Slide the Brush Roll Release Button. 1 2 Clear any threads or hair from both ends of the brush roll and any dirt or debris inside the housing of the Powered Nozzle. 3 4 WARNING To reduce the risk of personal injury from moving parts, turn the power switch to OFF and disconnect all accessories before servicing. 18 Lift the end of brush roll to remove from Reach Wand. Re-fit the brush roll into the housing. Maintenance: Removing and Replacing the Brush Roll Remove Powered Nozzle from the Powered Nozzle.

Product Manual
Page 19
...) 3. Remove filter and clean. (see page 17) 3. Turn off to reset stall protection. 19 Dirt cup full. 2. Nozzle/dirt passage clogged. 1. Empty dirt cup. (see page 18) 1. Troubleshooting Any other servicing should , has been dropped, damaged, left outdoors, or dropped into water, take it to a service center prior to continuing use. Filter is dirty 1. Power carpet nozzle not spinning. 1. Low suction. 1. Review filter removal and replacement. (see page 17) 2. Clean filter, rinse, dry and re-assemble. (see page 17) 4. Locate clog and remove. 1. Let the vacuum...
...) 3. Remove filter and clean. (see page 17) 3. Turn off to reset stall protection. 19 Dirt cup full. 2. Nozzle/dirt passage clogged. 1. Empty dirt cup. (see page 18) 1. Troubleshooting Any other servicing should , has been dropped, damaged, left outdoors, or dropped into water, take it to a service center prior to continuing use. Filter is dirty 1. Power carpet nozzle not spinning. 1. Low suction. 1. Review filter removal and replacement. (see page 17) 2. Clean filter, rinse, dry and re-assemble. (see page 17) 4. Locate clog and remove. 1. Let the vacuum...
Product Manual
Page 20
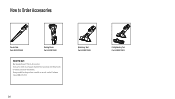
Having trouble locating an item or model on our site, contact Customer Care at 888 679-2121. Upholstery Tool Part #440012842 20 Pet Upholstery Tool Part #440012853 How to Order Accessories Crevice Tool Part #440012840 Dusting Brush Part #440012841 WHAT TO BUY: Buy Genuine Hoover® Parts & Accessories: If you are in need of a new part, attachment or accessory, visit Hoover.com or Hoover.ca for more information.
Having trouble locating an item or model on our site, contact Customer Care at 888 679-2121. Upholstery Tool Part #440012842 20 Pet Upholstery Tool Part #440012853 How to Order Accessories Crevice Tool Part #440012840 Dusting Brush Part #440012841 WHAT TO BUY: Buy Genuine Hoover® Parts & Accessories: If you are in need of a new part, attachment or accessory, visit Hoover.com or Hoover.ca for more information.
Product Manual
Page 21
... in your product by the model number and manufacturing code when requesting information or ordering replacement parts. (The model number and manufacturing code for the vacuum appears behind the dirt cup for a full two years from date of purchase. Some states do not allow the exclusion of the product by the owner. The Warranty Period will provide labor and parts at no cost to authorized service outlets...
... in your product by the model number and manufacturing code when requesting information or ordering replacement parts. (The model number and manufacturing code for the vacuum appears behind the dirt cup for a full two years from date of purchase. Some states do not allow the exclusion of the product by the owner. The Warranty Period will provide labor and parts at no cost to authorized service outlets...


