
Manual
Page 1
...PRODUCT TO THE STORE. www.hoover.com Review this manual before being shipped from the factory. Owner's Manual English § pp. 1-13 FloorMATE™ Español § pàg. 15-22 Français § p. 24-31 The Hard Floor Cleaner Thank you for an automated referral... to need assistance during assembly or operation: Visit us online at www.hoover.com to speak with a representative in our Consumer Response Center. If you (click on the "Service" button) or Call 1-800-944-9200 for selecting a HOOVER product. This cleaner was inspected and packaged carefully before operating...
...PRODUCT TO THE STORE. www.hoover.com Review this manual before being shipped from the factory. Owner's Manual English § pp. 1-13 FloorMATE™ Español § pàg. 15-22 Français § p. 24-31 The Hard Floor Cleaner Thank you for an automated referral... to need assistance during assembly or operation: Visit us online at www.hoover.com to speak with a representative in our Consumer Response Center. If you (click on the "Service" button) or Call 1-800-944-9200 for selecting a HOOVER product. This cleaner was inspected and packaged carefully before operating...

Manual
Page 2
... on bare floors or sealed wood floors. If appliance is not working as a toy or to a Hoover Factory Service Center or Authorized Hoover Warranty Service Dealer (Depot). • Use cleaner only for warranty service of body away from electrical outlet before unplugging. • Do not unplug by ...are located at the bottom of the back of an extension cord is not recommended. Index Assembly 3-4 Cleaner descriptions 5 How to use 5-8 Automatic shut-off all parts of your Hoover product. See "Grounding instructions". • Do not clean over cord. Do not expose machine to this...
... on bare floors or sealed wood floors. If appliance is not working as a toy or to a Hoover Factory Service Center or Authorized Hoover Warranty Service Dealer (Depot). • Use cleaner only for warranty service of body away from electrical outlet before unplugging. • Do not unplug by ...are located at the bottom of the back of an extension cord is not recommended. Index Assembly 3-4 Cleaner descriptions 5 How to use 5-8 Automatic shut-off all parts of your Hoover product. See "Grounding instructions". • Do not clean over cord. Do not expose machine to this...
Manual
Page 3
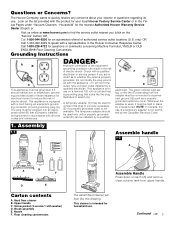
...conductor (C) and grounding plug (A). Nozzle F. If it should be used , it will look like the plug illustrated in the Hoover Consumer Response Center. The assembled cleaner will not fit the outlet, have a proper outlet installed by the Canadian Electrical Code. 1. Screw packet (3 screws-1 with ...appropriate outlet (B) that looks like this plug to find the service outlet nearest you are in the Yellow Pages under "Vacuum Cleaners - The Hoover Company wants to reduce the risk of a temporary adapter is properly installed and grounded in the risk of authorized service outlet...
...conductor (C) and grounding plug (A). Nozzle F. If it should be used , it will look like the plug illustrated in the Hoover Consumer Response Center. The assembled cleaner will not fit the outlet, have a proper outlet installed by the Canadian Electrical Code. 1. Screw packet (3 screws-1 with ...appropriate outlet (B) that looks like this plug to find the service outlet nearest you are in the Yellow Pages under "Vacuum Cleaners - The Hoover Company wants to reduce the risk of a temporary adapter is properly installed and grounded in the risk of authorized service outlet...
Manual
Page 4
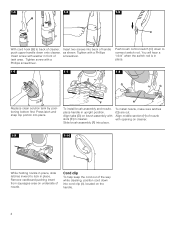
..." when the switch rod is in place. To install nozzle, make sure latches (G) are out. 1-3 1-4 B 1-5 C With cord hook (B) to back of cleaner, Insert two screws into cord clip (I While holding nozzle in place, slide latches inward to lock in place. 1-6 1-7 1-8 E D G G Replace clean solution... tank by positioning bottom first. Push brush control switch (C) down onto cleaner. F H To install brush assembly and nozzle, place handle in front of screwdriver. Tighten with a Phillips Insert screw with opening on...
..." when the switch rod is in place. To install nozzle, make sure latches (G) are out. 1-3 1-4 B 1-5 C With cord hook (B) to back of cleaner, Insert two screws into cord clip (I While holding nozzle in place, slide latches inward to lock in place. 1-6 1-7 1-8 E D G G Replace clean solution... tank by positioning bottom first. Push brush control switch (C) down onto cleaner. F H To install brush assembly and nozzle, place handle in front of screwdriver. Tighten with a Phillips Insert screw with opening on...

Manual
Page 5
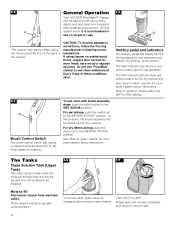
... dry vacuuming. 4. Recovery tank release 10. Clean solution tank cap/ measuring cup 6. Soft-tread wheels This cleaner is intended for easy clean-up to use . Plug cleaner into a single position but "floats" to operating position. Handle does not lock into a properly grounded outlet.... 1 2 3 4 5 6 17 7 18 9 8 10 16 13 12 11 16 14 15 13 19 The assembled cleaner will look like this drawing. 1. tilt cleaner back on pedal (A) to lower handle to allow convenient operation. Recovery tank lid and filter 9. Continued 5 2. Solution trigger: squeeze...
... dry vacuuming. 4. Recovery tank release 10. Clean solution tank cap/ measuring cup 6. Soft-tread wheels This cleaner is intended for easy clean-up to use . Plug cleaner into a single position but "floats" to operating position. Handle does not lock into a properly grounded outlet.... 1 2 3 4 5 6 17 7 18 9 8 10 16 13 12 11 16 14 15 13 19 The assembled cleaner will look like this drawing. 1. tilt cleaner back on pedal (A) to lower handle to allow convenient operation. Recovery tank lid and filter 9. Continued 5 2. Solution trigger: squeeze...
Manual
Page 6
...position. The Tanks 2-8 2-9 Clean Solution Tank (Upper Tank) The clean solution tank holds the cleaning solution that is set for complete cleaner setup instructions. To remove tank, press down to be cleaned. In this position, the brush assembly will show red when pedal is not... push the switch up dry debris. Step on release button and pivot tank forward. 2-5 C General Operation Your HOOVER FloorMate™ Cleaner can be used to fill Disconnect cleaner from electrical outlet. How to both vacuum dry debris and wet clean non-carpeted floor surfaces such as vinyl, ...
...position. The Tanks 2-8 2-9 Clean Solution Tank (Upper Tank) The clean solution tank holds the cleaning solution that is set for complete cleaner setup instructions. To remove tank, press down to be cleaned. In this position, the brush assembly will show red when pedal is not... push the switch up dry debris. Step on release button and pivot tank forward. 2-5 C General Operation Your HOOVER FloorMate™ Cleaner can be used to fill Disconnect cleaner from electrical outlet. How to both vacuum dry debris and wet clean non-carpeted floor surfaces such as vinyl, ...
Manual
Page 7
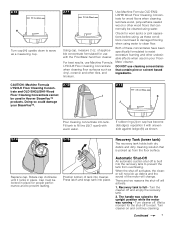
...your SteamVac™. 2-12 I ) (1 quart) with uneven side against ledge (K) as vinyl, ceramic and other tiles, and linoleum. Turn cleaner on cap has become dislodged, reposition it locks in place for proper performance and to fill line (I FILL 2-13 J 2.0 oz./60ml.... oz./60ml. CAUTION: Machine Formula LYSOL® Floor Cleaning Concentrate and OLD ENGLISH® Wood Floor Cleaning Concentrate cannot be used in Hoover SteamVac™ products. of tank into the recovery tank to clean floor. Continued 7 Both of the motor will activate. 1. Automatic Shut...
...your SteamVac™. 2-12 I ) (1 quart) with uneven side against ledge (K) as vinyl, ceramic and other tiles, and linoleum. Turn cleaner on cap has become dislodged, reposition it locks in place for proper performance and to fill line (I FILL 2-13 J 2.0 oz./60ml.... oz./60ml. CAUTION: Machine Formula LYSOL® Floor Cleaning Concentrate and OLD ENGLISH® Wood Floor Cleaning Concentrate cannot be used in Hoover SteamVac™ products. of tank into the recovery tank to clean floor. Continued 7 Both of the motor will activate. 1. Automatic Shut...

Manual
Page 8
...latch over tabs (R) on tank lid latch (M) and remove the tank lid (N). Check the solution tank also. To Clean Filter 2-21 S 2-22 Turn cleaner OFF and disconnect from electrical outlet. Replace filter lid. Press down on release button (L) and pivot tank forward. 2-17 N M Lift up on back ...tab (P) on lid with hole on the filter screen (O) in place. Remove filter lid (S), then remove filter. How to Empty Turn cleaner off and disconnect from electrical outlet. Remove debris from filter by rinsing it is recommended that the recovery tank be refilled at this filter ...
...latch over tabs (R) on tank lid latch (M) and remove the tank lid (N). Check the solution tank also. To Clean Filter 2-21 S 2-22 Turn cleaner OFF and disconnect from electrical outlet. Replace filter lid. Press down on release button (L) and pivot tank forward. 2-17 N M Lift up on back ...tab (P) on lid with hole on the filter screen (O) in place. Remove filter lid (S), then remove filter. How to Empty Turn cleaner off and disconnect from electrical outlet. Remove debris from filter by rinsing it is recommended that the recovery tank be refilled at this filter ...

Manual
Page 9
...) Wet Pickup/ Scrub See Page 6 Figs. 2-6 and 2-7 for each cleaning step. How to clean Recommended Cleaning Sequence Use your HOOVER 'FloorMate' Cleaner to help prevent streaking. Wet Clean the floor surface. 3. Follow the chart to set the controls for complete instructions on handle release ...Figs. 2-8 through 2-20). 3. To Clean Floor (vinyl, tile, linoleum, etc.) 1. Empty Recovery Tank. (Figs. 2-16 through 212. The cleaner's suction will pick up to "WET Scrub". NOTE: When switching between the two settings. 10. Simply move wet control switch down to the "...
...) Wet Pickup/ Scrub See Page 6 Figs. 2-6 and 2-7 for each cleaning step. How to clean Recommended Cleaning Sequence Use your HOOVER 'FloorMate' Cleaner to help prevent streaking. Wet Clean the floor surface. 3. Follow the chart to set the controls for complete instructions on handle release ...Figs. 2-8 through 2-20). 3. To Clean Floor (vinyl, tile, linoleum, etc.) 1. Empty Recovery Tank. (Figs. 2-16 through 212. The cleaner's suction will pick up to "WET Scrub". NOTE: When switching between the two settings. 10. Simply move wet control switch down to the "...
Manual
Page 10
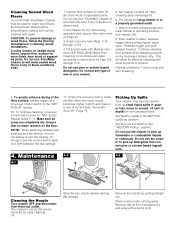
... sure all areas are completely dry. Do not use the cleaner to wood floors, follow the flooring manufacturer's cleaning recommendations. Do not use your cleaner. 5. Remove debris from electrical outlet. Rinse nozzle under running water. Cleaning Sealed Wood Floors Your HOOVER 'FloorMate' Cleaner may also be used to clean wood floors that have been...
... sure all areas are completely dry. Do not use the cleaner to wood floors, follow the flooring manufacturer's cleaning recommendations. Do not use your cleaner. 5. Remove debris from electrical outlet. Rinse nozzle under running water. Cleaning Sealed Wood Floors Your HOOVER 'FloorMate' Cleaner may also be used to clean wood floors that have been...
Manual
Page 11
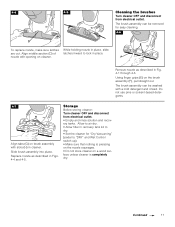
... as described in Fig. 4-1 through 4-3. Do not use pine or solvent-based detergents. 4-7 H G Align tabs (G) on brush assembly with opening on cleaner. Replace nozzle as described in Figs. 4-4 and 4-5. Continued 11 The brush assembly can be removed for easy cleaning. 4-6 D E To replace nozzle, make... sure latches While holding nozzle in recovery tank lid to dry. • Set the cleaner for "Dry Vacuuming" (pedal to "DRY" and Wet Control switch up). • Make sure that nothing is pressing on the nozzle squeegee. •...
... as described in Fig. 4-1 through 4-3. Do not use pine or solvent-based detergents. 4-7 H G Align tabs (G) on brush assembly with opening on cleaner. Replace nozzle as described in Figs. 4-4 and 4-5. Continued 11 The brush assembly can be removed for easy cleaning. 4-6 D E To replace nozzle, make... sure latches While holding nozzle in recovery tank lid to dry. • Set the cleaner for "Dry Vacuuming" (pedal to "DRY" and Wet Control switch up). • Make sure that nothing is pressing on the nozzle squeegee. •...
Manual
Page 12
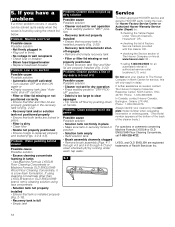
... of the back of Factory Service Centers provided with this will only result in North Canton for service, this cleaner OR - • checking the Service section of The Hoover Company on handle. 5. If you have a problem If a minor problem occurs, it Possible cause Possible solution... • Cleaner not set for wet operation • Press wet/dry pedal to The Hoover Company in delay. Always identify your cleaner to "WET" position. • Recovery tank not properly installed • Ensure that both...
... of the back of Factory Service Centers provided with this will only result in North Canton for service, this cleaner OR - • checking the Service section of The Hoover Company on handle. 5. If you have a problem If a minor problem occurs, it Possible cause Possible solution... • Cleaner not set for wet operation • Press wet/dry pedal to The Hoover Company in delay. Always identify your cleaner to "WET" position. • Recovery tank not properly installed • Ensure that both...


