
Manual
Page 1
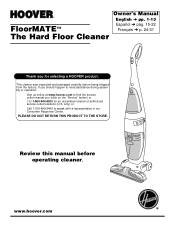
... of authorized service outlet locations (U.S. This cleaner was inspected and packaged carefully before operating cleaner. Review this manual before being shipped from the factory. Owner's Manual English § pp. 1-13 FloorMATE™ Español § pàg. 15-22 Français § p. 24-31 The Hard Floor Cleaner Thank you (click on the "Service" button) or Call 1-800-944-9200 for selecting a HOOVER product.
... of authorized service outlet locations (U.S. This cleaner was inspected and packaged carefully before operating cleaner. Review this manual before being shipped from the factory. Owner's Manual English § pp. 1-13 FloorMATE™ Español § pàg. 15-22 Français § p. 24-31 The Hard Floor Cleaner Thank you (click on the "Service" button) or Call 1-800-944-9200 for selecting a HOOVER product.

Manual
Page 2
... with damaged cord or plug. Turn off 7 General operation 6 Clean solution tank 6-7 Recovery tank 7 Storage 11 How to be required for all controls before servicing the cleaner. • Unplug cleaner when not in and retain The model and serial number are located at least a 16 gauge 3-wire cord which has a 3-prong grounding type plug and a 3-pole receptacle that you attach your sales receipt to this owner's manual. When using recommended...
... with damaged cord or plug. Turn off 7 General operation 6 Clean solution tank 6-7 Recovery tank 7 Storage 11 How to be required for all controls before servicing the cleaner. • Unplug cleaner when not in and retain The model and serial number are located at least a 16 gauge 3-wire cord which has a 3-prong grounding type plug and a 3-pole receptacle that you attach your sales receipt to this owner's manual. When using recommended...
Manual
Page 3
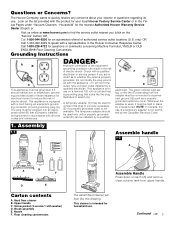
... Electrical Code. 1. if it will look like (F) extending from upper handle. NOTE: In Canada, the use . Call 1-800-228-4722 for your cleaner or questions regarding its use on latch (A) and remove clean solution tank from the adapter must be grounded. Hard floor cleaner B. Look on the list provided with a representative in the Hoover Consumer Response Center. Grounding Instructions A B C This appliance must be plugged...
... Electrical Code. 1. if it will look like (F) extending from upper handle. NOTE: In Canada, the use . Call 1-800-228-4722 for your cleaner or questions regarding its use on latch (A) and remove clean solution tank from the adapter must be grounded. Hard floor cleaner B. Look on the list provided with a representative in the Hoover Consumer Response Center. Grounding Instructions A B C This appliance must be plugged...
Manual
Page 4
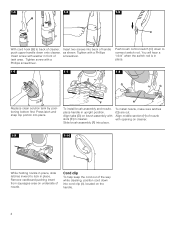
... cord clip (I), located on cleaner. 1-9 1-10 I While holding nozzle in cleaner. Tighten screw with washer in place. Remove cardboard packing insert from squeegee area on brush assembly with opening on the handle. 4 tank area. Cord clip To help keep the cord out of the way while cleaning, position cord down into place. To install nozzle, make sure latches (G) are out. Push brush control switch (C) down onto cleaner. Slide brush assembly (F) into back of handle...
... cord clip (I), located on cleaner. 1-9 1-10 I While holding nozzle in cleaner. Tighten screw with washer in place. Remove cardboard packing insert from squeegee area on brush assembly with opening on the handle. 4 tank area. Cord clip To help keep the cord out of the way while cleaning, position cord down into place. To install nozzle, make sure latches (G) are out. Push brush control switch (C) down onto cleaner. Slide brush assembly (F) into back of handle...

Manual
Page 5
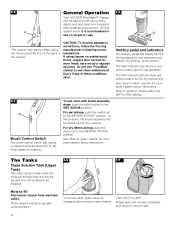
... to change between wet and dry cleaning. 12. Handle release pedal 17. Operate cleaner only at voltage specified on data plate on rear wheels and push forward. Recovery tank release 10. Wet/Dry indicators: Shows either wet or dry cleaning usage. 13. Nozzle release buttons: Release nozzle for wet pickup and dry vacuuming. 4. Carrying handle 19. Handle does not lock into a properly grounded outlet. 2-2 2-3 2-4 B A Handle Release Pedal Step on . Brush control switch: lowers the brush assembly for wet cleaning or raises the brush assembly for easy clean...
... to change between wet and dry cleaning. 12. Handle release pedal 17. Operate cleaner only at voltage specified on data plate on rear wheels and push forward. Recovery tank release 10. Wet/Dry indicators: Shows either wet or dry cleaning usage. 13. Nozzle release buttons: Release nozzle for wet pickup and dry vacuuming. 4. Carrying handle 19. Handle does not lock into a properly grounded outlet. 2-2 2-3 2-4 B A Handle Release Pedal Step on . Brush control switch: lowers the brush assembly for wet cleaning or raises the brush assembly for easy clean...
Manual
Page 6
... Switch The brush control switch (G) lowers or raises the brush assembly for worn finish, bare wood or separated joints. For dry debris pickup, push the switch up to clean" section for complete cleaner setup instructions. 2-6 D F E Wet/Dry pedal and indicators The wet/dry pedal (D) lowers the nozzle squeegee for wet operation and raises it for complete cleaner setup instructions. See "How to remove cap. 6 Step on pedal to both vacuum dry debris and wet clean non-carpeted floor...
... Switch The brush control switch (G) lowers or raises the brush assembly for worn finish, bare wood or separated joints. For dry debris pickup, push the switch up to clean" section for complete cleaner setup instructions. 2-6 D F E Wet/Dry pedal and indicators The wet/dry pedal (D) lowers the nozzle squeegee for wet operation and raises it for complete cleaner setup instructions. See "How to remove cap. 6 Step on pedal to both vacuum dry debris and wet clean non-carpeted floor...
Manual
Page 7
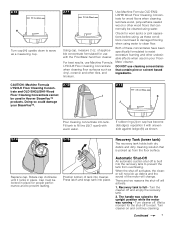
...-off will change. Turn the cleaner off to prevent leaking. 2-15 Recovery Tank (lower tank) The recovery tank holds both dry debris and dirty cleaning solution that can normally be used in place. Use Machine Formula OLD ENGLISH® Wood Floor Cleaning Concentrate for use with warm water. Fill tank to clean floor. The handle was raised to damaged flooring when using , as a measuring cup. 2-11 2.0 oz...
...-off will change. Turn the cleaner off to prevent leaking. 2-15 Recovery Tank (lower tank) The recovery tank holds both dry debris and dirty cleaning solution that can normally be used in place. Use Machine Formula OLD ENGLISH® Wood Floor Cleaning Concentrate for use with warm water. Fill tank to clean floor. The handle was raised to damaged flooring when using , as a measuring cup. 2-11 2.0 oz...

Manual
Page 8
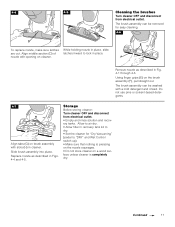
... firmly to be emptied after dry vacuuming and before wet operation. To replace lid, align tab (P) on lid with hole on back of tank into cleaner and pivot top portion until it is locked in the tank lid. Allow filter to Empty Turn cleaner off and disconnect from filter by rinsing it under running water. Press down on release button (L) and pivot tank forward...
... firmly to be emptied after dry vacuuming and before wet operation. To replace lid, align tab (P) on lid with hole on back of tank into cleaner and pivot top portion until it is locked in the tank lid. Allow filter to Empty Turn cleaner off and disconnect from filter by rinsing it under running water. Press down on release button (L) and pivot tank forward...

Manual
Page 9
... Use your HOOVER 'FloorMate' Cleaner to operating position; Wet Pickup reduces drying time of suction (see "Automatic Shut-Off", page 7). 9 OPERATION Dry Vacuuming BRUSH CONTROL SWITCH WET/DRY PEDAL "Wet/Dry Pickup" (UP) Dry Pickup Wet Cleaning "Wet Scrub" (DOWN) Wet Pickup/ Scrub Wet Pickup "Wet/Dry Pickup" (UP) Wet Pickup/ Scrub See Page 6 Figs. 2-6 and 2-7 for "Wet Cleaning" operation. (See chart on handle release pedal and lower handle to : 1. Step on page 9.) 5. Overlap strokes by one inch to the "WET/DRY PICKUP" setting. Wet Clean...
... Use your HOOVER 'FloorMate' Cleaner to operating position; Wet Pickup reduces drying time of suction (see "Automatic Shut-Off", page 7). 9 OPERATION Dry Vacuuming BRUSH CONTROL SWITCH WET/DRY PEDAL "Wet/Dry Pickup" (UP) Dry Pickup Wet Cleaning "Wet Scrub" (DOWN) Wet Pickup/ Scrub Wet Pickup "Wet/Dry Pickup" (UP) Wet Pickup/ Scrub See Page 6 Figs. 2-6 and 2-7 for "Wet Cleaning" operation. (See chart on handle release pedal and lower handle to : 1. Step on page 9.) 5. Overlap strokes by one inch to the "WET/DRY PICKUP" setting. Wet Clean...
Manual
Page 10
.... 2. Dry hands and plug cleaner in depth) on handle release pedal and lower handle to operating position; Repeat steps 7 - 9. Maintenance 4-1 11. Set Wet/Dry pedal in pitch and there is not necessary to "WET Scrub". Release trigger and push cleaner forward. NOTE: When switching between the two settings. 4. Set cleaner for Dry Vacuuming operation and vacuum floor (see chart on sealed wood floors, inspect floor surface for "Wet" Cleaning (see "Automatic Shut-Off", Page 7). 4-2 B Picking Up Spills Your cleaner may...
.... 2. Dry hands and plug cleaner in depth) on handle release pedal and lower handle to operating position; Repeat steps 7 - 9. Maintenance 4-1 11. Set Wet/Dry pedal in pitch and there is not necessary to "WET Scrub". Release trigger and push cleaner forward. NOTE: When switching between the two settings. 4. Set cleaner for Dry Vacuuming operation and vacuum floor (see chart on sealed wood floors, inspect floor surface for "Wet" Cleaning (see "Automatic Shut-Off", Page 7). 4-2 B Picking Up Spills Your cleaner may...
Manual
Page 11
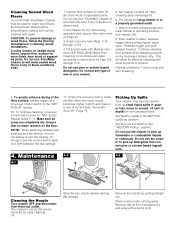
... out. Allow to air dry. • Allow filter in recovery tank lid to dry. • Set the cleaner for easy cleaning. 4-6 D E To replace nozzle, make sure latches While holding nozzle in cleaner. The brush assembly can be removed for "Dry Vacuuming" (pedal to lock in Figs. 4-4 and 4-5. nozzle with opening on a wood surface unless cleaner is completely dry. Align middle section (D) of latches inward to "DRY" and Wet Control switch up). • Make...
... out. Allow to air dry. • Allow filter in recovery tank lid to dry. • Set the cleaner for easy cleaning. 4-6 D E To replace nozzle, make sure latches While holding nozzle in cleaner. The brush assembly can be removed for "Dry Vacuuming" (pedal to lock in Figs. 4-4 and 4-5. nozzle with opening on a wood surface unless cleaner is completely dry. Align middle section (D) of latches inward to "DRY" and Wet Control switch up). • Make...
Manual
Page 12
... parts. (The model number appears at www.hoover.com OR - • calling 1-800-944-9200 for service, this cleaner OR - • checking the Service section of The Hoover Company on handle. only). Problem: Cleaner pushes a line of dry debris in North Canton for an automated referral of Reckitt Benckiser Inc. 12 Problem: Low or no suction Possible cause Possible solution • Automatic shut-off activated • Turn cleaner...
... parts. (The model number appears at www.hoover.com OR - • calling 1-800-944-9200 for service, this cleaner OR - • checking the Service section of The Hoover Company on handle. only). Problem: Cleaner pushes a line of dry debris in North Canton for an automated referral of Reckitt Benckiser Inc. 12 Problem: Low or no suction Possible cause Possible solution • Automatic shut-off activated • Turn cleaner...

Manual
Page 13
... presenting the appliance to a Hoover Factory Service Center for a period of one full year from state to state. Full One Year Warranty (Domestic Use) Your HOOVER® appliance is warranted in normal household use, in accordance with the Owner's Manual against original defects in material and workmanship for warranty service, transportation will be required before service is used in a commercial or rental application.
... presenting the appliance to a Hoover Factory Service Center for a period of one full year from state to state. Full One Year Warranty (Domestic Use) Your HOOVER® appliance is warranted in normal household use, in accordance with the Owner's Manual against original defects in material and workmanship for warranty service, transportation will be required before service is used in a commercial or rental application.


