

Manual
Page 5
... control switch: lowers the brush assembly for wet cleaning or raises the brush assembly for easy clean-up to operating position. Recovery tank lid and filter 9. Carrying handle 19. tilt cleaner back on . Push switch down to release clean solution. 3. Clean solution tank cap/ measuring cup 6.
... control switch: lowers the brush assembly for wet cleaning or raises the brush assembly for easy clean-up to operating position. Recovery tank lid and filter 9. Carrying handle 19. tilt cleaner back on . Push switch down to release clean solution. 3. Clean solution tank cap/ measuring cup 6.

Manual
Page 8
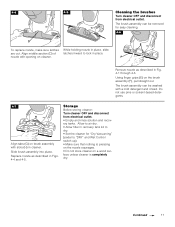
...S 2-22 Turn cleaner OFF and disconnect from screen. Press down on release button (L) and pivot tank forward. 2-17 N M Lift up on the filter screen (O) in place. Check the solution tank also. Remove debris from electrical outlet. To replace lid, align tab (P) on lid with hole on back... and pivot top portion until it is low or reduced (Figs. 2-21 and 2-22). How to Empty Turn cleaner off and disconnect from filter by rinsing it under running water. It may need to be emptied after dry vacuuming and before wet operation. Although not necessary for additional cleaning...
...S 2-22 Turn cleaner OFF and disconnect from screen. Press down on release button (L) and pivot tank forward. 2-17 N M Lift up on the filter screen (O) in place. Check the solution tank also. Remove debris from electrical outlet. To replace lid, align tab (P) on lid with hole on back... and pivot top portion until it is low or reduced (Figs. 2-21 and 2-22). How to Empty Turn cleaner off and disconnect from filter by rinsing it under running water. It may need to be emptied after dry vacuuming and before wet operation. Although not necessary for additional cleaning...

Manual
Page 9
How to clean Recommended Cleaning Sequence Use your HOOVER 'FloorMate' Cleaner to instructions for Figs. 2-8 through 2-20). 3. Wet Clean the floor surface. 3. Fill solution tank with steps 7-9. Do not use any type of the ... to pick up the dirty solution. 9. Continue to move cleaner forward and backward over the area to be cleaned. Empty recovery tank or clean the filter when the motor sound becomes higher in pitch and there is not necessary to the "WET/DRY PICKUP" setting. 3. Dry Vacuum to release solution as...
How to clean Recommended Cleaning Sequence Use your HOOVER 'FloorMate' Cleaner to instructions for Figs. 2-8 through 2-20). 3. Wet Clean the floor surface. 3. Fill solution tank with steps 7-9. Do not use any type of the ... to pick up the dirty solution. 9. Continue to move cleaner forward and backward over the area to be cleaned. Empty recovery tank or clean the filter when the motor sound becomes higher in pitch and there is not necessary to the "WET/DRY PICKUP" setting. 3. Dry Vacuum to release solution as...
Manual
Page 10
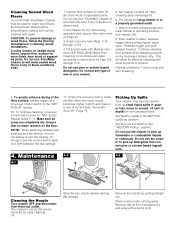
...Scrub position. Make sure all areas are completely dry. NOTE: When switching between the two settings. 4. Empty the recovery tank or clean the filter when the motor sound becomes higher in pitch and there is not necessary to turn cleaner ON. 8. Do not use your cleaner. 5. Remove...trigger and move wet control switch down to "WET Scrub". To greatly enhance drying of these conditions exist. 2. Cleaning Sealed Wood Floors Your HOOVER 'FloorMate' Cleaner may also be used to clean wood floors that no water remains on handle release pedal and lower handle to operating position...
...Scrub position. Make sure all areas are completely dry. NOTE: When switching between the two settings. 4. Empty the recovery tank or clean the filter when the motor sound becomes higher in pitch and there is not necessary to turn cleaner ON. 8. Do not use your cleaner. 5. Remove...trigger and move wet control switch down to "WET Scrub". To greatly enhance drying of these conditions exist. 2. Cleaning Sealed Wood Floors Your HOOVER 'FloorMate' Cleaner may also be used to clean wood floors that no water remains on handle release pedal and lower handle to operating position...
Manual
Page 11
... dry. • Set the cleaner for easy cleaning. 4-6 D E To replace nozzle, make sure latches While holding nozzle in cleaner. Allow to air dry. • Allow filter in recovery tank lid to lock in Fig. 4-1 through 4-3. Replace nozzle as described in place. The brush assembly can be washed with a mild detergent and...
... dry. • Set the cleaner for easy cleaning. 4-6 D E To replace nozzle, make sure latches While holding nozzle in cleaner. Allow to air dry. • Allow filter in recovery tank lid to lock in Fig. 4-1 through 4-3. Replace nozzle as described in place. The brush assembly can be washed with a mild detergent and...
Manual
Page 12
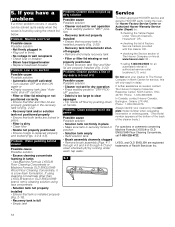
...to "DRY PICKUP" position. • Debris is securely locked in place. • Filter is dirty • Clean filter • Nozzle not properly positioned • Ensure nozzle is needed, contact The Hoover Company Consumer Response Center, North Canton, Ohio 44720 Phone: 1-330-499-9499. Always ...identify your cleaner to clear squeegee • Tip nozzle off " section) • Filter or filter lid missing or not positioned correctly • Ensure...
...to "DRY PICKUP" position. • Debris is securely locked in place. • Filter is dirty • Clean filter • Nozzle not properly positioned • Ensure nozzle is needed, contact The Hoover Company Consumer Response Center, North Canton, Ohio 44720 Phone: 1-330-499-9499. Always ...identify your cleaner to clear squeegee • Tip nozzle off " section) • Filter or filter lid missing or not positioned correctly • Ensure...


