Product Manual
Page 1
All Rights Reserved. #961152061 • Rev3 If used commercially the warranty is intended for household use only. FUSION CORDLESS VACUUM USER MANUAL IMPORTANT: READ CAREFULLY BEFORE ASSEMBLY AND USE. REPLACEMENT PARTS: Filter: 440011434 Battery: BH04000 Charger: BH04200 ©2017 Techtronic Floor Care Technology Limited. This product is void.
All Rights Reserved. #961152061 • Rev3 If used commercially the warranty is intended for household use only. FUSION CORDLESS VACUUM USER MANUAL IMPORTANT: READ CAREFULLY BEFORE ASSEMBLY AND USE. REPLACEMENT PARTS: Filter: 440011434 Battery: BH04000 Charger: BH04200 ©2017 Techtronic Floor Care Technology Limited. This product is void.
Product Manual
Page 3
...?...7 Assembly...8 Mounting the Wall Bracket...9 Charging your ONE PWR™ Lithium Battery...10 The Hoover® Dashboard...11 Quick Start...12 Using your Vacuum...13 Using your Vacuum as a Handheld...14 Using your Vacuum to Clean Up High...15 Maintenance: Removing the ONE PWR™ Lithium Battery 16 Maintenance: Emptying the Dirt Cup...17 Maintenance: Cleaning the Filter, Dirt Cup and Separator 18 Maintenance: Removing and Replacing the Brush Roll 19 How to Order Accessories...20 Need Help?...21 Service & Warranty Information...
...?...7 Assembly...8 Mounting the Wall Bracket...9 Charging your ONE PWR™ Lithium Battery...10 The Hoover® Dashboard...11 Quick Start...12 Using your Vacuum...13 Using your Vacuum as a Handheld...14 Using your Vacuum to Clean Up High...15 Maintenance: Removing the ONE PWR™ Lithium Battery 16 Maintenance: Emptying the Dirt Cup...17 Maintenance: Cleaning the Filter, Dirt Cup and Separator 18 Maintenance: Removing and Replacing the Brush Roll 19 How to Order Accessories...20 Need Help?...21 Service & Warranty Information...
Product Manual
Page 4
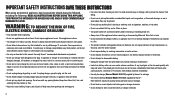
... described in place. • Turn power switch off and remove battery before removing or installing brush roll. • Always turn off this manual. Seek medical attention immediately. • Use only the charger (Hoover Model #BH04200) supplied by pulling on the skin wash quickly with damaged cord or plug. To avoid injury or damage, keep free of dust, lint, hair, and anything that may catch fire and/or explode. • Do not expose...
... described in place. • Turn power switch off and remove battery before removing or installing brush roll. • Always turn off this manual. Seek medical attention immediately. • Use only the charger (Hoover Model #BH04200) supplied by pulling on the skin wash quickly with damaged cord or plug. To avoid injury or damage, keep free of dust, lint, hair, and anything that may catch fire and/or explode. • Do not expose...

Product Manual
Page 5
... projecting from children. WASH HANDS AFTER HANDLING. 5 • Prevent unintentional starting the appliance accidentally. Carrying the appliance with your area. CHARGING AMBIENT TEMPERATURE RANGE: 5°C-50°C (41°F - 122°F) • Have servicing performed by a qualified repair person using only identical replacement parts. Use of fire or explosion. Do not attempt to repair the appliance or the battery pack except as...
... projecting from children. WASH HANDS AFTER HANDLING. 5 • Prevent unintentional starting the appliance accidentally. Carrying the appliance with your area. CHARGING AMBIENT TEMPERATURE RANGE: 5°C-50°C (41°F - 122°F) • Have servicing performed by a qualified repair person using only identical replacement parts. Use of fire or explosion. Do not attempt to repair the appliance or the battery pack except as...
Product Manual
Page 6
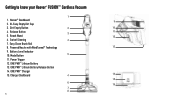
Easy Clean Brush Roll 8. XL Easy Empty Dirt Cup 3. Powered Nozzle with WindTunnel® Technology 13 9. Power Trigger 12. ONE PWR™ Lithium Battery Release Button 14. Swivel Steering 4 7. Getting to know your Hoover® FUSION™ Cordless Vacuum 1 1. Hoover® Dashboard 9 2. Reach Wand 12 6. Mode Button 5 11. ONE PWR™ Charger 15. ONE PWR™ Lithium Battery 13. Charger Dashboard 4 14 12 6 15 7 8 6 Release Button 3 11 5. Battery Level Indicator 10. Dirt Empty Button 2 10 4.
Easy Clean Brush Roll 8. XL Easy Empty Dirt Cup 3. Powered Nozzle with WindTunnel® Technology 13 9. Power Trigger 12. ONE PWR™ Lithium Battery Release Button 14. Swivel Steering 4 7. Getting to know your Hoover® FUSION™ Cordless Vacuum 1 1. Hoover® Dashboard 9 2. Reach Wand 12 6. Mode Button 5 11. ONE PWR™ Charger 15. ONE PWR™ Lithium Battery 13. Charger Dashboard 4 14 12 6 15 7 8 6 Release Button 3 11 5. Battery Level Indicator 10. Dirt Empty Button 2 10 4.

Product Manual
Page 7
Unit Model BH53100/CA BH53110/CDI BH53120 Crevice Tool ü ü ü Dusting Brush ü ü ü Upholstery Tool ü ü Above Floor Extension ü Reach Wand Tool Storage Clip ü ü ü All models come with a Handheld, Powered Nozzle, Reach Wand, ONE PWR™ Lithium Battery, Charger and Wall Mount. 7 CONTENTS VARY DEPENDING ON THE MODEL PURCHASED. What's in the Box?
Unit Model BH53100/CA BH53110/CDI BH53120 Crevice Tool ü ü ü Dusting Brush ü ü ü Upholstery Tool ü ü Above Floor Extension ü Reach Wand Tool Storage Clip ü ü ü All models come with a Handheld, Powered Nozzle, Reach Wand, ONE PWR™ Lithium Battery, Charger and Wall Mount. 7 CONTENTS VARY DEPENDING ON THE MODEL PURCHASED. What's in the Box?
Product Manual
Page 8
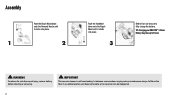
... the floor in a suitable location so it clicks into place. 1 2 Push the Handheld down onto the Reach Wand until it does not become a trip hazard or can be sure to 3 hours WARNING To reduce the risk of personal injury, remove battery before cleaning or servicing. IMPORTANT This vacuum cleaner is not free standing. Assembly Push the Reach Wand down onto the Powered Nozzle until...
... the floor in a suitable location so it clicks into place. 1 2 Push the Handheld down onto the Reach Wand until it does not become a trip hazard or can be sure to 3 hours WARNING To reduce the risk of personal injury, remove battery before cleaning or servicing. IMPORTANT This vacuum cleaner is not free standing. Assembly Push the Reach Wand down onto the Powered Nozzle until...

Product Manual
Page 9
... the vacuum. 1 2 TIP: The Floor Nozzle must be flat on the wall mount bracket until it locks into the slot on the ground for proper wall mounting. Set the vacuum aside. Hold the vacuum against the wall. Install the ...anchors and screw the Wall Bracket to the Wall Bracket. Install the Wall Bracket arm to the wall. IMPORTANT: Use BOTH screws to mount the Wall Bracket to wall. 3 Slide tool storage part into place. 9 Mounting the Wall Bracket First, fully assemble the vacuum but do not attach the battery...
... the vacuum. 1 2 TIP: The Floor Nozzle must be flat on the wall mount bracket until it locks into the slot on the ground for proper wall mounting. Set the vacuum aside. Hold the vacuum against the wall. Install the ...anchors and screw the Wall Bracket to the Wall Bracket. Install the Wall Bracket arm to the wall. IMPORTANT: Use BOTH screws to mount the Wall Bracket to wall. 3 Slide tool storage part into place. 9 Mounting the Wall Bracket First, fully assemble the vacuum but do not attach the battery...

Product Manual
Page 10
... Maintenance sections for Troubleshooting 10 Once charge is complete, remove the ONE PWR™ Lithium Battery from the charger and place it into the handheld for charger indicator explanation. 3 Continuous white light, battery is charged Pulsing white light, battery is charging Pulsing yellow light, battery... waiting to charge will take up to 3 hours. Charging your ONE PWR™ Lithium Battery Charge the battery fully before first use, this will resume shortly Solid red light, ...
... Maintenance sections for Troubleshooting 10 Once charge is complete, remove the ONE PWR™ Lithium Battery from the charger and place it into the handheld for charger indicator explanation. 3 Continuous white light, battery is charged Pulsing white light, battery is charging Pulsing yellow light, battery... waiting to charge will take up to 3 hours. Charging your ONE PWR™ Lithium Battery Charge the battery fully before first use, this will resume shortly Solid red light, ...
Product Manual
Page 11
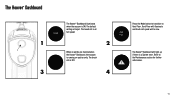
Press the Mode button to transition to the Maintenance section for further information. 3 4 11 The default setting is at full speed. The Hoover® Dashboard will be Low. The brush roll is Carpet. Hard Floor 1 2 When no words are illuminated on suction only. The brush roll is running on the Hoover® Dashboard, the vacuum is OFF. Hard Floor will illuminate and brush roll speed will light up if there is ON. Refer to Hard Floor. The Hoover® Dashboard Carpet The Hoover® Dashboard illuminates when the vacuum is a System error.
Press the Mode button to transition to the Maintenance section for further information. 3 4 11 The default setting is at full speed. The Hoover® Dashboard will be Low. The brush roll is Carpet. Hard Floor 1 2 When no words are illuminated on suction only. The brush roll is running on the Hoover® Dashboard, the vacuum is OFF. Hard Floor will illuminate and brush roll speed will light up if there is ON. Refer to Hard Floor. The Hoover® Dashboard Carpet The Hoover® Dashboard illuminates when the vacuum is a System error.
Product Manual
Page 13
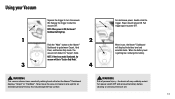
...; Dashboard will default to shut the vacuum OFF. Turn power switch OFF and remove the battery before cleaning or servicing the brush roll. 13 WARNING Risk of time as this may suddenly restart. NOTE: When power is getting low, recharge the battery. Power should remain ON. the brush roll may damage the floor surface. Release the trigger to "Carpet" mode. When in use, the Hoover® Dashboard will be in one...
...; Dashboard will default to shut the vacuum OFF. Turn power switch OFF and remove the battery before cleaning or servicing the brush roll. 13 WARNING Risk of time as this may suddenly restart. NOTE: When power is getting low, recharge the battery. Power should remain ON. the brush roll may damage the floor surface. Release the trigger to "Carpet" mode. When in use, the Hoover® Dashboard will be in one...
Product Manual
Page 14
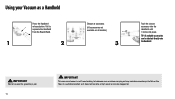
... accessories not available on . Pull to be stepped on all models). 3 Push the chosen accessory into the Handheld until it does not become a trip hazard or can be attached directly onto the Handheld. TIP: All available accessories can be used for grooming a pet. 14 IMPORTANT This vacuum cleaner is not free standing. Using your Vacuum as a Handheld Press the Handheld release button.
... accessories not available on . Pull to be stepped on all models). 3 Push the chosen accessory into the Handheld until it does not become a trip hazard or can be attached directly onto the Handheld. TIP: All available accessories can be used for grooming a pet. 14 IMPORTANT This vacuum cleaner is not free standing. Using your Vacuum as a Handheld Press the Handheld release button.

Product Manual
Page 15
TIP: The Reach Wand can be used for hard-toreach places. IMPORTANT This vacuum cleaner is not free standing. Using your Vacuum to Clean Up High Press the Powered Nozzle release button and pull to remove the Powered Nozzle from the Reach Wand. 1 2 Choose an accessory (all models). 3 Push the chosen accessory into place. In between uses or when carrying out any maintenance always lie flat on the floor in a suitable location so it clicks into the Reach Wand until it does not become a trip hazard or can be stepped on all accessories not available on . 15
TIP: The Reach Wand can be used for hard-toreach places. IMPORTANT This vacuum cleaner is not free standing. Using your Vacuum to Clean Up High Press the Powered Nozzle release button and pull to remove the Powered Nozzle from the Reach Wand. 1 2 Choose an accessory (all models). 3 Push the chosen accessory into place. In between uses or when carrying out any maintenance always lie flat on the floor in a suitable location so it clicks into the Reach Wand until it does not become a trip hazard or can be stepped on all accessories not available on . 15
Product Manual
Page 16
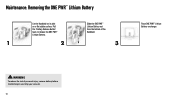
Maintenance: Removing the ONE PWR™ Lithium Battery Lie the Handheld on its side on charger. Pull the "Battery Release Button" back to release the ONE PWR™ Lithium Battery. WARNING To reduce the risk of the Handheld. 1 2 3 Place ONE PWR™ Lithium Battery on a flat stable surface. Slide the ONE PWR™ Lithium Battery out from the bottom of personal injury, remove battery before maintaining or servicing your vacuum. 16
Maintenance: Removing the ONE PWR™ Lithium Battery Lie the Handheld on its side on charger. Pull the "Battery Release Button" back to release the ONE PWR™ Lithium Battery. WARNING To reduce the risk of the Handheld. 1 2 3 Place ONE PWR™ Lithium Battery on a flat stable surface. Slide the ONE PWR™ Lithium Battery out from the bottom of personal injury, remove battery before maintaining or servicing your vacuum. 16
Product Manual
Page 17
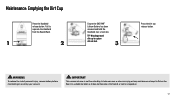
... vacuum cleaner is not free standing. WARNING To reduce the risk of personal injury, remove battery before maintaining or servicing your vacuum. In between uses or when carrying out any maintenance always lie flat on the floor in a suitable location so it does not become a trip hazard or can be stepped on. 17 Maintenance: Emptying the Dirt Cup Press the Handheld release button. Pull to capture dirt...
... vacuum cleaner is not free standing. WARNING To reduce the risk of personal injury, remove battery before maintaining or servicing your vacuum. In between uses or when carrying out any maintenance always lie flat on the floor in a suitable location so it does not become a trip hazard or can be stepped on. 17 Maintenance: Emptying the Dirt Cup Press the Handheld release button. Pull to capture dirt...

Product Manual
Page 18
... injury, remove battery before reinstalling. Dry filter completely, for 24 hours or until completely dry before cleaning or servicing. Pull the filter away and tap over a trash bin to clean. IMPORTANT Do not use soap or other chemicals to remove dirt. Push the dirt cup backwards, until water is clear. To reassemble, align the hook to remove. Maintenance: Cleaning the Filter, Dirt Cup and Separator Remove the Reach Wand. Allow filter to dry for up...
... injury, remove battery before reinstalling. Dry filter completely, for 24 hours or until completely dry before cleaning or servicing. Pull the filter away and tap over a trash bin to clean. IMPORTANT Do not use soap or other chemicals to remove dirt. Push the dirt cup backwards, until water is clear. To reassemble, align the hook to remove. Maintenance: Cleaning the Filter, Dirt Cup and Separator Remove the Reach Wand. Allow filter to dry for up...

Product Manual
Page 19
Slide the Brush Roll Release Button. 1 2 Clear any threads or hair from both ends of the brush roll and any dirt or debris inside the housing of the Powered Nozzle. 3 4 WARNING Risk of brush roll to remove from Reach Wand. Turn power OFF and remove the battery before cleaning or servicing the brush roll. Re-fit the brush roll into the housing. 19 Lift the end of personal injury - Turn the Powered Nozzle upside down. the brush roll may suddenly restart. Maintenance: Removing and Replacing the Brush Roll Remove Powered Nozzle from the Powered Nozzle.
Slide the Brush Roll Release Button. 1 2 Clear any threads or hair from both ends of the brush roll and any dirt or debris inside the housing of the Powered Nozzle. 3 4 WARNING Risk of brush roll to remove from Reach Wand. Turn power OFF and remove the battery before cleaning or servicing the brush roll. Re-fit the brush roll into the housing. 19 Lift the end of personal injury - Turn the Powered Nozzle upside down. the brush roll may suddenly restart. Maintenance: Removing and Replacing the Brush Roll Remove Powered Nozzle from the Powered Nozzle.
Product Manual
Page 20
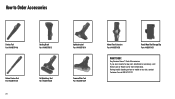
How to Order Accessories Crevice Tool Part #440011446 Dusting Brush Part #440011813 Deluxe Crevice Tool Part #440011447 20 Pet Upholstery Tool Part #440011448 Upholstery tool Part #440011814 Powered Stair Tool Part #440011449 Above Floor Extension Part #440011450 Reach Wand Tool Storage Clip Part #440011451 WHAT TO BUY: Buy Genuine Hoover® Parts & Accessories: If you are in need of a new part, attachment or accessory, visit Hoover.com or Hoover.ca for more information. Having trouble locating an item or model on our site, contact Customer Care at 888 679-2121.
How to Order Accessories Crevice Tool Part #440011446 Dusting Brush Part #440011813 Deluxe Crevice Tool Part #440011447 20 Pet Upholstery Tool Part #440011448 Upholstery tool Part #440011814 Powered Stair Tool Part #440011449 Above Floor Extension Part #440011450 Reach Wand Tool Storage Clip Part #440011451 WHAT TO BUY: Buy Genuine Hoover® Parts & Accessories: If you are in need of a new part, attachment or accessory, visit Hoover.com or Hoover.ca for more information. Having trouble locating an item or model on our site, contact Customer Care at 888 679-2121.
Product Manual
Page 21
... completely dry before cleaning or servicing. See back of personal injury, remove battery before reinstalling it 's low. My Hoover® FUSION™ Cordless Vacuum won't turn on carpet. You may take it dry for model number. 21 Remove the filter. If your display shows that you fill the dirt cup or at least once a month. Check the Reach Wand for two minutes. Hoover.com/support or Hoover.ca/support Connect with clear warm water for any clogged...
... completely dry before cleaning or servicing. See back of personal injury, remove battery before reinstalling it 's low. My Hoover® FUSION™ Cordless Vacuum won't turn on carpet. You may take it dry for model number. 21 Remove the filter. If your display shows that you fill the dirt cup or at least once a month. Check the Reach Wand for two minutes. Hoover.com/support or Hoover.ca/support Connect with clear warm water for any clogged...
Product Manual
Page 22
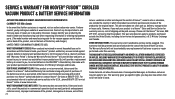
... HOOVER® FUSION™ CORDLESS VACUUM PRODUCT & BATTERY SERVICE INFORMATION ANY SERVICING SHOULD BE DONE BY AN AUTHORIZED SERVICE REPRESENTATIVE Call 888 679-2121 USA & Canada In the event that came with proof of purchase to a Hoover® authorized dealer or contact Hoover® Services at 888 679-2121. WHAT THIS WARRANTY DOES NOT COVER: This warranty does not cover belts, filters and brush rolls, use of the product in a commercial operation...
... HOOVER® FUSION™ CORDLESS VACUUM PRODUCT & BATTERY SERVICE INFORMATION ANY SERVICING SHOULD BE DONE BY AN AUTHORIZED SERVICE REPRESENTATIVE Call 888 679-2121 USA & Canada In the event that came with proof of purchase to a Hoover® authorized dealer or contact Hoover® Services at 888 679-2121. WHAT THIS WARRANTY DOES NOT COVER: This warranty does not cover belts, filters and brush rolls, use of the product in a commercial operation...


