
Product Manual
Page 3
Your Guide: Safety Instructions 1 How to assemble your Dual Power™ Pro 3 Getting started with your Dual Power™ Pro 5 Using your Dual Power™ Pro 7 How to attach your Dual Power™ Pro tools 11 Keeping your Dual Power™ Pro running properly 17 Troubleshooting 25 Warranty 26
Your Guide: Safety Instructions 1 How to assemble your Dual Power™ Pro 3 Getting started with your Dual Power™ Pro 5 Using your Dual Power™ Pro 7 How to attach your Dual Power™ Pro tools 11 Keeping your Dual Power™ Pro running properly 17 Troubleshooting 25 Warranty 26
Product Manual
Page 6
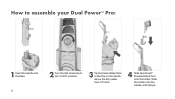
It'll click. 4 Slide SpinScrub® Powered Hand Tool onto the holder. Slide the holder onto the handle until it stops. How to assemble your Dual Power™ Pro: 1 Insert the handle into the base. 3 2 Turn the dial clockwise to the "LOCK" position. 3 Tip the Clean Water Tank in like this on the handle above the dirty water tank.
It'll click. 4 Slide SpinScrub® Powered Hand Tool onto the holder. Slide the holder onto the handle until it stops. How to assemble your Dual Power™ Pro: 1 Insert the handle into the base. 3 2 Turn the dial clockwise to the "LOCK" position. 3 Tip the Clean Water Tank in like this on the handle above the dirty water tank.
Product Manual
Page 8
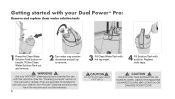
... use with solution. CAUTION ! DO NOT USE THIS EXTRACTOR ON HARD FLOORS. Non-Hoover cleaning solutions may harm the machine and void the warranty. 5 3 Fill Clean Water Tank with hot tap water. 4 Fill Solution Tank with your Dual Power™ Pro: Remove and replace clean water solution tank: 1 Press the Clean Water...
... use with solution. CAUTION ! DO NOT USE THIS EXTRACTOR ON HARD FLOORS. Non-Hoover cleaning solutions may harm the machine and void the warranty. 5 3 Fill Clean Water Tank with hot tap water. 4 Fill Solution Tank with your Dual Power™ Pro: Remove and replace clean water solution tank: 1 Press the Clean Water...
Product Manual
Page 10
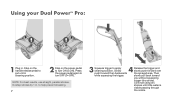
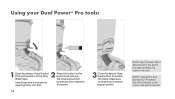
Press the power pedal again to turn OFF (0=OFF). Slowly push forward then backwards Release the trigger and slowly push forward over the sprayed area. Overlap strokes by 1 ... the handle release pedal to put unit in cleaning position. 2 Step on the power pedal to turn ON (I=ON). NOTE: For best results, use straight, parallel strokes. slowly pull back toward you without squeezing trigger (dry stroke). Using your Dual Power™ Pro: 1 Plug in . to help prevent streaking. 7 3 4 Squeeze trigger to apply...
Press the power pedal again to turn OFF (0=OFF). Slowly push forward then backwards Release the trigger and slowly push forward over the sprayed area. Overlap strokes by 1 ... the handle release pedal to put unit in cleaning position. 2 Step on the power pedal to turn ON (I=ON). NOTE: For best results, use straight, parallel strokes. slowly pull back toward you without squeezing trigger (dry stroke). Using your Dual Power™ Pro: 1 Plug in . to help prevent streaking. 7 3 4 Squeeze trigger to apply...

Product Manual
Page 12
WARNING ! To reduce the risk of the tank to open. 3 Remove lid and empty tank. 4 Replace lid by pulling up on the latch at the back of personal injury Unplug before cleaning or servicing. Pull tank out at an angle like this. 9 2 Empty the Dirty Water Tank by lining up with hinge and snap when secured. ! Latch will line up the hinge and pulling latch down to release. Emptying your Dual Power™ Pro dirty water tank: 1 Grasp Dirty Water Tank handle and push latch to lock.
WARNING ! To reduce the risk of the tank to open. 3 Remove lid and empty tank. 4 Replace lid by pulling up on the latch at the back of personal injury Unplug before cleaning or servicing. Pull tank out at an angle like this. 9 2 Empty the Dirty Water Tank by lining up with hinge and snap when secured. ! Latch will line up the hinge and pulling latch down to release. Emptying your Dual Power™ Pro dirty water tank: 1 Grasp Dirty Water Tank handle and push latch to lock.
Product Manual
Page 14
... until it locks. To reduce risk of injury from falling, always place cleaner at bottom of stairs or on floor. CAUTION ! Push forward with your Dual Power™ Pro tools: 1 Place handle in injury or damage. 11 Unplug before servicing. ! Use extra care when cleaning on stairs. To avoid personal injury or...
... until it locks. To reduce risk of injury from falling, always place cleaner at bottom of stairs or on floor. CAUTION ! Push forward with your Dual Power™ Pro tools: 1 Place handle in injury or damage. 11 Unplug before servicing. ! Use extra care when cleaning on stairs. To avoid personal injury or...
Product Manual
Page 16
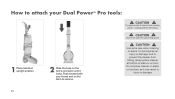
Press the button on the end of the Dirty Water Tank. Make sure to close door to the unit. NOTE: Spot Treater Wand attachment is the same process as attaching hose to ensure proper suction. connection from machine to the hose in the same manner. NOTE: Upholstery and SpinScrub Powered Hand Tool attach to remove. 13 3 Close Accessory Hose Suction Port door back into Port. Using your Dual Power™ Pro tools: 1 2 Open Accessory Hose Suction Port at the bottom of hose and pull the hose and solution Insert hose end connector by inserting firmly into place.
Press the button on the end of the Dirty Water Tank. Make sure to close door to the unit. NOTE: Spot Treater Wand attachment is the same process as attaching hose to ensure proper suction. connection from machine to the hose in the same manner. NOTE: Upholstery and SpinScrub Powered Hand Tool attach to remove. 13 3 Close Accessory Hose Suction Port door back into Port. Using your Dual Power™ Pro tools: 1 2 Open Accessory Hose Suction Port at the bottom of hose and pull the hose and solution Insert hose end connector by inserting firmly into place.
Product Manual
Page 18
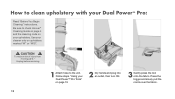
...outlet, then turn ON. 3 Gently press the tool onto the fabric. Follow steps "Using your Dual Power™ Pro Tools" on upholstery marked "W" or "W/S". ! Be sure to clean upholstery with your Dual Power™ Pro: Read "Before You Begin Cleaning" instructions. To reduce risk of injury from moving ...parts - CAUTION ! Press the trigger and slowly pull the nozzle over the fabric. 15 How to check Hoover Cleaning Guide on page 4 and ...
...outlet, then turn ON. 3 Gently press the tool onto the fabric. Follow steps "Using your Dual Power™ Pro Tools" on upholstery marked "W" or "W/S". ! Be sure to clean upholstery with your Dual Power™ Pro: Read "Before You Begin Cleaning" instructions. To reduce risk of injury from moving ...parts - CAUTION ! Press the trigger and slowly pull the nozzle over the fabric. 15 How to check Hoover Cleaning Guide on page 4 and ...
Product Manual
Page 20
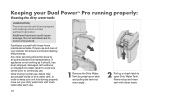
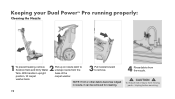
Keeping your Dual Power™ Pro running properly: Cleaning the dirty water tank: LUBRICATION The motor and brushroll are equipped with clean water. 17 Any other servicing should , has ...
Keeping your Dual Power™ Pro running properly: Cleaning the dirty water tank: LUBRICATION The motor and brushroll are equipped with clean water. 17 Any other servicing should , has ...
Product Manual
Page 22
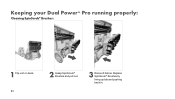
Keeping your Dual Power™ Pro running properly: Cleaning the Nozzle: 1 2 To prevent leaking, remove Solution Tank and Dirty Water Pull up on nozzle latch to remove. With handle in nozzle, it can be removed for cleaning. 4 Rinse debris from the nozzle. ! To reduce risk of the 3 Pull nozzle forward to unsnap nozzle from moving parts - washer back. Unplug before servicing. 19 NOTE: If lint or other debris becomes lodged in upright base of injury from the Tank. CAUTION ! position, tilt carpet carpet washer.
Keeping your Dual Power™ Pro running properly: Cleaning the Nozzle: 1 2 To prevent leaking, remove Solution Tank and Dirty Water Pull up on nozzle latch to remove. With handle in nozzle, it can be removed for cleaning. 4 Rinse debris from the nozzle. ! To reduce risk of the 3 Pull nozzle forward to unsnap nozzle from moving parts - washer back. Unplug before servicing. 19 NOTE: If lint or other debris becomes lodged in upright base of injury from the Tank. CAUTION ! position, tilt carpet carpet washer.
Product Manual
Page 24
Keeping your Dual Power™ Pro running properly: Cleaning SpinScrub Brushes: 1 Flip unit on back. 21 2 Grasp SpinScrub Brushes and pull out. 3 Rinse off debris. Replace SpinScrub Brushes by lining up tab and pushing back in.
Keeping your Dual Power™ Pro running properly: Cleaning SpinScrub Brushes: 1 Flip unit on back. 21 2 Grasp SpinScrub Brushes and pull out. 3 Rinse off debris. Replace SpinScrub Brushes by lining up tab and pushing back in.

Product Manual
Page 25
CAUTION ! To reduce risk of screws. 3 Flip cleaner to the upright position. ! Circles show location of injury from moving parts - Unplug before servicing. 4 Press the ON/OFF button and the handle release button to expose bottom of cleaner. Keeping® your Dual Power™ Pro running properly: Removing the flat belt: 1 Flip cleaner on its back to loosen hood. 22 Make sure nozzle and SpinScrub Brushes are removed. 2 To access the belt remove the 9 screws.
CAUTION ! To reduce risk of screws. 3 Flip cleaner to the upright position. ! Circles show location of injury from moving parts - Unplug before servicing. 4 Press the ON/OFF button and the handle release button to expose bottom of cleaner. Keeping® your Dual Power™ Pro running properly: Removing the flat belt: 1 Flip cleaner on its back to loosen hood. 22 Make sure nozzle and SpinScrub Brushes are removed. 2 To access the belt remove the 9 screws.
Product Manual
Page 27
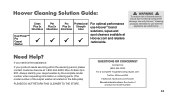
...products intended for model number. 24 Need Help? Always identify your product needs servicing within the warranty period, please contact Customer Service at Hoover.com and retailers nationwide. ! See back of the carpet washer is located on the data plate) PLEASE DO NOT RETURN THIS CLEANER TO... requesting information or ordering parts. (The model number of product for use with the appliance as noted below. Hoover Cleaning Solution Guide: Clean Plus 2x 32oz/64oz Dual Power™ Pro Carpet Washer Pet Plus 2x 32oz/64oz Pro Professional Plus 2x Strength 32oz/64oz 50oz For optimal...
...products intended for model number. 24 Need Help? Always identify your product needs servicing within the warranty period, please contact Customer Service at Hoover.com and retailers nationwide. ! See back of the carpet washer is located on the data plate) PLEASE DO NOT RETURN THIS CLEANER TO... requesting information or ordering parts. (The model number of product for use with the appliance as noted below. Hoover Cleaning Solution Guide: Clean Plus 2x 32oz/64oz Dual Power™ Pro Carpet Washer Pet Plus 2x 32oz/64oz Pro Professional Plus 2x Strength 32oz/64oz 50oz For optimal...


