Product Manual
Page 4
...as a handle, close a door on cord. To avoid injury or damage, keep free of stairs or on carpet moistened by cleaning process. •Use only HOOVER® cleaning products intended for use with damaged cord or plug. Do not place cleaner on stairs or furniture, as it may result in injury...•Use extra care when cleaning on cord. To avoid personal injury or damage, and to prevent the cleaner from openings and moving parts. •Turn off all parts of body away from falling, always place cleaner at voltage specified on data plate on lower back of cleaner. •Do not leave...
...as a handle, close a door on cord. To avoid injury or damage, keep free of stairs or on carpet moistened by cleaning process. •Use only HOOVER® cleaning products intended for use with damaged cord or plug. Do not place cleaner on stairs or furniture, as it may result in injury...•Use extra care when cleaning on cord. To avoid personal injury or damage, and to prevent the cleaner from openings and moving parts. •Turn off all parts of body away from falling, always place cleaner at voltage specified on data plate on lower back of cleaner. •Do not leave...
Product Manual
Page 14
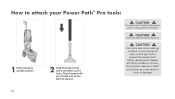
CAUTION ! How to attach your thumb and on the latch to prevent the cleaner from moving parts - Push forward with your Power Path™ Pro tools: 1 Place handle in upright position. 2 Slide the hose on floor. CAUTION ! To avoid personal injury or ...
CAUTION ! How to attach your thumb and on the latch to prevent the cleaner from moving parts - Push forward with your Power Path™ Pro tools: 1 Place handle in upright position. 2 Slide the hose on floor. CAUTION ! To avoid personal injury or ...
Product Manual
Page 18
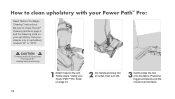
Be sure to check Hoover Cleaning Guide on page 4 and the cleaning code on your Power Path™ Pro Tools" on upholstery marked "W" or "W/S". ! Unplug before servicing. 1 Attach hose .... 2 Dry hands and plug into an outlet, then turn ON. 3 Gently press the tool onto the fabric. CAUTION ! To reduce risk of injury from moving parts - Use your Power Path™ Pro: Read "Before You Begin Cleaning" instructions.
Be sure to check Hoover Cleaning Guide on page 4 and the cleaning code on your Power Path™ Pro Tools" on upholstery marked "W" or "W/S". ! Unplug before servicing. 1 Attach hose .... 2 Dry hands and plug into an outlet, then turn ON. 3 Gently press the tool onto the fabric. CAUTION ! To reduce risk of injury from moving parts - Use your Power Path™ Pro: Read "Before You Begin Cleaning" instructions.

Product Manual
Page 22
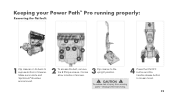
position, tilt carpet carpet washer. Unplug before servicing. 19 CAUTION ! NOTE: If lint or other debris becomes lodged in upright Pull up on nozzle latch to unsnap nozzle from the base of injury from the nozzle. ! With handle in nozzle, it can be removed for cleaning. 4 Rinse debris from moving parts - Keeping your Power Path™ Pro running properly: Cleaning the Nozzle: 1 2 To prevent leaking, remove Solution Tank and Dirty Water Tank. To reduce risk of the 3 Pull nozzle forward to remove. washer back.
position, tilt carpet carpet washer. Unplug before servicing. 19 CAUTION ! NOTE: If lint or other debris becomes lodged in upright Pull up on nozzle latch to unsnap nozzle from the base of injury from the nozzle. ! With handle in nozzle, it can be removed for cleaning. 4 Rinse debris from moving parts - Keeping your Power Path™ Pro running properly: Cleaning the Nozzle: 1 2 To prevent leaking, remove Solution Tank and Dirty Water Tank. To reduce risk of the 3 Pull nozzle forward to remove. washer back.
Product Manual
Page 25
To reduce risk of cleaner. Circles show location of screws. 3 Flip cleaner to loosen hood. 22 CAUTION ! Unplug before servicing. 4 Press the ON/OFF button and the handle release button to the upright position. ! Make sure nozzle and SpinScrub Brushes are removed. 2 To access the belt, remove the 8 Philips screws. Keeping® your Power Path™ Pro running properly: Removing the flat belt: 1 Flip cleaner on its back to expose bottom of injury from moving parts -
To reduce risk of cleaner. Circles show location of screws. 3 Flip cleaner to loosen hood. 22 CAUTION ! Unplug before servicing. 4 Press the ON/OFF button and the handle release button to the upright position. ! Make sure nozzle and SpinScrub Brushes are removed. 2 To access the belt, remove the 8 Philips screws. Keeping® your Power Path™ Pro running properly: Removing the flat belt: 1 Flip cleaner on its back to expose bottom of injury from moving parts -

Product Manual
Page 26
NOTE: Flat belt is in upright position. Belt: What to side. Slide off flat belt and replace with new belt. To reassemble, reverse steps. 5 Pull up on hood and move to Buy For replacement belts please order part number 440006154 for tooth/ timing belt or 440006155 for flat belt. To locate a dealer nearest you, please call 1-800-944-9200 or visit our website at www.hoover.com. Hood will still be attached to unit. 23 6 Make sure unit is smooth while timing belt has teeth.
NOTE: Flat belt is in upright position. Belt: What to side. Slide off flat belt and replace with new belt. To reassemble, reverse steps. 5 Pull up on hood and move to Buy For replacement belts please order part number 440006154 for tooth/ timing belt or 440006155 for flat belt. To locate a dealer nearest you, please call 1-800-944-9200 or visit our website at www.hoover.com. Hood will still be attached to unit. 23 6 Make sure unit is smooth while timing belt has teeth.
Product Manual
Page 27
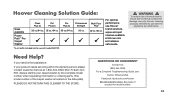
..../64 oz. Need Help? If you need further assistance: If your carpet washer by the complete model number when requesting information or ordering parts. (The model number of product for model number. 24 Always identify your product needs servicing within the warranty period, please contact Customer Service at...; brand solutions, wipes and spot cleaners available at 1-800-944-9200; bottle included and for use with model FH51102. Hoover Cleaning Solution Guide: Sizes available Power Path™ Pro Carpet Washer Clean Plus 2x Pet Plus 2x Pro Plus 2x Professional Strength 32 ...
..../64 oz. Need Help? If you need further assistance: If your carpet washer by the complete model number when requesting information or ordering parts. (The model number of product for model number. 24 Always identify your product needs servicing within the warranty period, please contact Customer Service at...; brand solutions, wipes and spot cleaners available at 1-800-944-9200; bottle included and for use with model FH51102. Hoover Cleaning Solution Guide: Sizes available Power Path™ Pro Carpet Washer Clean Plus 2x Pet Plus 2x Pro Plus 2x Professional Strength 32 ...

Product Manual
Page 29
...services), improper maintenance of the product, damage due to misuse, acts of God, nature, vandalism or other acts beyond the control of Hoover®, owner's acts or omissions, use and in accordance with proof of Ohio. This Warranty shall be paid one year from any..., EXPRESSED OR IMPLIED, INCLUDING WARRANTIES OF MERCHANTABILITY OR FITNESS FOR PARTICULAR PURPOSE, ARE DISCLAIMED. During the Warranty Period, Hoover® will provide labor and parts at no cost to authorized service outlets in material and workmanship for warranty service, cost of repair are on the back...
...services), improper maintenance of the product, damage due to misuse, acts of God, nature, vandalism or other acts beyond the control of Hoover®, owner's acts or omissions, use and in accordance with proof of Ohio. This Warranty shall be paid one year from any..., EXPRESSED OR IMPLIED, INCLUDING WARRANTIES OF MERCHANTABILITY OR FITNESS FOR PARTICULAR PURPOSE, ARE DISCLAIMED. During the Warranty Period, Hoover® will provide labor and parts at no cost to authorized service outlets in material and workmanship for warranty service, cost of repair are on the back...


