Product Manual
Page 2
OWNER'S Manual Operating and Servicing Instructions www.hoover.com DUAL POWER MAX Carpet Washer Please visit Hoover.com for video instructions for this product to the store. For assistance, please call Customer Service at 1-800-944-9200 Mon-Fri 8am-7pm EST before returning this cleaner. THIS PRODUCT IS INTENDED FOR HOUSEHOLD USE ONLY. IF USED COMMERCIALLY WARRANTY IS VOID. ©2013 Techtronic Floor Care Technology Limited. Questions or concerns? All rights reserved. #961151113 ID108382-R0 IMPORTANT: READ CAREFULLY BEFORE ASSEMBLY AND USE.
OWNER'S Manual Operating and Servicing Instructions www.hoover.com DUAL POWER MAX Carpet Washer Please visit Hoover.com for video instructions for this product to the store. For assistance, please call Customer Service at 1-800-944-9200 Mon-Fri 8am-7pm EST before returning this cleaner. THIS PRODUCT IS INTENDED FOR HOUSEHOLD USE ONLY. IF USED COMMERCIALLY WARRANTY IS VOID. ©2013 Techtronic Floor Care Technology Limited. Questions or concerns? All rights reserved. #961151113 ID108382-R0 IMPORTANT: READ CAREFULLY BEFORE ASSEMBLY AND USE.
Product Manual
Page 3
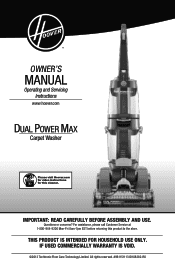
... rear of cleaner) Contents Important Safety Instructions...3 Features...5 Cleaner Assembly...6 How To Assemble...6 General Operation...7 Clean Water/Solution Tank...7 On-Off Switch...7 Dirty Water Tank...8 Tools 9 Maintenance...12 Tanks...12 Nozzle...12 Belt/Brushes...13 Troubleshooting...14 Service...15 Cleaning Products...15 Warranty...16 If you need assistance: Visit our website at Hoover.com or call 1-800-944-9200 for warranty service of Hoover® authorized dealer locations (U.S. Fri 8am- 7pm EST. Thank you for this Hard Floor Cleaner. CODE Hint: Attach your sales...
... rear of cleaner) Contents Important Safety Instructions...3 Features...5 Cleaner Assembly...6 How To Assemble...6 General Operation...7 Clean Water/Solution Tank...7 On-Off Switch...7 Dirty Water Tank...8 Tools 9 Maintenance...12 Tanks...12 Nozzle...12 Belt/Brushes...13 Troubleshooting...14 Service...15 Cleaning Products...15 Warranty...16 If you need assistance: Visit our website at Hoover.com or call 1-800-944-9200 for warranty service of Hoover® authorized dealer locations (U.S. Fri 8am- 7pm EST. Thank you for this Hard Floor Cleaner. CODE Hint: Attach your sales...
Product Manual
Page 6
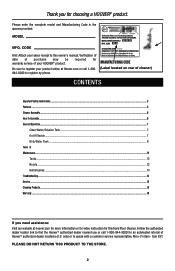
... HOOVER® cleaning products intended for use with wet hands. • Do not put any object into any opening blocked; Do not run appliance over floor electrical outlets. • WARNING: This product contains chemicals known to the State of this manual. To unplug, grasp the plug, not the cord. • Do not handle plug or appliance with this machine. (See the "Cleaning Products...
... HOOVER® cleaning products intended for use with wet hands. • Do not put any object into any opening blocked; Do not run appliance over floor electrical outlets. • WARNING: This product contains chemicals known to the State of this manual. To unplug, grasp the plug, not the cord. • Do not handle plug or appliance with this machine. (See the "Cleaning Products...
Product Manual
Page 7
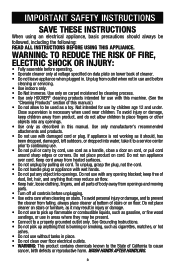
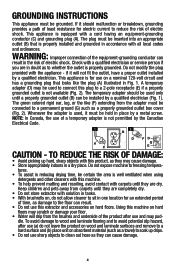
... accordance with this machine on hard floors may scratch or damage your floor. • Water will not fit the outlet, have a proper outlet installed by the Canadian Electrical Code. 1 2 B A C D FD G E Caution - This appliance is equipped with the appliance - Grounding Instructions This appliance must be certain the area is well ventilated when using detergents and other cleaners with solution in tanks. • With brushrolls...
... accordance with this machine on hard floors may scratch or damage your floor. • Water will not fit the outlet, have a proper outlet installed by the Canadian Electrical Code. 1 2 B A C D FD G E Caution - This appliance is equipped with the appliance - Grounding Instructions This appliance must be certain the area is well ventilated when using detergents and other cleaners with solution in tanks. • With brushrolls...
Product Manual
Page 10
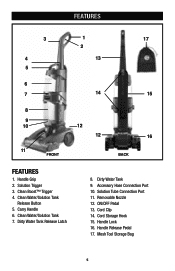
Dirty Water Tank Release Latch 8. Cord Clip 14. Handle Release Pedal 17. Mesh Tool Storage Bag 5 Accessory Hose Connection Port 10. ON/OFF Pedal 13. Removable Nozzle 12. Solution Trigger 3. Handle Grip 2. Dirty Water Tank 9. Clean Water/Solution Tank 7. Cord Storage Hook 15. Clean Water/Solution Tank Release Button 5. Carry Handle 6. Solution Tube Connection Port 11. FEATURES 3 1 17 2 4 13 5 6 7 14 15 8 9 10 12 12 16 11 FRONT BACK FEATURES 1. Clean Boost™ Trigger 4. Handle Lock 16.
Dirty Water Tank Release Latch 8. Cord Clip 14. Handle Release Pedal 17. Mesh Tool Storage Bag 5 Accessory Hose Connection Port 10. ON/OFF Pedal 13. Removable Nozzle 12. Solution Trigger 3. Handle Grip 2. Dirty Water Tank 9. Clean Water/Solution Tank 7. Cord Storage Hook 15. Clean Water/Solution Tank Release Button 5. Carry Handle 6. Solution Tube Connection Port 11. FEATURES 3 1 17 2 4 13 5 6 7 14 15 8 9 10 12 12 16 11 FRONT BACK FEATURES 1. Clean Boost™ Trigger 4. Handle Lock 16.

Product Manual
Page 11
... dampened cloth. Vacuum upholstery with a vacuum cleaner with an agitator for color removal or bleed with an appropriate Hoover Cleaning Solutions, see "Cleaning Solutions" section. 1. Use a crevice tool to protect wood or metal surfaces from carton and identify each item shown. Cleaner ASSEMBLY CARTON CONTENTS A. Clean Water/Solution Tank D. Carpet Cleaning Detergent F. HOW TO ASSEMBLe Base and Lower Handle Assembly 2.1 2.2 2.1 Stand base in upright position. Push handle onto base. 2.2 Turn dial counter clockwise to cord. Attach the plug end...
... dampened cloth. Vacuum upholstery with a vacuum cleaner with an agitator for color removal or bleed with an appropriate Hoover Cleaning Solutions, see "Cleaning Solutions" section. 1. Use a crevice tool to protect wood or metal surfaces from carton and identify each item shown. Cleaner ASSEMBLY CARTON CONTENTS A. Clean Water/Solution Tank D. Carpet Cleaning Detergent F. HOW TO ASSEMBLe Base and Lower Handle Assembly 2.1 2.2 2.1 Stand base in upright position. Push handle onto base. 2.2 Turn dial counter clockwise to cord. Attach the plug end...
Product Manual
Page 14
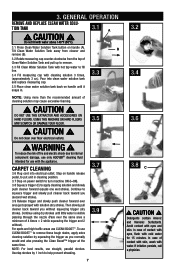
... at the same time. Pour into electrical outlet. USING THIS MACHINE ON HARD FLOORS MAY SCRATCH OR DAMAGE YOUR FLOOR. ! Step on handle until little water is visible passing through the nozzle (Pass over floor electrical outlets. 3.5 ! For spots and high traffic areas use straight, parallel strokes. CAUTION ! Tilt Clean Water Solution Tank away from cleaner and B remove (B). 3.2 Rotate measuring cap counter-clockwise from the top of fire...
... at the same time. Pour into electrical outlet. USING THIS MACHINE ON HARD FLOORS MAY SCRATCH OR DAMAGE YOUR FLOOR. ! Step on handle until little water is visible passing through the nozzle (Pass over floor electrical outlets. 3.5 ! For spots and high traffic areas use straight, parallel strokes. CAUTION ! Tilt Clean Water Solution Tank away from cleaner and B remove (B). 3.2 Rotate measuring cap counter-clockwise from the top of fire...
Product Manual
Page 15
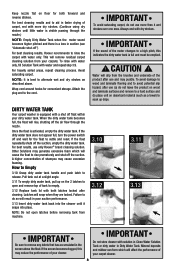
... . IMPORTANT Do not store cleaner with more than 4 wet strokes over one area. Avoid saturating carpet. For best results, use only Hoover® brand cleaning solution. If the screen becomes clogged, this indicates the dirty water tank is activated, empty the dirty water tank. This will drip from the brushes and underside of your dirty water tank. Attach the plug end to release. Keep nozzle flat on floor for both latches locked...
... . IMPORTANT Do not store cleaner with more than 4 wet strokes over one area. Avoid saturating carpet. For best results, use only Hoover® brand cleaning solution. If the screen becomes clogged, this indicates the dirty water tank is activated, empty the dirty water tank. This will drip from the brushes and underside of your dirty water tank. Attach the plug end to release. Keep nozzle flat on floor for both latches locked...
Product Manual
Page 18
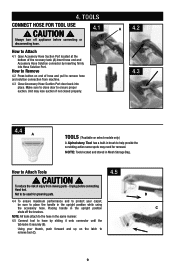
... Storage Bag. Using your carpet, be used for removal. Unit may need for grooming pets. 4.4 To ensure maximum performance and to protect your thumb, push forward and up on select models only.) A. CAUTION ! NOTE: Tools located and stored in the upright position while using the accessory hose. Upholstery Tool has a built-in brush to remove tool (C). 4.5 B C 9 TOOLS CONNECT hose FOR TOOL USE 4.1 ! Unplug before connecting or disconnecting hose. Make sure to close door to Attach Tools !
... Storage Bag. Using your carpet, be used for removal. Unit may need for grooming pets. 4.4 To ensure maximum performance and to protect your thumb, push forward and up on select models only.) A. CAUTION ! NOTE: Tools located and stored in the upright position while using the accessory hose. Upholstery Tool has a built-in brush to remove tool (C). 4.5 B C 9 TOOLS CONNECT hose FOR TOOL USE 4.1 ! Unplug before connecting or disconnecting hose. Make sure to close door to Attach Tools !

Product Manual
Page 19
... your upholstery. For best cleaning results, Hoover recommends to check Hoover Cleaning Guide on page 6 and the cleaning code on your upholstery. When finished cleaning, follow "After Cleaning" and "After Using Tool" instructions. 10 Always turn off appliance before using the tool again. Press the trigger and slowly pull the nozzle over -wetting and damage to fabric. 11. Make no more solution. This will not rotate while handle is completely dry before connecting or disconnecting hose...
... your upholstery. For best cleaning results, Hoover recommends to check Hoover Cleaning Guide on page 6 and the cleaning code on your upholstery. When finished cleaning, follow "After Cleaning" and "After Using Tool" instructions. 10 Always turn off appliance before using the tool again. Press the trigger and slowly pull the nozzle over -wetting and damage to fabric. 11. Make no more solution. This will not rotate while handle is completely dry before connecting or disconnecting hose...

Product Manual
Page 22
... the screen becomes clogged, this may accumulate inside of personal injury - Cleaning the dirty water tank Note: During normal use . ! Latches will ensure continued cleaning effectiveness. Replace dirty water tank back onto unit until it to a service center prior to remove the filter screen from unit by an authorized service representative. Attempts to continuing use of cleaning, debris may reduce the performance of your cleaner will snap when...
... the screen becomes clogged, this may accumulate inside of personal injury - Cleaning the dirty water tank Note: During normal use . ! Latches will ensure continued cleaning effectiveness. Replace dirty water tank back onto unit until it to a service center prior to remove the filter screen from unit by an authorized service representative. Attempts to continuing use of cleaning, debris may reduce the performance of your cleaner will snap when...
Product Manual
Page 23
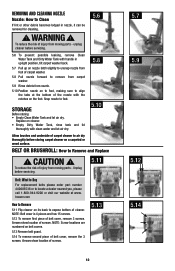
... of cleaner. Snap nozzle to Remove and Replace ! Arrows show location of screws. Storage Before storing: • Empty Clean Water Tank and let air dry. unplug cleaner before servicing. 5.6 To prevent possible leaking, remove Clean Water Tank and Dirty Water Tank with handle in nozzle, it can be removed for cleaning. ! To reduce the risk of belt cover, remove the 3 screws. REMOVING AND CLEANING NOZZLE 5.6 Nozzle: How to Clean If lint or other debris becomes lodged in upright position, tilt carpet washer...
... of cleaner. Snap nozzle to Remove and Replace ! Arrows show location of screws. Storage Before storing: • Empty Clean Water Tank and let air dry. unplug cleaner before servicing. 5.6 To prevent possible leaking, remove Clean Water Tank and Dirty Water Tank with handle in nozzle, it can be removed for cleaning. ! To reduce the risk of belt cover, remove the 3 screws. REMOVING AND CLEANING NOZZLE 5.6 Nozzle: How to Clean If lint or other debris becomes lodged in upright position, tilt carpet washer...
Product Manual
Page 26
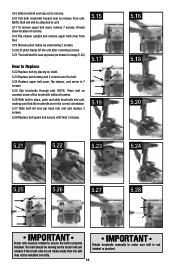
... not be rotated to Replace 5.22 Replace belt by placing on rounded areas of screws. 5.18 Flip cleaner upright and remove upper belt cover from unit. NOTE: Place belt on shaft. 5.23 Replace pivot clamp and 2 screws over the belt. 5.24 Replace upper belt cover, flip cleaner, and screw in the correct orientation. 5.27 Slide belt roll end cap back into unit and replace 3 screws. 5.28 Replace belt guard and...
... not be rotated to Replace 5.22 Replace belt by placing on rounded areas of screws. 5.18 Flip cleaner upright and remove upper belt cover from unit. NOTE: Place belt on shaft. 5.23 Replace pivot clamp and 2 screws over the belt. 5.24 Replace upper belt cover, flip cleaner, and screw in the correct orientation. 5.27 Slide belt roll end cap back into unit and replace 3 screws. 5.28 Replace belt guard and...
Product Manual
Page 27
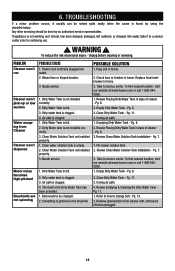
...Blown fuse or tripped breaker. 3. Needs service. 1. Dirty Water tank is full. 3. Clean Water Solution Tank not installed properly. 3. Replace fuse/reset breaker in firmly. 2. Pg. 11. 4. Pg. 8. 2. Review Placing Dirty Water Tank in base of personal injury - Empty Dirty Water Tank - Clean Dirty Water Tank - PROBLEM Cleaner won't run Cleaner won't pick-up or low suction Water escaping from cleaner with unit turned off and unplugged. 14 Dirty Water Tank is not installed correctly. 3. Dirty water tank is clogged. 3. Dirty water tank is clogged. 4. Plug unit in home...
...Blown fuse or tripped breaker. 3. Needs service. 1. Dirty Water tank is full. 3. Clean Water Solution Tank not installed properly. 3. Replace fuse/reset breaker in firmly. 2. Pg. 11. 4. Pg. 8. 2. Review Placing Dirty Water Tank in base of personal injury - Empty Dirty Water Tank - Clean Dirty Water Tank - PROBLEM Cleaner won't run Cleaner won't pick-up or low suction Water escaping from cleaner with unit turned off and unplugged. 14 Dirty Water Tank is not installed correctly. 3. Dirty water tank is clogged. 3. Dirty water tank is clogged. 4. Plug unit in home...
Product Manual
Page 30
...-9200; Follow the service center link to find the service outlet nearest you need further assistance: To speak with the appliance as noted below. ® Hoover Cleaning Solution Guide Product Name Clean Plus 2x 32oz/64oz Pet Pro Plus 2x Plus 2x 32oz/64oz 32oz/64oz DUHAoLovPeOrW®EPRoMwAeXr CSacrrpuebt DWealushxer ✓ ✓ ✓ For optimal performance use only Hoover® cleaning products intended for service. Mon-Fri...
...-9200; Follow the service center link to find the service outlet nearest you need further assistance: To speak with the appliance as noted below. ® Hoover Cleaning Solution Guide Product Name Clean Plus 2x 32oz/64oz Pet Pro Plus 2x Plus 2x 32oz/64oz 32oz/64oz DUHAoLovPeOrW®EPRoMwAeXr CSacrrpuebt DWealushxer ✓ ✓ ✓ For optimal performance use only Hoover® cleaning products intended for service. Mon-Fri...
Product Manual
Page 31
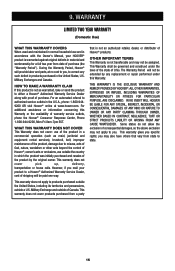
... and parts, at www.hoover.com. For an automated referral to authorized service outlets in accordance with the Owner's Manual, your product to products purchased outside the United States, including its territories and possessions, outside of Hoover® products. WHAT THIS WARRANTY DOES NOT COVER This Warranty does not cover: use of the product in a commercial operation (such as warranted, take or send the product to you specific rights...
... and parts, at www.hoover.com. For an automated referral to authorized service outlets in accordance with the Owner's Manual, your product to products purchased outside the United States, including its territories and possessions, outside of Hoover® products. WHAT THIS WARRANTY DOES NOT COVER This Warranty does not cover: use of the product in a commercial operation (such as warranted, take or send the product to you specific rights...


