Product Manual
Page 1
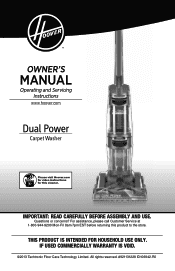
OWNER'S Manual Operating and Servicing Instructions www.hoover.com Dual Power Carpet Washer Please visit Hoover.com for video instructions for this product to the store. For assistance, please call Customer Service at 1-800-944-9200 Mon-Fri 8am-7pm EST before returning this cleaner. THIS PRODUCT IS INTENDED FOR HOUSEHOLD USE ONLY. All rights reserved. #921131228 ID106942-R0 IMPORTANT: READ CAREFULLY BEFORE ASSEMBLY AND USE. IF USED COMMERCIALLY WARRANTY IS VOID. ©2013 Techtronic Floor Care Technology Limited. Questions or concerns?
OWNER'S Manual Operating and Servicing Instructions www.hoover.com Dual Power Carpet Washer Please visit Hoover.com for video instructions for this product to the store. For assistance, please call Customer Service at 1-800-944-9200 Mon-Fri 8am-7pm EST before returning this cleaner. THIS PRODUCT IS INTENDED FOR HOUSEHOLD USE ONLY. All rights reserved. #921131228 ID106942-R0 IMPORTANT: READ CAREFULLY BEFORE ASSEMBLY AND USE. IF USED COMMERCIALLY WARRANTY IS VOID. ©2013 Techtronic Floor Care Technology Limited. Questions or concerns?
Product Manual
Page 3
... complete model and Manufacturing Code in China Manufacturing code (Label located on rear of cleaner) Contents Important Safeguards 3 Features...5 Cleaner Assembly...6 How To Assemble...6 General Operation...7 Clean Water/Solution Tank 7 On-Off Switch...7 Dirty Water Tank 8 Maintenance...9 Tanks...9 Belt/Brushes...10 Troubleshooting...11 Service...11 Cleaning Products...12 Warranty...13 If you need assistance: Visit our website at Hoover.com or call 1-800944-9200 for choosing a HOOVER® product. Fri 8am- 7pm EST. only) or to this Hard Floor Cleaner. Follow...
... complete model and Manufacturing Code in China Manufacturing code (Label located on rear of cleaner) Contents Important Safeguards 3 Features...5 Cleaner Assembly...6 How To Assemble...6 General Operation...7 Clean Water/Solution Tank 7 On-Off Switch...7 Dirty Water Tank 8 Maintenance...9 Tanks...9 Belt/Brushes...10 Troubleshooting...11 Service...11 Cleaning Products...12 Warranty...13 If you need assistance: Visit our website at Hoover.com or call 1-800944-9200 for choosing a HOOVER® product. Fri 8am- 7pm EST. only) or to this Hard Floor Cleaner. Follow...
Product Manual
Page 6
... or plug. Do not place cleaner on carpet moistened by cleaning process. • Use only HOOVER® cleaning products intended for use by cord, use cord as a handle, close a door on cord. WASH HANDS AFTER HANDLING. 3 Use only manufacturer's recommended attachments and products. • Do not use with any openings. • Use only as described in the upright position. • Turn off all parts of body away from falling, always...
... or plug. Do not place cleaner on carpet moistened by cleaning process. • Use only HOOVER® cleaning products intended for use by cord, use cord as a handle, close a door on cord. WASH HANDS AFTER HANDLING. 3 Use only manufacturer's recommended attachments and products. • Do not use with any openings. • Use only as described in the upright position. • Turn off all parts of body away from falling, always...
Product Manual
Page 7
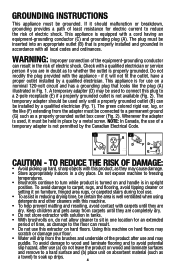
... other cleaners with this product, as they are completely dry. • Do not store extractor with this machine. • To help prevent matting and resoiling, avoid contact with a qualified electrician or service person if you are dry. Using this machine on furniture, fringed area rugs, or carpeted stairs during tool use of the equipment-grounding conductor can be installed by a qualified electrician. Grounding Instructions...
... other cleaners with this product, as they are completely dry. • Do not store extractor with this machine. • To help prevent matting and resoiling, avoid contact with a qualified electrician or service person if you are dry. Using this machine on furniture, fringed area rugs, or carpeted stairs during tool use of the equipment-grounding conductor can be installed by a qualified electrician. Grounding Instructions...

Product Manual
Page 10
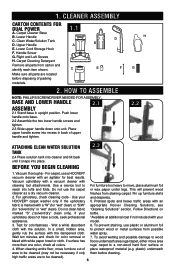
Clean Water/Solution Tank Release Latch 5. FEATURES 1 2 10 3 4 5 11 6 7 8 12 8 FRONT 9 BACK FEATURES 1. Clean Water/Solution Tank 6. Nozzle 10. Handle Release Pedal 5 Cord Clip 11. Dirty Water Tank 8. Cord Storage Hooks (rotate) 12. Dirty Water Tank Release Latch 7. Handle Grip 2. ON/OFF Pedal 9. Carry Handle 4. Solution Trigger 3.
Clean Water/Solution Tank Release Latch 5. FEATURES 1 2 10 3 4 5 11 6 7 8 12 8 FRONT 9 BACK FEATURES 1. Clean Water/Solution Tank 6. Nozzle 10. Handle Release Pedal 5 Cord Clip 11. Dirty Water Tank 8. Cord Storage Hooks (rotate) 12. Dirty Water Tank Release Latch 7. Handle Grip 2. ON/OFF Pedal 9. Carry Handle 4. Solution Trigger 3.
Product Manual
Page 11
... Handle C. Carpet Cleaning Detergent Remove all colors. Vacuum upholstery with a vacuum cleaner with the dampened cloth. model. 3. Place upper handle screw into recess in upright position. H G 2.2 Attaching clean water solution tank 2.4 Place solution tank into cleaner and tilt back until it snaps into tufts and folds. To prevent staining, use the carpet or wax paper under legs. Lower Cord Storage Hook F. Wet a white absorbent 6. 1. finishes from possible gently rub the surface with cleaning tool attachments. To avoid wetting and...
... Handle C. Carpet Cleaning Detergent Remove all colors. Vacuum upholstery with a vacuum cleaner with the dampened cloth. model. 3. Place upper handle screw into recess in upright position. H G 2.2 Attaching clean water solution tank 2.4 Place solution tank into cleaner and tilt back until it snaps into tufts and folds. To prevent staining, use the carpet or wax paper under legs. Lower Cord Storage Hook F. Wet a white absorbent 6. 1. finishes from possible gently rub the surface with cleaning tool attachments. To avoid wetting and...
Product Manual
Page 14
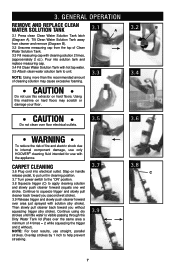
3. general operation remove and replace clean water solution tank 3.1 A 3.2 B 3.1 Press clean Clean Water Solution Tank latch (Diagram A). Tilt Clean Water Solution Tank away from cleaner and remove (Diagram B). 3.2 Unscrew measuring cap from the top of cleaning solution may scratch or damage your floor. Step on hard floors may cause excessive foaming. 3.3 3.4 CAUTION Do not use this machine on handle release pedal, to put unit in cleaning position. 3.7 Turn power switch to the "ON" position. 3.8 Squeeze trigger (C) to apply cleaning solution and slowly push cleaner forward...
3. general operation remove and replace clean water solution tank 3.1 A 3.2 B 3.1 Press clean Clean Water Solution Tank latch (Diagram A). Tilt Clean Water Solution Tank away from cleaner and remove (Diagram B). 3.2 Unscrew measuring cap from the top of cleaning solution may scratch or damage your floor. Step on hard floors may cause excessive foaming. 3.3 3.4 CAUTION Do not use this machine on handle release pedal, to put unit in cleaning position. 3.7 Turn power switch to the "ON" position. 3.8 Squeeze trigger (C) to apply cleaning solution and slowly push cleaner forward...
Product Manual
Page 15
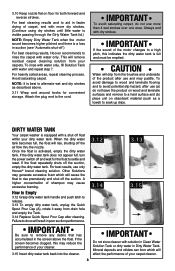
... Solutions may puddle. To rinse with water only, fill Solution Tank with a shut off the suction. NOTE: It is a loss in the screen above . 3.11 Wrap cord around hooks for convenient storage. IMPORTANT If the sound of your dirty water tank. Dirty Water Tank Your carpet washer is activated, empty the dirty water tank. If the dirty water tank does not appear full, turn the power switch off the suction, empty the dirty water tank. For best results, use...
... Solutions may puddle. To rinse with water only, fill Solution Tank with a shut off the suction. NOTE: It is a loss in the screen above . 3.11 Wrap cord around hooks for convenient storage. IMPORTANT If the sound of your dirty water tank. Dirty Water Tank Your carpet washer is activated, empty the dirty water tank. If the dirty water tank does not appear full, turn the power switch off the suction, empty the dirty water tank. For best results, use...
Product Manual
Page 18
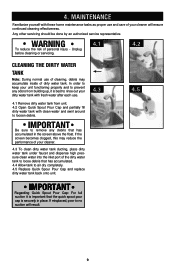
... and replace dirty water tank back onto unit. 4.3 4.5 IMPORTANT Regarding Quick Spout Pour Cap: For full suction it is securely in the screen above the float. If the screen becomes clogged, this may accumulate inside of dirty water tank. 4. MAINTENANCE Familiarize yourself with these home maintenance tasks as proper use and care of your cleaner. 4.3 To clean dirty water tank ducting, place dirty water tank under faucet and dispense high pressure clean water...
... and replace dirty water tank back onto unit. 4.3 4.5 IMPORTANT Regarding Quick Spout Pour Cap: For full suction it is securely in the screen above the float. If the screen becomes clogged, this may accumulate inside of dirty water tank. 4. MAINTENANCE Familiarize yourself with these home maintenance tasks as proper use and care of your cleaner. 4.3 To clean dirty water tank ducting, place dirty water tank under faucet and dispense high pressure clean water...
Product Manual
Page 19
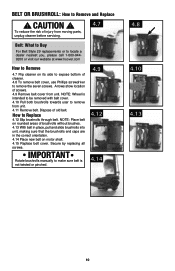
.... 4.9 Remove belt cover from moving parts, unplug cleaner before servicing. 4.7 Belt: What to Buy For Belt Style 29 replacements or to locate a dealer nearest you, please call 1-800-9449200 or visit our website at www.hoover.com How to Remove 4.7 Flip cleaner on motor shaft. 4.15 Replace belt cover. IMPORTANT Rotate brushrolls manually to make sure belt is intended to be removed with belt cover. 4.10 Pull both brushrolls towards user to remove the...
.... 4.9 Remove belt cover from moving parts, unplug cleaner before servicing. 4.7 Belt: What to Buy For Belt Style 29 replacements or to locate a dealer nearest you, please call 1-800-9449200 or visit our website at www.hoover.com How to Remove 4.7 Flip cleaner on motor shaft. 4.15 Replace belt cover. IMPORTANT Rotate brushrolls manually to make sure belt is intended to be removed with belt cover. 4.10 Pull both brushrolls towards user to remove the...
Product Manual
Page 22
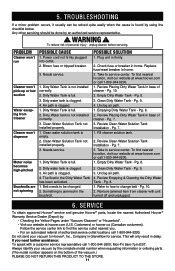
... Cleaner won 't dispense Motor noise becomes high-pitched Brushrolls are not spinning POSSIBLE CAUSE 1. Dirty Water Tank is empty. 2. The float in home. Take to change belt - Pg. 7. 3. TROUBLESHOOTING If a minor problem occurs, it usually can be done by the complete model number when requesting information or ordering parts. (The model number appears on the bottom of the vacuum.) PLEASE DO NOT RETURN THIS PRODUCT TO THE STORE. 11 Needs service...
... Cleaner won 't dispense Motor noise becomes high-pitched Brushrolls are not spinning POSSIBLE CAUSE 1. Dirty Water Tank is empty. 2. The float in home. Take to change belt - Pg. 7. 3. TROUBLESHOOTING If a minor problem occurs, it usually can be done by the complete model number when requesting information or ordering parts. (The model number appears on the bottom of the vacuum.) PLEASE DO NOT RETURN THIS PRODUCT TO THE STORE. 11 Needs service...
Product Manual
Page 23
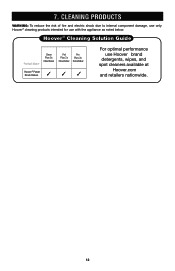
7.CLCELAENANINIGNGSOPLRUOTDIOUNCTSS WARNING: To reduce the risk of fire and electric shock due to internal component damage, use only Hoover® cleaning products intended for use with the appliance as noted below. ® Hoover Cleaning Solution Guide Product Name Clean Plus 2x 32oz/64oz Pet Pro Plus 2x Plus 2x 32oz/64oz 32oz/64oz Hoover® Power Scrub Deluxe ✓ ✓ ✓ For optimal performance use HooverÆ brand detergents, wipes, and spot cleaners available at Hoover.com and retailers nationwide. 12
7.CLCELAENANINIGNGSOPLRUOTDIOUNCTSS WARNING: To reduce the risk of fire and electric shock due to internal component damage, use only Hoover® cleaning products intended for use with the appliance as noted below. ® Hoover Cleaning Solution Guide Product Name Clean Plus 2x 32oz/64oz Pet Pro Plus 2x Plus 2x 32oz/64oz 32oz/64oz Hoover® Power Scrub Deluxe ✓ ✓ ✓ For optimal performance use HooverÆ brand detergents, wipes, and spot cleaners available at Hoover.com and retailers nationwide. 12
Product Manual
Page 26
... EST. WHAT THIS WARRANTY DOES NOT COVER This Warranty does not cover: use of the product in a commercial operation (such as warranted, take or send the product to either a Hoover® Sales and Service Center or Hoover® Authorized Warranty Service Dealer along with the Owner's Manual, your product to a Hoover® Sales and Service Center for a full one year from state to correct any replacement or repair performed under the...
... EST. WHAT THIS WARRANTY DOES NOT COVER This Warranty does not cover: use of the product in a commercial operation (such as warranted, take or send the product to either a Hoover® Sales and Service Center or Hoover® Authorized Warranty Service Dealer along with the Owner's Manual, your product to a Hoover® Sales and Service Center for a full one year from state to correct any replacement or repair performed under the...


