
Product Manual
Page 2
... register by phone. only) or to this owner's manual. Verification of date of purchase may be required for an automated referral of your HOOVERS product. Please enter the complete model and Manufacturing Code in the spaces provided. Be sure to register your sales receipt to speak with a customer service representative; Mon- Thankyou...
... register by phone. only) or to this owner's manual. Verification of date of purchase may be required for an automated referral of your HOOVERS product. Please enter the complete model and Manufacturing Code in the spaces provided. Be sure to register your sales receipt to speak with a customer service representative; Mon- Thankyou...
Product Manual
Page 5
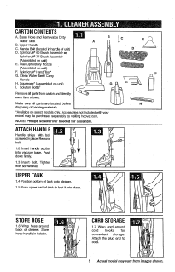
Base, Hose and Removable Dirty 1 1 Water Tank A B. Upper Handle C. Solution Bottle* B *:1,7 Remove all parts are located before disposing of tank to cord. 5 Actual model may be purchased separately by visiting hoover.com. Push down firmly. 1.3 Insert bolt. SpinScrub° 60 Brush Assembly or SpinScrube 77 Brush Assembly (Assembled on unit) I. Squeegee* (Assembled on...
Base, Hose and Removable Dirty 1 1 Water Tank A B. Upper Handle C. Solution Bottle* B *:1,7 Remove all parts are located before disposing of tank to cord. 5 Actual model may be purchased separately by visiting hoover.com. Push down firmly. 1.3 Insert bolt. SpinScrub° 60 Brush Assembly or SpinScrube 77 Brush Assembly (Assembled on unit) I. Squeegee* (Assembled on...
Product Manual
Page 6
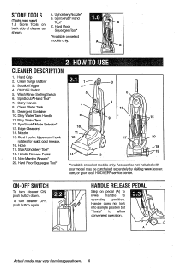
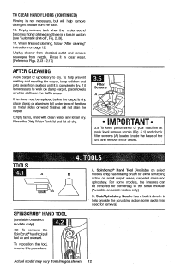
... .HDWTO US CLEANER DESCRIPTION 1. Hand Grip 2. Clean Surge Button* 3. SpinScrub® Mode Selector* 13. corn, or your model may be purchased separately by visiting www.hoover. To turn cleaner ON, push button down. SolutionTrigger 4. SpinScrub® Hand Tool* 7. Carry Handle 8. Nozzle 15. ON-...Detergent Container 10. Handle Release Pedal 19. HANDLE RELEASE PEDAL Step on pedal (A) to lower handle to allow convenient operation. 0 Actual model may vary) 1.8 Store Tools on back side of cleaner as shown. Upholstery Nozzle* B. SpinScrub° Hand Tool* C. Wash/Rinse ...
... .HDWTO US CLEANER DESCRIPTION 1. Hand Grip 2. Clean Surge Button* 3. SpinScrub® Mode Selector* 13. corn, or your model may be purchased separately by visiting www.hoover. To turn cleaner ON, push button down. SolutionTrigger 4. SpinScrub® Hand Tool* 7. Carry Handle 8. Nozzle 15. ON-...Detergent Container 10. Handle Release Pedal 19. HANDLE RELEASE PEDAL Step on pedal (A) to lower handle to allow convenient operation. 0 Actual model may vary) 1.8 Store Tools on back side of cleaner as shown. Upholstery Nozzle* B. SpinScrub° Hand Tool* C. Wash/Rinse ...
Product Manual
Page 7
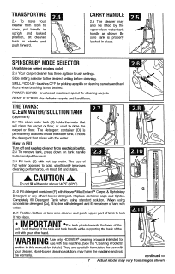
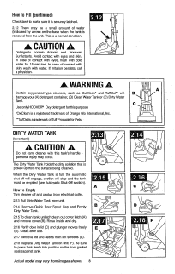
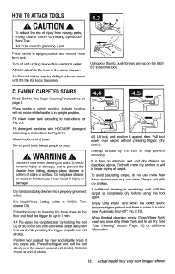
... (2x), fill to Fill Turn off and unplug cleaner from electrical outlet. 2.8 To remove tank, press down on wheels and push forward. WARNING Use only HOOVER"' cleaning products intended for use of the unit. CARRY HANDLE 2.5 The cleaner may vary from room to room, put handle in upright and locked position... on most dirt and stains. A CAUTION A Do not fill with water above 140°F (60°C). 2.10 03 2.10 Fill detergent container (F) with your other Hoover detergent. continued » 7 Actual model may also be lifted by the upper clean water tank handle as shown. Non...
... (2x), fill to Fill Turn off and unplug cleaner from electrical outlet. 2.8 To remove tank, press down on wheels and push forward. WARNING Use only HOOVER"' cleaning products intended for use of the unit. CARRY HANDLE 2.5 The cleaner may vary from room to room, put handle in upright and locked position... on most dirt and stains. A CAUTION A Do not fill with water above 140°F (60°C). 2.10 03 2.10 Fill detergent container (F) with your other Hoover detergent. continued » 7 Actual model may also be lifted by the upper clean water tank handle as shown. Non...
Product Manual
Page 8
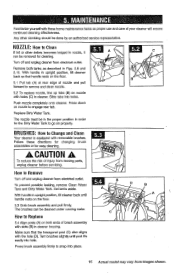
... Replace Dirty Water Tank on the base when the tank is securely latched. 2.12 There may be emptied (see Automatic Shut-Off section). Actual model may occur. This is a trademark of contact with eyes, flush with water. A CAUTION A Detergents contain Anionic and Nonionic Surfactants. In case ...dry. 2 7 2.16 Verify door in lid (C) and plunger moves freely (D). Be sure to make sure it is removed from the unit. Use only HOOVERS Oxy detergent for Pets. O 2.1;5 How to Empty Turn cleaner off will engage, suction will damage your (A) detergent container, (B) Clean Water Tank or ...
... Replace Dirty Water Tank on the base when the tank is securely latched. 2.12 There may be emptied (see Automatic Shut-Off section). Actual model may occur. This is a trademark of contact with eyes, flush with water. A CAUTION A Detergents contain Anionic and Nonionic Surfactants. In case ...dry. 2 7 2.16 Verify door in lid (C) and plunger moves freely (D). Be sure to make sure it is removed from the unit. Use only HOOVERS Oxy detergent for Pets. O 2.1;5 How to Empty Turn cleaner off will engage, suction will damage your (A) detergent container, (B) Clean Water Tank or ...
Product Manual
Page 9
...Dirty Water Tank lid (B). g. Wait ten minutes and check for color removal or bleed with cleaning tool attachments. d. To prevent staining, use a HOOVER° vacuum cleaner with an agitator for best results. This will become noticeably higher in place. Follow Directions on bottle. 9 Actualmodelmay vary from ...disk will rise to the top of area to be cleaned (may need to protect wood or metal surfaces from possible water spray. If your model. AUTOMATIC SHUT OFF When the Dirty Water Tank (lower tank) is marked with a "W" (for "wet' clean) or "S/W" (for "solvent/dry...
...Dirty Water Tank lid (B). g. Wait ten minutes and check for color removal or bleed with cleaning tool attachments. d. To prevent staining, use a HOOVER° vacuum cleaner with an agitator for best results. This will become noticeably higher in place. Follow Directions on bottle. 9 Actualmodelmay vary from ...disk will rise to the top of area to be cleaned (may need to protect wood or metal surfaces from possible water spray. If your model. AUTOMATIC SHUT OFF When the Dirty Water Tank (lower tank) is marked with a "W" (for "wet' clean) or "S/W" (for "solvent/dry...
Product Manual
Page 10
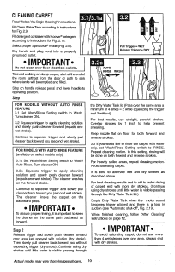
... on the forward stroke. Step 2 Release trigger and slowly push cleaner forward over the same area a minimum of carpet, end with Hoover detergent according to apply cleaning solution and slowly push cleaner forward (equals one area. For best results, use more dry strokes. (Continue...Fill Clean Water Tank according to operating position. Turn cleaner ON. 3.2 Squeeze trigger to help prevent streaking. Avoid saturating carpet. Step 1 FOR MODELS WITHOUT AUTO RINSE FEATURE 3.1 Set Wash/Rinse Setting switch to aid in suction (see "Automatic shut-off", Fig. 2.19). The cleaner rinses...
... on the forward stroke. Step 2 Release trigger and slowly push cleaner forward over the same area a minimum of carpet, end with Hoover detergent according to apply cleaning solution and slowly push cleaner forward (equals one area. For best results, use more dry strokes. (Continue...Fill Clean Water Tank according to operating position. Turn cleaner ON. 3.2 Squeeze trigger to help prevent streaking. Avoid saturating carpet. Step 1 FOR MODELS WITHOUT AUTO RINSE FEATURE 3.1 Set Wash/Rinse Setting switch to aid in suction (see "Automatic shut-off", Fig. 2.19). The cleaner rinses...
Product Manual
Page 11
... be released on the forward stroke. Turn cleaner on page 9. 3. To prevent damage to operating position. 6. PICKING UP SPILLS Your HOOVER® carpet cleaner may vary from moving parts, unplug cleaner. When finished picking up tight against the nozzle. Read "Before you begin..."After Cleaning" instructions. To release solution, press trigger. Water and detergent will automatically be released on the reverse stroke. 8. For models with HOOVER® Hard Floor that handle rests on the floor. If rinsing the floor is not recommended to instructions for Hg. 2.10. ...
... be released on the forward stroke. Turn cleaner on page 9. 3. To prevent damage to operating position. 6. PICKING UP SPILLS Your HOOVER® carpet cleaner may vary from moving parts, unplug cleaner. When finished picking up tight against the nozzle. Read "Before you begin..."After Cleaning" instructions. To release solution, press trigger. Water and detergent will automatically be released on the reverse stroke. 8. For models with HOOVER® Hard Floor that handle rests on the floor. If rinsing the floor is not recommended to instructions for Hg. 2.10. ...
Product Manual
Page 12
...residue from surface until it is necessary to dry. If it in suction (see "Automatic shut-off', Fig. 2.19). 11. Actual model may need for removal. Rinse it is completely dry. Unplug cleaner from electrical outlet and remove squeegee from images shown. 12 When finished... cleaning, follow "After cleaning" instructions on select models only) 4.2 4.2 To remove the SpinScrub® hand tool pull 0 tool up and outward. If furniture must be removed for extra ...
...residue from surface until it is necessary to dry. If it in suction (see "Automatic shut-off', Fig. 2.19). 11. Actual model may need for removal. Rinse it is completely dry. Unplug cleaner from electrical outlet and remove squeegee from images shown. 12 When finished... cleaning, follow "After cleaning" instructions on select models only) 4.2 4.2 To remove the SpinScrub® hand tool pull 0 tool up and outward. If furniture must be removed for extra ...
Product Manual
Page 13
... hose down to the floor and hold the trigger for up on page 9. Always end with HOOVER® detergent according to remove tool. Turn cleaner ON. See "After Cleaning" section (Page. 12) for grooming a pet. Actual model may result in suction (see "Automatic Shut-Off', Fig. 2.19). It is in faster drying...
... hose down to the floor and hold the trigger for up on page 9. Always end with HOOVER® detergent according to remove tool. Turn cleaner ON. See "After Cleaning" section (Page. 12) for grooming a pet. Actual model may result in suction (see "Automatic Shut-Off', Fig. 2.19). It is in faster drying...
Product Manual
Page 15
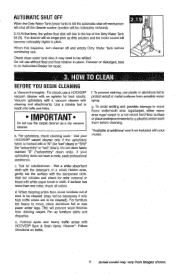
Familiarize yourself with the hole (D). Slide tabs into place. 15 Actual model may vary from electrical outlet. To prevent possible leaking, remove Clean Water Tank and Dirty Water Tank. Press brush assembly firmly to Change and Clean ...
Familiarize yourself with the hole (D). Slide tabs into place. 15 Actual model may vary from electrical outlet. To prevent possible leaking, remove Clean Water Tank and Dirty Water Tank. Press brush assembly firmly to Change and Clean ...
Product Manual
Page 17
... according to Fig. 3.5 for Service: 17800-944-9200 1. empty. 1 Turn off engaged. 2. Remove nozzle to a scrub set on "Spill Pick-ur.* setting. *Available on select models only. 17 Not firmly plugged in home. 3. Filter screens clogged. 1. Check fuse or breaker in . 1. Dirty filter screen (orange 1. Dirty Water Tank full/ automatic shut...
... according to Fig. 3.5 for Service: 17800-944-9200 1. empty. 1 Turn off engaged. 2. Remove nozzle to a scrub set on "Spill Pick-ur.* setting. *Available on select models only. 17 Not firmly plugged in home. 3. Filter screens clogged. 1. Check fuse or breaker in . 1. Dirty filter screen (orange 1. Dirty Water Tank full/ automatic shut...
Product Manual
Page 18
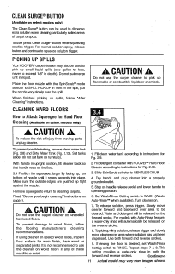
...DO NOT RETURN THIS PRODUCT TO THE STORE. 18 To obtain approved Hoover° service and genuine Hoover' parts, locate the nearest Authorized Hoover* Warranty Service Dealer (Depot) by the complete model number when requesting information or ordering parts. (Label located on lower ...handle of the following. Customers) or hoover.ca (Canadian customers). If you . • For an automated...
...DO NOT RETURN THIS PRODUCT TO THE STORE. 18 To obtain approved Hoover° service and genuine Hoover' parts, locate the nearest Authorized Hoover* Warranty Service Dealer (Depot) by the complete model number when requesting information or ordering parts. (Label located on lower ...handle of the following. Customers) or hoover.ca (Canadian customers). If you . • For an automated...


