
Manual
Page 3
...children to place fingers or other objects into openings. Unplug from heated surfaces. • Do not unplug by cleaning process. • Use only HOOVER® cleaning products intended for use by cord, use . • Do not pull or carry by children age 12 and under. Not ..., and do not allow to be followed, including the following: READ ALL INSTRUCTIONS BEFORE USING THIS APPLIANCE. keep children away from openings and moving parts. • Turn off all controls before unplugging. • Use extra care when cleaning on floor. See Grounding Instructions. • Unplug before ...
...children to place fingers or other objects into openings. Unplug from heated surfaces. • Do not unplug by cleaning process. • Use only HOOVER® cleaning products intended for use by cord, use . • Do not pull or carry by children age 12 and under. Not ..., and do not allow to be followed, including the following: READ ALL INSTRUCTIONS BEFORE USING THIS APPLIANCE. keep children away from openings and moving parts. • Turn off all controls before unplugging. • Use extra care when cleaning on floor. See Grounding Instructions. • Unplug before ...
Manual
Page 5
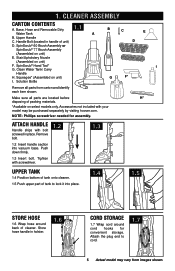
... for assembly. Push down firmly. 1.3 Insert bolt. Handle Bolt (located in handle of packing materials. *Available on unit) I G F* Remove all parts are located before H* disposing of unit) D. Stair/Upholstery Nozzle (Assembled on unit) E. Squeegee* (Assembled on select models only. Solution Bottle b C... 1.6 Cord storaGe 1.7 Wrap cord around back of tank to cord. 1.7 5 Actual model may be purchased separately by visiting hoover.com. attaCh handle Handle ships with your model may vary from carton and identify each item shown. Attach the plug end to...
... for assembly. Push down firmly. 1.3 Insert bolt. Handle Bolt (located in handle of packing materials. *Available on unit) I G F* Remove all parts are located before H* disposing of unit) D. Stair/Upholstery Nozzle (Assembled on unit) E. Squeegee* (Assembled on select models only. Solution Bottle b C... 1.6 Cord storaGe 1.7 Wrap cord around back of tank to cord. 1.7 5 Actual model may be purchased separately by visiting hoover.com. attaCh handle Handle ships with your model may vary from carton and identify each item shown. Attach the plug end to...
Manual
Page 7
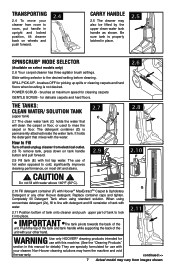
... The tanks: CLEAN WATER/ SOLUTION TANK 2.7 (upper tank) C D 2.7 The clean water tank (C) holds the water that mixes with your other Hoover detergent. IMPORTANT The tank pivots towards the back of tank to lock it into place. brushes OFF for cleaning carpets GENTLE SCRUB - E ! Completely fill...handle button and pull forward. 2.9 2.9 Fill tank (E) with water. 2.11 Position bottom of tank onto cleaner and push upper part of the unit. continued >> 7 Actual model may harm the machine and void the warranty. POWER SCRUB - CAUTION ! When using standard solution. Non...
... The tanks: CLEAN WATER/ SOLUTION TANK 2.7 (upper tank) C D 2.7 The clean water tank (C) holds the water that mixes with your other Hoover detergent. IMPORTANT The tank pivots towards the back of tank to lock it into place. brushes OFF for cleaning carpets GENTLE SCRUB - E ! Completely fill...handle button and pull forward. 2.9 2.9 Fill tank (E) with water. 2.11 Position bottom of tank onto cleaner and push upper part of the unit. continued >> 7 Actual model may harm the machine and void the warranty. POWER SCRUB - CAUTION ! When using standard solution. Non...
Manual
Page 11
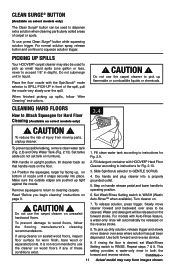
...Water and detergent will automatically be released on the forward stroke. Use both the forward and reverse strokes. Place the floor nozzle with HOOVER® Hard Floor that handle rests on the floor. Do not use the carpet cleaner on wood floors if any of these conditions...dirty solution, release trigger and slowly move cleaner forward and backward over area to be cleaned. Picking up spills Your HOOVER® carpet cleaner may vary from moving parts, unplug cleaner. CAUTION ! Slowly move cleaner over the spill. ! Do not submerge unit in depth). When finished...
...Water and detergent will automatically be released on the forward stroke. Use both the forward and reverse strokes. Place the floor nozzle with HOOVER® Hard Floor that handle rests on the floor. Do not use the carpet cleaner on wood floors if any of these conditions...dirty solution, release trigger and slowly move cleaner forward and backward over area to be cleaned. Picking up spills Your HOOVER® carpet cleaner may vary from moving parts, unplug cleaner. CAUTION ! Slowly move cleaner over the spill. ! Do not submerge unit in depth). When finished...
Manual
Page 13
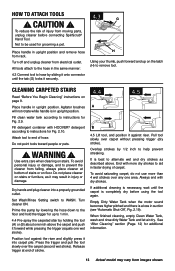
... above the carpet and push it securely. 4.3 G H Using your thumb, push forward and up to help prevent streaking. Always end with HOOVER® detergent according to instructions for additional information. 13 Actual model may result in the same manner: 4.3 Connect tool to hose by 1/2 inch... at bottom of stroke. 4.4 4.5 A B 4.5 Lift tool, and position it against the riser and slightly press it may vary from moving parts, unplug cleaner before using the tool again. End with more than 4 wet strokes over any one wet stroke). CAUTION ! Overlap strokes by sliding...
... above the carpet and push it securely. 4.3 G H Using your thumb, push forward and up to help prevent streaking. Always end with HOOVER® detergent according to instructions for additional information. 13 Actual model may result in the same manner: 4.3 Connect tool to hose by 1/2 inch... at bottom of stroke. 4.4 4.5 A B 4.5 Lift tool, and position it against the riser and slightly press it may vary from moving parts, unplug cleaner before using the tool again. End with more than 4 wet strokes over any one wet stroke). CAUTION ! Overlap strokes by sliding...
Manual
Page 15
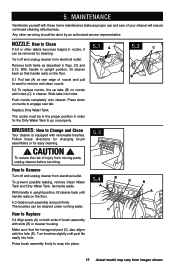
... cleaner housing. With handle in Figs. 2.8 and 2.13. To reduce the risk of brush assembly with the hole (D). Remove both ends of injury from moving parts, unplug cleaner before servicing. 5.3 How to engage rear tab. 5.
... cleaner housing. With handle in Figs. 2.8 and 2.13. To reduce the risk of brush assembly with the hole (D). Remove both ends of injury from moving parts, unplug cleaner before servicing. 5.3 How to engage rear tab. 5.
Manual
Page 18
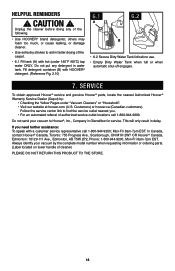
... container (B) with a customer service representative call 1-800-944-9200. Service To obtain approved Hoover® service and genuine Hoover® parts, locate the nearest Authorized Hoover® Warranty Service Dealer (Depot) by the complete model number when requesting information or ordering parts. (Label located on lower handle of the carpet. • 6.1 Fill tank (A) with hot...
... container (B) with a customer service representative call 1-800-944-9200. Service To obtain approved Hoover® service and genuine Hoover® parts, locate the nearest Authorized Hoover® Warranty Service Dealer (Depot) by the complete model number when requesting information or ordering parts. (Label located on lower handle of the carpet. • 6.1 Fill tank (A) with hot...

Manual
Page 19
... ✓ ✓ ✓ ✓ ✓ ✓ ✓ ✓ 1 Allergens: pollen, pet dander, dirt, and dust. 2 When cleaning a hard surface, the Hoover® hard surface attachment below must be used : 6 Brush Hoover® part # 302658001 19 For optimal performance use with the appliance as noted below must be used (optional if not included): 5 Brush...
... ✓ ✓ ✓ ✓ ✓ ✓ ✓ ✓ 1 Allergens: pollen, pet dander, dirt, and dust. 2 When cleaning a hard surface, the Hoover® hard surface attachment below must be used : 6 Brush Hoover® part # 302658001 19 For optimal performance use with the appliance as noted below must be used (optional if not included): 5 Brush...
Manual
Page 20
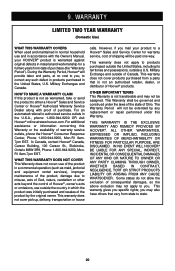
During the Warranty Period, Hoover® will provide labor and parts, at www.hoover.com. For additional assistance or information concerning this Warranty. OTHER IMPORTANT TERMS This Warranty is not transferable and may not apply to you mail your HOOVER® product is warranted against original defects ...HOW TO MAKE A WARRANTY CLAIM If this product is not an authorized retailer, dealer, or distributor of warranty service outlets, phone the Hoover® Consumer Response Center, Phone 1-800-944-9200, Mon-Fri 8am7pm EST. WHAT THIS WARRANTY DOES NOT COVER This Warranty does ...
During the Warranty Period, Hoover® will provide labor and parts, at www.hoover.com. For additional assistance or information concerning this Warranty. OTHER IMPORTANT TERMS This Warranty is not transferable and may not apply to you mail your HOOVER® product is warranted against original defects ...HOW TO MAKE A WARRANTY CLAIM If this product is not an authorized retailer, dealer, or distributor of warranty service outlets, phone the Hoover® Consumer Response Center, Phone 1-800-944-9200, Mon-Fri 8am7pm EST. WHAT THIS WARRANTY DOES NOT COVER This Warranty does ...


