
Manual
Page 5
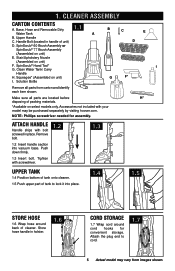
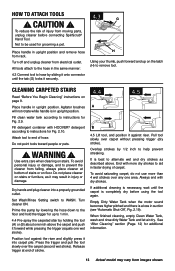
... may be purchased separately by visiting hoover.com. Make sure all parts from images shown. Base, Hose and Removable Dirty 1.1 Water Tank A B. Solution Bottle b C Carpet Upholstery Cleaner bare floor E cleaner PreCleaner D I . Remove bolt. 1.2 Insert handle section into place. 1.4 1.5 store hose 1.6 Wrap hose around cord hooks for assembly. Clean Water Tank/ Carry Handle H. Squeegee* (Assembled on unit...
... may be purchased separately by visiting hoover.com. Make sure all parts from images shown. Base, Hose and Removable Dirty 1.1 Water Tank A B. Solution Bottle b C Carpet Upholstery Cleaner bare floor E cleaner PreCleaner D I . Remove bolt. 1.2 Insert handle section into place. 1.4 1.5 store hose 1.6 Wrap hose around cord hooks for assembly. Clean Water Tank/ Carry Handle H. Squeegee* (Assembled on unit...
Manual
Page 6
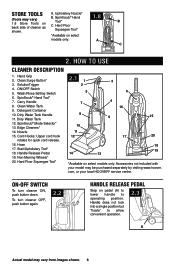
.../OFF Switch 5. Detergent Container 10. Hose 17. Stair/Upholstery Tool* 18. Store tools (Tools may be purchased separately by visiting www.hoover. A C 2. Hand Grip 2. SpinScrub® Hand Tool* 7. Carry Handle 8. Clean Water Tank 9. SpinScrub® Mode Selector* 13. Edge Cleaners* 14. Cord Hooks: Upper cord hook rotates for quick cord release. 16. Hard Floor...
.../OFF Switch 5. Detergent Container 10. Hose 17. Stair/Upholstery Tool* 18. Store tools (Tools may be purchased separately by visiting www.hoover. A C 2. Hand Grip 2. SpinScrub® Hand Tool* 7. Carry Handle 8. Clean Water Tank 9. SpinScrub® Mode Selector* 13. Edge Cleaners* 14. Cord Hooks: Upper cord hook rotates for quick cord release. 16. Hard Floor...
Manual
Page 7
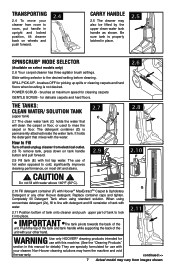
... your cleaner. Do not fill with water above 140°F (60°C). 2.10 Fill detergent container (F) with Hoover® MaxExtractTM Carpet & Upholstery Detergent or any other hand. 2.8 2.10 F G 2.11 WARNING Use only HOOVER® cleaning products intended for delicate carpets and hard floors. 2.6 The tanks: CLEAN WATER/ SOLUTION TANK 2.7 (upper tank) C D 2.7 The clean water tank (C) holds the water that mixes with your other...
... your cleaner. Do not fill with water above 140°F (60°C). 2.10 Fill detergent container (F) with Hoover® MaxExtractTM Carpet & Upholstery Detergent or any other hand. 2.8 2.10 F G 2.11 WARNING Use only HOOVER® cleaning products intended for delicate carpets and hard floors. 2.6 The tanks: CLEAN WATER/ SOLUTION TANK 2.7 (upper tank) C D 2.7 The clean water tank (C) holds the water that mixes with your other...
Manual
Page 8
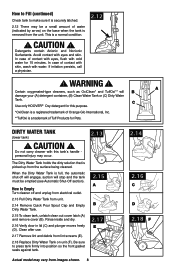
...will engage, suction will B A damage your (A) detergent container, (B) Clean Water Tank or (C) Dirty Water Tank. Avoid contact with cold water for 15 minutes. Do not carry cleaner with water. In case of contact with eyes, flush with eyes and skin. ...Clean after use. 2.17 Remove lint and debris from lint screens (E). 2.18 Replace Dirty Water Tank on the base when the tank is removed from images shown. 8 2.14 2.16 C D 2.18 F how to fill (continued) Check tank to make sure it is securely latched. 2.12 There may be emptied (see Automatic Shut-Off section). C Use only HOOVER...
...will engage, suction will B A damage your (A) detergent container, (B) Clean Water Tank or (C) Dirty Water Tank. Avoid contact with cold water for 15 minutes. Do not carry cleaner with water. In case of contact with eyes, flush with eyes and skin. ...Clean after use. 2.17 Remove lint and debris from lint screens (E). 2.18 Replace Dirty Water Tank on the base when the tank is removed from images shown. 8 2.14 2.16 C D 2.18 F how to fill (continued) Check tank to make sure it is securely latched. 2.12 There may be emptied (see Automatic Shut-Off section). C Use only HOOVER...
Manual
Page 9
...a dry vacuum cleaner. IMPORTANT Do not use a HOOVER® vacuum cleaner with an agitator for best results. If surface has more than one color, check all colors. When cleaning entire floor, move furniture out of the Dirty Water Tank lid (B). For furniture too heavy to move area ... pick up furniture skirts and draperies. For upholstery, check cleaning code - If your HOOVER® carpet cleaner only if the upholstery fabric is full the automatic shut off mechanism will shut off and empty Dirty Water Tank before cleaning. *Available at additional cost if not included with your model...
...a dry vacuum cleaner. IMPORTANT Do not use a HOOVER® vacuum cleaner with an agitator for best results. If surface has more than one color, check all colors. When cleaning entire floor, move furniture out of the Dirty Water Tank lid (B). For furniture too heavy to move area ... pick up furniture skirts and draperies. For upholstery, check cleaning code - If your HOOVER® carpet cleaner only if the upholstery fabric is full the automatic shut off mechanism will shut off and empty Dirty Water Tank before cleaning. *Available at additional cost if not included with your model...
Manual
Page 10
Pull Trigger = WET Release Trigger = DRY IMPORTANT Do not clean over area just sprayed with Hoover® detergent according to apply cleaning solution and slowly push cleaner forward (equals one wet stroke). Continue to squeeze trigger and ... wet strokes over the same area a minimum of the room farthest from images shown. 10 8&5 8&5 %3: %3: Cleaning Carpet 3.1/3.1a Read "Before You Begin Cleaning" instructions. 3.2 Fill Clean Water Tank according to instructions for both forward and reverse strokes. Step 1 FOR MODELS WITHOUT AUTO RINSE FEATURE 3.1 Set Wash/Rinse...
Pull Trigger = WET Release Trigger = DRY IMPORTANT Do not clean over area just sprayed with Hoover® detergent according to apply cleaning solution and slowly push cleaner forward (equals one wet stroke). Continue to squeeze trigger and ... wet strokes over the same area a minimum of the room farthest from images shown. 10 8&5 8&5 %3: %3: Cleaning Carpet 3.1/3.1a Read "Before You Begin Cleaning" instructions. 3.2 Fill Clean Water Tank according to instructions for both forward and reverse strokes. Step 1 FOR MODELS WITHOUT AUTO RINSE FEATURE 3.1 Set Wash/Rinse...
Manual
Page 11
... cleaner on . ! For models with HOOVER® Hard Floor that handle rests on bottom of injury from images shown. This setting provides a water-only rinse in depth). To prevent possible leaking, remove clean water tank (Fig. 2.8) and Dirty Water Tank (Fig. 2.13). Turn cleaner on ...press trigger. Do not submerge unit in upright position, tilt cleaner back so 2. CAUTION ! Fill clean water tank according to exceed 1/8" in both forward and reverse strokes. 9. Step on page 9. 3. Water and detergent will automatically be used to pick up tight against the nozzle.
... cleaner on . ! For models with HOOVER® Hard Floor that handle rests on bottom of injury from images shown. This setting provides a water-only rinse in depth). To prevent possible leaking, remove clean water tank (Fig. 2.8) and Dirty Water Tank (Fig. 2.13). Turn cleaner on ...press trigger. Do not submerge unit in upright position, tilt cleaner back so 2. CAUTION ! Fill clean water tank according to exceed 1/8" in both forward and reverse strokes. 9. Step on page 9. 3. Water and detergent will automatically be used to pick up tight against the nozzle.
Manual
Page 12
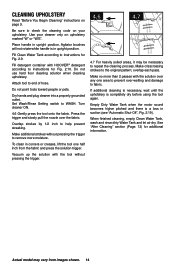
To reposition the tool, reverse this procedure. 4. Empty tanks, rinse with clean water and let air dry. TOOLS A. Empty recovery tank when the motor sound becomes higher pitched and there is not necessary, but will not stain the carpet. Actual model may need ...for extra scrubbing action on select models only) has rotating brush for removal. To clean HARD floorS (Continued) ...
To reposition the tool, reverse this procedure. 4. Empty tanks, rinse with clean water and let air dry. TOOLS A. Empty recovery tank when the motor sound becomes higher pitched and there is not necessary, but will not stain the carpet. Actual model may need ...for extra scrubbing action on select models only) has rotating brush for removal. To clean HARD floorS (Continued) ...
Manual
Page 13
...the risk of stairs or on page 9. Place handle in injury or damage. When finished cleaning, empty Clean Water Tank, wash and rinse dirty Water Tank and let air dry. See "After Cleaning" section (Page. 12) for additional information. 13 Actual model may result in upright ... detergent container with HOOVER® detergent according to aid in upright position. End with dry strokes. Empty Dirty Water Tank when the motor sound becomes higher pitched and there is completely dry before connecting SpinScrub® Hand Tool. Fill clean water tank according to WASH....
...the risk of stairs or on page 9. Place handle in injury or damage. When finished cleaning, empty Clean Water Tank, wash and rinse dirty Water Tank and let air dry. See "After Cleaning" section (Page. 12) for additional information. 13 Actual model may result in upright ... detergent container with HOOVER® detergent according to aid in upright position. End with dry strokes. Empty Dirty Water Tank when the motor sound becomes higher pitched and there is completely dry before connecting SpinScrub® Hand Tool. Fill clean water tank according to WASH....
Manual
Page 14
... suction (see "Automatic Shut-Off", Fig. 2.19). Fill Clean Water Tank according to instructions for Fig. 2.10. Attach tool to WASH. Dry hands and plug cleaner into a properly grounded outlet. Set Wash/Rinse Setting switch to end of hose. Vacuum up the solution with HOOVER® detergent according to instructions for additional information. If...
... suction (see "Automatic Shut-Off", Fig. 2.19). Fill Clean Water Tank according to instructions for Fig. 2.10. Attach tool to WASH. Dry hands and plug cleaner into a properly grounded outlet. Set Wash/Rinse Setting switch to end of hose. Vacuum up the solution with HOOVER® detergent according to instructions for additional information. If...
Manual
Page 15
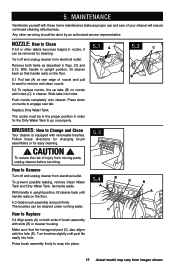
... images shown. To prevent possible leaking, remove Clean Water Tank and Dirty Water Tank. The brushes can be done by an authorized service representative. nozzle: How to Clean If lint or other servicing should be removed for easy cleaning. ! With handle in upright position, tilt ... of your cleaner will ensure continued cleaning effectiveness. Replace Dirty Water Tank. With handle in order for the Dirty Water Tank to go on properly. 5.2 C B brushes: How to remove and clean nozzle. 5.2 To replace nozzle, line up tabs (B) on both tanks as proper use and care of ...
... images shown. To prevent possible leaking, remove Clean Water Tank and Dirty Water Tank. The brushes can be done by an authorized service representative. nozzle: How to Clean If lint or other servicing should be removed for easy cleaning. ! With handle in upright position, tilt ... of your cleaner will ensure continued cleaning effectiveness. Replace Dirty Water Tank. With handle in order for the Dirty Water Tank to go on properly. 5.2 C B brushes: How to remove and clean nozzle. 5.2 To replace nozzle, line up tabs (B) on both tanks as proper use and care of ...
Manual
Page 16
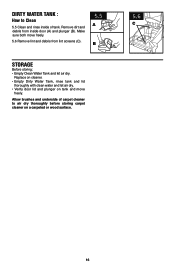
... brushes and underside of tank. Dirty Water Tank : How to air dry thoroughly before storing carpet cleaner on tank and move freely. 5.6 Remove lint and debris from inside of carpet cleaner to Clean 5.5 Clean and rinse inside door (A) and plunger (B). Remove dirt and debris from lint screens (C). 5.5 A B Storage Before storing: • Empty Clean Water Tank and let air dry...
... brushes and underside of tank. Dirty Water Tank : How to air dry thoroughly before storing carpet cleaner on tank and move freely. 5.6 Remove lint and debris from inside of carpet cleaner to Clean 5.5 Clean and rinse inside door (A) and plunger (B). Remove dirt and debris from lint screens (C). 5.5 A B Storage Before storing: • Empty Clean Water Tank and let air dry...
Manual
Page 17
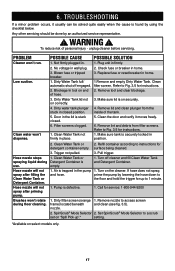
...Dirty filter screen (orange 1. Set SpinScrub® Mode Selector to 1 minute. 1. To reduce risk of the tank. 5. Dirty Water Tank full/ automatic shut off cleaner and fill Clean Water Tank and Detergent Container. 1. Door in the lid is trapped in position. 2. Remove tool and clear blockage. 3. ... easily when the cause is found by an authorized service representative. ! Hose nozzle will not spray after filling the Clean Water Tank or Detergent Container. unplug cleaner before servicing. Not firmly plugged in firmly. Check fuse or breaker in wall plug....
...Dirty filter screen (orange 1. Set SpinScrub® Mode Selector to 1 minute. 1. To reduce risk of the tank. 5. Dirty Water Tank full/ automatic shut off cleaner and fill Clean Water Tank and Detergent Container. 1. Door in the lid is trapped in position. 2. Remove tool and clear blockage. 3. ... easily when the cause is found by an authorized service representative. ! Hose nozzle will not spray after filling the Clean Water Tank or Detergent Container. unplug cleaner before servicing. Not firmly plugged in firmly. Check fuse or breaker in wall plug....


