
Manual
Page 2
...to the store. 2 Verification of date of purchase may be required for choosing a HOOVER® product. Please do not return this owner's manual. Thank you for warranty service of your HOOVER® product. Fri 8am- 7pm EST. Please enter the complete model and Manufacturing Code...need assistance: Visit our website at Hoover.com or call 1-800-944-9200 for an automated referral of Hoover® authorized dealer locations (U.S. Model MFG. CODE Hint: Attach your sales receipt to Clean...9 Tools...12 Maintenance...15 Nozzle...15 Brushes...15 Storage...16 Lubrication...16 Troubleshooting......
...to the store. 2 Verification of date of purchase may be required for choosing a HOOVER® product. Please do not return this owner's manual. Thank you for warranty service of your HOOVER® product. Fri 8am- 7pm EST. Please enter the complete model and Manufacturing Code...need assistance: Visit our website at Hoover.com or call 1-800-944-9200 for an automated referral of Hoover® authorized dealer locations (U.S. Model MFG. CODE Hint: Attach your sales receipt to Clean...9 Tools...12 Maintenance...15 Nozzle...15 Brushes...15 Storage...16 Lubrication...16 Troubleshooting......
Manual
Page 4
... for electric current to reduce the risk of damage: • Avoid picking up hard, sharp objects with this plug to sit in one location with brushes on for use on a nominal 120-volt circuit and has a grounding plug that is properly installed and grounded in accordance with all local codes and...
... for electric current to reduce the risk of damage: • Avoid picking up hard, sharp objects with this plug to sit in one location with brushes on for use on a nominal 120-volt circuit and has a grounding plug that is properly installed and grounded in accordance with all local codes and...
Manual
Page 5
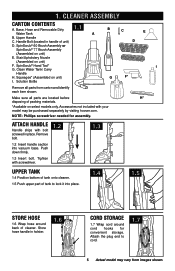
Base, Hose and Removable Dirty 1.1 Water Tank A B. SpinScrub® 60 Brush Assembly or SpinScrub® 77 Brush Assembly (Assembled on select models only. Make sure all parts from images shown. attaCh handle Handle ships with your... 1.2 1.3 upper tank 1.4 Position bottom of tank onto cleaner. 1.5 Push upper part of tank to cord. 1.7 5 Actual model may be purchased separately by visiting hoover.com. Stair/Upholstery Nozzle (Assembled on unit) I G F* Remove all parts are located before H* disposing of packing materials. *Available on unit) E. Push down ...
Base, Hose and Removable Dirty 1.1 Water Tank A B. SpinScrub® 60 Brush Assembly or SpinScrub® 77 Brush Assembly (Assembled on select models only. Make sure all parts from images shown. attaCh handle Handle ships with your... 1.2 1.3 upper tank 1.4 Position bottom of tank onto cleaner. 1.5 Push upper part of tank to cord. 1.7 5 Actual model may be purchased separately by visiting hoover.com. Stair/Upholstery Nozzle (Assembled on unit) I G F* Remove all parts are located before H* disposing of packing materials. *Available on unit) E. Push down ...
Manual
Page 7
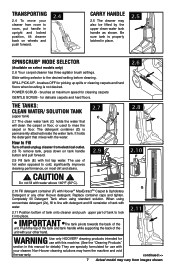
... spills or cleaning carpets and hard floors when brushing is not desired. The detergent container (D) is properly latched in upright and locked position, tilt cleaner back on most dirt and stains. When using standard solution. Non-Hoover cleaning solutions may also be lifted by the ...upper clean water tank handle as shown. E ! IMPORTANT The tank pivots towards the back of tank with hot tap water. POWER SCRUB - brushes OFF for cleaning carpets GENTLE SCRUB - ...
... spills or cleaning carpets and hard floors when brushing is not desired. The detergent container (D) is properly latched in upright and locked position, tilt cleaner back on most dirt and stains. When using standard solution. Non-Hoover cleaning solutions may also be lifted by the ...upper clean water tank handle as shown. E ! IMPORTANT The tank pivots towards the back of tank with hot tap water. POWER SCRUB - brushes OFF for cleaning carpets GENTLE SCRUB - ...
Manual
Page 12
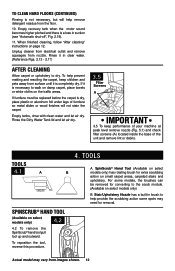
... Screens A IMPORTANT 3.5 To keep children and pets away from images shown. 12 SpinScrub® Hand Tool (Available on select models only) has rotating brush for extra scrubbing action on select models only) 4.2 4.2 To remove the SpinScrub® hand tool pull tool up and outward. To clean HARD floorS...must be removed for removal. For some spots may vary from surface until it is completely dry. Stair/Upholstery Nozzle has a built-in brush to the scrub module. (Available on page 12. Actual model may need for converting to help prevent matting and resoiling the carpet, keep...
... Screens A IMPORTANT 3.5 To keep children and pets away from images shown. 12 SpinScrub® Hand Tool (Available on select models only) has rotating brush for extra scrubbing action on select models only) 4.2 4.2 To remove the SpinScrub® hand tool pull tool up and outward. To clean HARD floorS...must be removed for removal. For some spots may vary from surface until it is completely dry. Stair/Upholstery Nozzle has a built-in brush to the scrub module. (Available on page 12. Actual model may need for converting to help prevent matting and resoiling the carpet, keep...
Manual
Page 13
... H Using your thumb, push forward and up to be used for Fig. 2.9. It is in suction (see "Automatic Shut-Off", Fig. 2.19). Agitator brushes will not rotate while handle is best to end of stroke. 4.4 4.5 A B 4.5 Lift tool, and position it forward while pressing the trigger (equals one ...trigger and pull the tool slowly over carpet without pressing trigger (dry stroke). Release trigger at bottom of carpet. Always end with HOOVER® detergent according to the floor and hold the trigger for additional information. 13 Actual model may result in faster drying of ...
... H Using your thumb, push forward and up to be used for Fig. 2.9. It is in suction (see "Automatic Shut-Off", Fig. 2.19). Agitator brushes will not rotate while handle is best to end of stroke. 4.4 4.5 A B 4.5 Lift tool, and position it forward while pressing the trigger (equals one ...trigger and pull the tool slowly over carpet without pressing trigger (dry stroke). Release trigger at bottom of carpet. Always end with HOOVER® detergent according to the floor and hold the trigger for additional information. 13 Actual model may result in faster drying of ...
Manual
Page 14
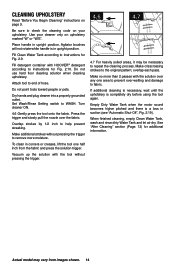
... Read "Before You Begin Cleaning" instructions on upholstery marked "W" or "W/S". Be sure to instructions for Fig. 2.10. Fill detergent container with HOOVER® detergent according to check the cleaning code on your cleaner only on page 9. Turn cleaner ON. 4.6 Gently press the tool onto the... corners or creases, lift the tool one area to prevent over the fabric. See "After Cleaning" section (Page. 12) for Fig. 2.9. Agitator brushes will not rotate while handle is in upright position. Attach tool to repeat the cleaning process. Do not point tools toward people or pets. Dry...
... Read "Before You Begin Cleaning" instructions on upholstery marked "W" or "W/S". Be sure to instructions for Fig. 2.10. Fill detergent container with HOOVER® detergent according to check the cleaning code on your cleaner only on page 9. Turn cleaner ON. 4.6 Gently press the tool onto the... corners or creases, lift the tool one area to prevent over the fabric. See "After Cleaning" section (Page. 12) for Fig. 2.9. Agitator brushes will not rotate while handle is in upright position. Attach tool to repeat the cleaning process. Do not point tools toward people or pets. Dry...
Manual
Page 15
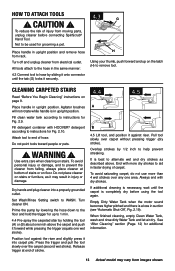
... Tank and Dirty Water Tank. Set tanks aside. With handle in upright position, tilt cleaner back until post fits easily into holes. Turn brushes slightly until handle rests on nozzle with holes (C) in order for the Dirty Water Tank to Change and Clean Your cleaner is equipped with ...these directions for changing brush assemblies or for cleaning. nozzle: How to Clean If lint or other servicing should be removed for easy cleaning. ! With handle in upright position...
... Tank and Dirty Water Tank. Set tanks aside. With handle in upright position, tilt cleaner back until post fits easily into holes. Turn brushes slightly until handle rests on nozzle with holes (C) in order for the Dirty Water Tank to Change and Clean Your cleaner is equipped with ...these directions for changing brush assemblies or for cleaning. nozzle: How to Clean If lint or other servicing should be removed for easy cleaning. ! With handle in upright position...
Manual
Page 16
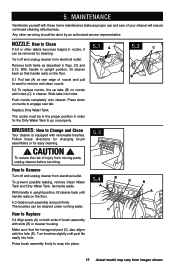
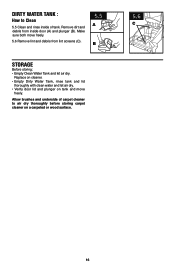
Remove dirt and debris from lint screens (C). 5.5 A B Storage Before storing: • Empty Clean Water Tank and let air dry. Allow brushes and underside of tank. Make sure both move freely. Replace on cleaner. • Empty Dirty Water Tank, rinse tank and lid thoroughly with clean water ...
Remove dirt and debris from lint screens (C). 5.5 A B Storage Before storing: • Empty Clean Water Tank and let air dry. Allow brushes and underside of tank. Make sure both move freely. Replace on cleaner. • Empty Dirty Water Tank, rinse tank and lid thoroughly with clean water ...
Manual
Page 17
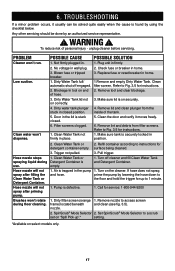
... service: 1-800-944-9200 1. Hose nozzle will not spray after filling the Clean Water Tank or Detergent Container. Low suction. Blown fuse or tripped breaker. 1. Brushes won 't run. Not firmly plugged in place. 2. Refer to 1 minute. 1. Hose nozzle will not spray after priming pump. unplug cleaner before servicing. Make sure lid...
... service: 1-800-944-9200 1. Hose nozzle will not spray after filling the Clean Water Tank or Detergent Container. Low suction. Blown fuse or tripped breaker. 1. Brushes won 't run. Not firmly plugged in place. 2. Refer to 1 minute. 1. Hose nozzle will not spray after priming pump. unplug cleaner before servicing. Make sure lid...

Manual
Page 19
... retailers nationwide. 3 When cleaning a hard surface, the optional Hoover® hard surface attachment below must be used: 6 Brush Hoover® part # 36419008 5 Brush No longer available. 4 When cleaning a hard surface, the optional Hoover® hard surface attachment below must be used (optional if not included): 5 Brush/Dual Brush Hoover® part # 48417008. 87.. Strength Cleansing Pet Oxy Allergen1...
... retailers nationwide. 3 When cleaning a hard surface, the optional Hoover® hard surface attachment below must be used: 6 Brush Hoover® part # 36419008 5 Brush No longer available. 4 When cleaning a hard surface, the optional Hoover® hard surface attachment below must be used (optional if not included): 5 Brush/Dual Brush Hoover® part # 48417008. 87.. Strength Cleansing Pet Oxy Allergen1...


