

Product Manual
Page 1
... Mfg. Glenwillow, Oh 44139 #961151057 ID105762-R4 IF USED COMMERCIALLY WARRANTY IS VOID. © 2015 Techtronic Floor Care Technology Limited. página E1 / Frances - IMPORTANT: READ CAREFULLY BEFORE ASSEMBLY AND USE. Questions or concerns? For assistance, please call Customer Service at 1-800-944-9200 Mon-Fri 8am-7pm EST before returning this cleaner. Co. OWNER'S MANUAL Operating and Servicing Instructions Español -
... Mfg. Glenwillow, Oh 44139 #961151057 ID105762-R4 IF USED COMMERCIALLY WARRANTY IS VOID. © 2015 Techtronic Floor Care Technology Limited. página E1 / Frances - IMPORTANT: READ CAREFULLY BEFORE ASSEMBLY AND USE. Questions or concerns? For assistance, please call Customer Service at 1-800-944-9200 Mon-Fri 8am-7pm EST before returning this cleaner. Co. OWNER'S MANUAL Operating and Servicing Instructions Español -
Product Manual
Page 3
... of cleaner) CONTENTS Important Safeguards 3 Carton Contents...5 How To Assemble...6 Features...7 How To Use...8 On-Off Pedal...8 Handle Release Pedal 8 Transporting...8 Carry Handles...8 Clean Water/Solution Tank 8 Dirty Water Tank 9 How To Clean...10 Tools...13 Maintenance...16 Nozzle...16 Brushes...16 Service...17 Troubleshooting...18 Cleaning Solutions...19 Warranty...20 If you for video instruction fot this owner's manual. PLEASE DO NOT RETURN THIS PRODUCT TO THE STORE. 2 only) or to this carpet washer. Please enter the complete model...
... of cleaner) CONTENTS Important Safeguards 3 Carton Contents...5 How To Assemble...6 Features...7 How To Use...8 On-Off Pedal...8 Handle Release Pedal 8 Transporting...8 Carry Handles...8 Clean Water/Solution Tank 8 Dirty Water Tank 9 How To Clean...10 Tools...13 Maintenance...16 Nozzle...16 Brushes...16 Service...17 Troubleshooting...18 Cleaning Solutions...19 Warranty...20 If you for video instruction fot this owner's manual. PLEASE DO NOT RETURN THIS PRODUCT TO THE STORE. 2 only) or to this carpet washer. Please enter the complete model...
Product Manual
Page 6
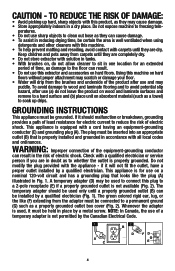
... OR INJURY: • Fully assemble before cleaning or servicing. • Use indoors only. • Do not immerse. Do not place cleaner on floor. Unplug from openings and moving parts. • Turn off all controls before connecting SpinScrub® Hand Tool. • Do not pick up flammable or combustible materials, such as described in this machine. (See the "Cleaning Products" section of cleaner. • Do not leave...
... OR INJURY: • Fully assemble before cleaning or servicing. • Use indoors only. • Do not immerse. Do not place cleaner on floor. Unplug from openings and moving parts. • Turn off all controls before connecting SpinScrub® Hand Tool. • Do not pick up flammable or combustible materials, such as described in this machine. (See the "Cleaning Products" section of cleaner. • Do not leave...
Product Manual
Page 7
... clean out hose as to a 2-pole receptacle (E) if a properly grounded outlet is properly grounded. Whenever the adapter is properly installed and grounded in accordance with a qualified electrician or service person if you are completely dry. • Do not store extractor with solution in tanks. • With brushes on, do not leave the product on wood and laminate surfaces and remove to a hard...
... clean out hose as to a 2-pole receptacle (E) if a properly grounded outlet is properly grounded. Whenever the adapter is properly installed and grounded in accordance with a qualified electrician or service person if you are completely dry. • Do not store extractor with solution in tanks. • With brushes on, do not leave the product on wood and laminate surfaces and remove to a hard...
Product Manual
Page 10
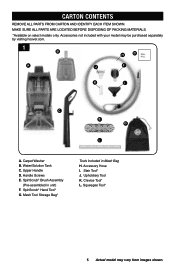
SpinScrub® Brush Assembly (Pre-assembled in Mesh Bag H. Crevice Tool* L. Squeegee Tool* 5 Actual model may be purchased separately by visiting hoover.com. 1 B H D A J F K I . Carpet Washer B. Stair Tool* J. Upholstery Tool K. Water/Solution Tank C. Upper Handle D. Handle Screws E. Accessory Hose I C E G L A. Mesh Tool Storage Bag* Tools Included in unit) F. Accessories not included with your model may vary from images shown. CARTON CONTENTS REMOVE ALL PARTS FROM CARTON AND IDENTIFY EACH ITEM SHOWN. MAKE SURE ALL PARTS ARE LOCATED BEFORE ...
SpinScrub® Brush Assembly (Pre-assembled in Mesh Bag H. Crevice Tool* L. Squeegee Tool* 5 Actual model may be purchased separately by visiting hoover.com. 1 B H D A J F K I . Carpet Washer B. Stair Tool* J. Upholstery Tool K. Water/Solution Tank C. Upper Handle D. Handle Screws E. Accessory Hose I C E G L A. Mesh Tool Storage Bag* Tools Included in unit) F. Accessories not included with your model may vary from images shown. CARTON CONTENTS REMOVE ALL PARTS FROM CARTON AND IDENTIFY EACH ITEM SHOWN. MAKE SURE ALL PARTS ARE LOCATED BEFORE ...
Product Manual
Page 11
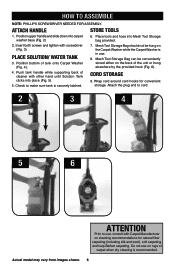
... elsewhere by the provided hook (Fig. 6). 4. Mesh Tool Storage Bag can be hung on rugs or carpet when dry cleaning is securely latched. CORD STORAGE 9. Do not use , consult with screwdriver (Fig. 3). Push tank handle while supporting back of cleaner with other hand until Solution Tank clicks into Mesh Tool Storage bag provided. 2. Check to use on the Carpet Washer while the Carpet Washer is in use. 8. Attach the plug end...
... elsewhere by the provided hook (Fig. 6). 4. Mesh Tool Storage Bag can be hung on rugs or carpet when dry cleaning is securely latched. CORD STORAGE 9. Do not use , consult with screwdriver (Fig. 3). Push tank handle while supporting back of cleaner with other hand until Solution Tank clicks into Mesh Tool Storage bag provided. 2. Check to use on the Carpet Washer while the Carpet Washer is in use. 8. Attach the plug end...
Product Manual
Page 14
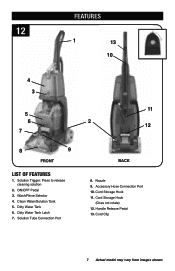
Wash/Rinse Selector 4. Dirty Water Tank 6. Cord Storage Hook (Does not rotate) 12. Clean Water/Solution Tank 5. FEATURES 12 1 13 10 4 3 5 6 7 8 9 FRONT LIST OF FEATURES 1. Cord Storage Hook 11. Cord Clip 7 Actual model may vary from images shown. Dirty Water Tank Latch 7. Solution Tube Connection Port 11 2 12 BACK 8. ON/OFF Pedal 3. Solution Trigger: Press to release cleaning solution 2. Nozzle 9. Accessory Hose Connection Port 10. Handle Release Pedal 13.
Wash/Rinse Selector 4. Dirty Water Tank 6. Cord Storage Hook (Does not rotate) 12. Clean Water/Solution Tank 5. FEATURES 12 1 13 10 4 3 5 6 7 8 9 FRONT LIST OF FEATURES 1. Cord Storage Hook 11. Cord Clip 7 Actual model may vary from images shown. Dirty Water Tank Latch 7. Solution Tube Connection Port 11 2 12 BACK 8. ON/OFF Pedal 3. Solution Trigger: Press to release cleaning solution 2. Nozzle 9. Accessory Hose Connection Port 10. Handle Release Pedal 13.
Product Manual
Page 15
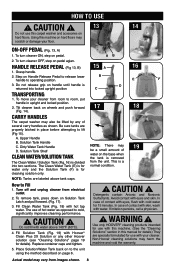
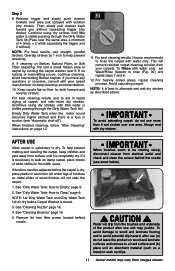
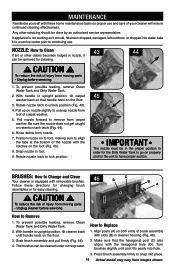
...). CAUTION ! WARNING ! Use only HOOVER® cleaning products intended for use with cold water for cleaning solution only. ON-OFF PEDAL (Fig. 13, A) 1. To turn cleaner ON, step on Solution Tank Latch and pull forward. (Fig. 17). 3. Turn off and unplug cleaner from the unit. Do not fill with this machine. (See the "Cleaning Solutions" section in upright and locked position. 2. Detergents contain Anionic and Nonionic Surfactants. Solution Tank Handle C. HANDLE RELEASE PEDAL...
...). CAUTION ! WARNING ! Use only HOOVER® cleaning products intended for use with cold water for cleaning solution only. ON-OFF PEDAL (Fig. 13, A) 1. To turn cleaner ON, step on Solution Tank Latch and pull forward. (Fig. 17). 3. Turn off and unplug cleaner from the unit. Do not fill with this machine. (See the "Cleaning Solutions" section in upright and locked position. 2. Detergents contain Anionic and Nonionic Surfactants. Solution Tank Handle C. HANDLE RELEASE PEDAL...
Product Manual
Page 18
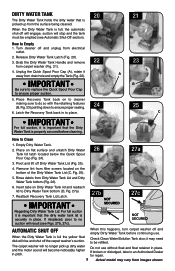
... happens, turn carpet washer off the carpet washer's suction. Pivot and lift off and unplug from electrical outlet. 2. Check Clean Water/Solution Tank also; If broken or dislodged, take to an Authorized Dealer for repair. 9 Actual model may need to ensure proper sealing. 24 6. How to Clean 1. Release Dirty Water Tank Latch (Fig. 20). 3. Grab the Dirty Water Tank Handle and remove 22 from images shown. DIRTY WATER TANK 20 21 The Dirty Water Tank holds the dirty water that...
... happens, turn carpet washer off the carpet washer's suction. Pivot and lift off and unplug from electrical outlet. 2. Check Clean Water/Solution Tank also; If broken or dislodged, take to an Authorized Dealer for repair. 9 Actual model may need to ensure proper sealing. 24 6. How to Clean 1. Release Dirty Water Tank Latch (Fig. 20). 3. Grab the Dirty Water Tank Handle and remove 22 from images shown. DIRTY WATER TANK 20 21 The Dirty Water Tank holds the dirty water that...
Product Manual
Page 19
... rugs/carpet, either move , place aluminum foil or wax paper under legs. Use your model. 6. To avoid wetting and possible damage to reach into a properly grounded outlet. ! Fill Clean Water Tank according to Wash (Fig. 28) Turn cleaner ON. 6. Set Wash/Rinse Selector to instructions (Pg. 8). 2. Vacuum thoroughly - Do not use a HOOVER® vacuum cleaner with an agitator for colorfastness - plastic) underneath them before using on a full room & consult with cleaning tool attachments...
... rugs/carpet, either move , place aluminum foil or wax paper under legs. Use your model. 6. To avoid wetting and possible damage to reach into a properly grounded outlet. ! Fill Clean Water Tank according to Wash (Fig. 28) Turn cleaner ON. 6. Set Wash/Rinse Selector to instructions (Pg. 8). 2. Vacuum thoroughly - Do not use a HOOVER® vacuum cleaner with an agitator for colorfastness - plastic) underneath them before using on a full room & consult with cleaning tool attachments...
Product Manual
Page 22
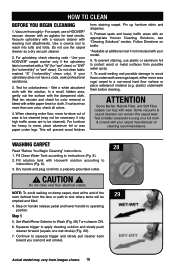
... use and may vary from filter screen located behind the nozzle (see "Automatic shut-off"). Avoid overwetting Berber carpets. If you without ). For best cleaning results and to be replaced before Carpet Washer is completely dry. When finished cleaning, follow "After Cleaning" instructions on floor for both forward and reverse strokes. IMPORTANT When brushes seem to aid in suction (see arrow below). ! This will remove residual carpet cleaning solution from...
... use and may vary from filter screen located behind the nozzle (see "Automatic shut-off"). Avoid overwetting Berber carpets. If you without ). For best cleaning results and to be replaced before Carpet Washer is completely dry. When finished cleaning, follow "After Cleaning" instructions on floor for both forward and reverse strokes. IMPORTANT When brushes seem to aid in suction (see arrow below). ! This will remove residual carpet cleaning solution from...
Product Manual
Page 23
... remove to a hard surface and (b) place unit on unsealed hardwood floors. ing recommendations. Dry hands and plug cleaner into place (Fig. 32). How to operating postion. 5. Do not use (a) do not set Wash/Rinse Setting switch to RINSE. To reduce the risk of the product after use the carpet cleaner on absorbent material (such as towel) to instructions for worn finish, bare wood or separated floors if any of suction...
... remove to a hard surface and (b) place unit on unsealed hardwood floors. ing recommendations. Dry hands and plug cleaner into place (Fig. 32). How to operating postion. 5. Do not use (a) do not set Wash/Rinse Setting switch to RINSE. To reduce the risk of the product after use the carpet cleaner on absorbent material (such as towel) to instructions for worn finish, bare wood or separated floors if any of suction...
Product Manual
Page 25
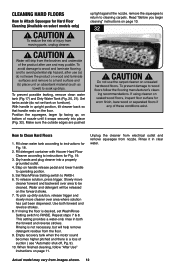
... Hose Solution Port (C, Fig. 34). TOOLS (*Available on tube, this may lose suction if not closed properly. B. CAUTION ! SpinScrub® Hand Tool* has rotating brush(s) for use around baseboards and those hard to unsure proper suction, unit may cause damage. For some spots may vary from moving parts - Connect tool to the hose in the upright position shuts off appliance before connecting SpinScrub Hand tool. TOOLS CONNECT HOSE FOR TOOL USE 33 34 ! Always turn off the SpinScrub brushes. NOTE: All tools attach...
... Hose Solution Port (C, Fig. 34). TOOLS (*Available on tube, this may lose suction if not closed properly. B. CAUTION ! SpinScrub® Hand Tool* has rotating brush(s) for use around baseboards and those hard to unsure proper suction, unit may cause damage. For some spots may vary from moving parts - Connect tool to the hose in the upright position shuts off appliance before connecting SpinScrub Hand tool. TOOLS CONNECT HOSE FOR TOOL USE 33 34 ! Always turn off the SpinScrub brushes. NOTE: All tools attach...
Product Manual
Page 28
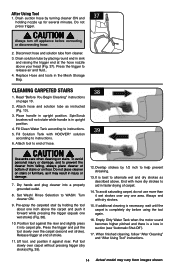
... turn off appliance before using the tool again. 16. Press the trigger to alternate wet and dry strokes as described above. Attach tool to help prevent streaking. 13. Use extra care when cleaning on page 10. 2. Do not place cleaner on floor. Pre-spray the carpeted stair by 1/2 inch to end of carpet. 14. Disconnect hose and solution tube from images shown. Replace Hose and tools in upright position. CLEANING CARPETED STAIRS 38 1. Place handle...
... turn off appliance before using the tool again. 16. Press the trigger to alternate wet and dry strokes as described above. Attach tool to help prevent streaking. 13. Use extra care when cleaning on page 10. 2. Do not place cleaner on floor. Pre-spray the carpeted stair by 1/2 inch to end of carpet. 14. Disconnect hose and solution tube from images shown. Replace Hose and tools in upright position. CLEANING CARPETED STAIRS 38 1. Place handle...
Product Manual
Page 29
... repeat the cleaning process. Place handle in upright position. 3. Fill solution container with the solution over any one half inch from images shown. 15 Do not use hard floor cleaning solution when cleaning upholstery. 5. Attach tool to WASH. Fill Clean Water Tank according to RINSE (Fig. 42). Turn cleaner ON. 8. Set Wash/Rinse Selector to end of hose. 6. Press the trigger and slowly pull the nozzle over -wetting and damage to rinse the carpet with water only. Overlap...
... repeat the cleaning process. Place handle in upright position. 3. Fill solution container with the solution over any one half inch from images shown. 15 Do not use hard floor cleaning solution when cleaning upholstery. 5. Attach tool to WASH. Fill Clean Water Tank according to RINSE (Fig. 42). Turn cleaner ON. 8. Set Wash/Rinse Selector to end of hose. 6. Press the trigger and slowly pull the nozzle over -wetting and damage to rinse the carpet with water only. Overlap...
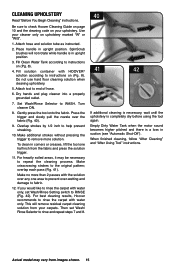
Product Manual
Page 32
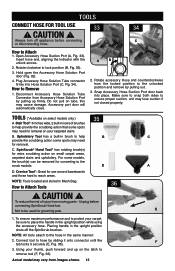
... directions for changing brush assemblies or for easy cleaning. ! Any other debris becomes lodged in cleaner housing (Fig. 46). 2. NOZZLE: How to unsnap nozzle from images shown. CAUTION ! To reduce the risk of carpet washer. 5. To prevent possible leaking, remove Clean Water Tank and Dirty Water Tank. 2. With handle in upright position, tilt cleaner back until post fits easily into water, take it can be done by an authorized service representative. Rotate nozzle latch to Replace...
... directions for changing brush assemblies or for easy cleaning. ! Any other debris becomes lodged in cleaner housing (Fig. 46). 2. NOZZLE: How to unsnap nozzle from images shown. CAUTION ! To reduce the risk of carpet washer. 5. To prevent possible leaking, remove Clean Water Tank and Dirty Water Tank. 2. With handle in upright position, tilt cleaner back until post fits easily into water, take it can be done by an authorized service representative. Rotate nozzle latch to Replace...
Product Manual
Page 33
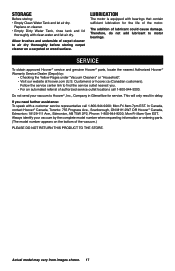
... of the motor. Customers) or hoover.ca (Canadian customers). Allow brushes and underside of carpet cleaner to find the service outlet nearest you need further assistance: To speak with clean water and let air dry. SERVICE To obtain approved Hoover® service and genuine Hoover® parts, locate the nearest Authorized Hoover® Warranty Service Dealer (Depot) by the complete model number when requesting information or ordering parts. (The model number appears...
... of the motor. Customers) or hoover.ca (Canadian customers). Allow brushes and underside of carpet cleaner to find the service outlet nearest you need further assistance: To speak with clean water and let air dry. SERVICE To obtain approved Hoover® service and genuine Hoover® parts, locate the nearest Authorized Hoover® Warranty Service Dealer (Depot) by the complete model number when requesting information or ordering parts. (The model number appears...
Product Manual
Page 36
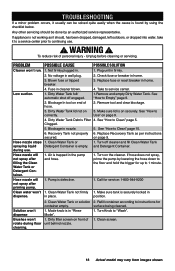
... the cause is not working as per instructions on page 9. 1. Solution won't dispense Brushes won't rotate during use . ! Refill container according to instructions for service: 1-800-944-9200 1. Turn Knob to Clean" page 15. 6. PROBLEM POSSIBLE CAUSE POSSIBLE SOLUTION Cleaner won 't dispense. 5. Replace fuse or reset breaker in the pump and hose. 1. See "How to Use" on front of personal injury - Clean Water Tank or Detergent Container is defective. 1. Dirty filter screen on page 9. 4. To...
... the cause is not working as per instructions on page 9. 1. Solution won't dispense Brushes won't rotate during use . ! Refill container according to instructions for service: 1-800-944-9200 1. Turn Knob to Clean" page 15. 6. PROBLEM POSSIBLE CAUSE POSSIBLE SOLUTION Cleaner won 't dispense. 5. Replace fuse or reset breaker in the pump and hose. 1. See "How to Use" on front of personal injury - Clean Water Tank or Detergent Container is defective. 1. Dirty filter screen on page 9. 4. To...
Product Manual
Page 37
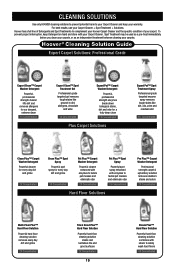
... between cleaning your warranty. CLEANING SOLUTIONS Use only HOOVER cleaning solutions to prevent potential harm to your Carpet Cleaner and keep Detergent on hand and store with steam to safely wash hard floors 4X Concentrated For best results, use your carpet. To prevent project interruption, keep your carpets. Hoover ® Cleaning Solution Guide Expert Carpet Solutions: Professional Grade Expert Clean™ Carpet Washer Detergent Powerful, professional strength cleaner lifts dirt and removes allergens for our deepest, extreme clean 1X Concentrated Expert Clean™ Spot...
... between cleaning your warranty. CLEANING SOLUTIONS Use only HOOVER cleaning solutions to prevent potential harm to your Carpet Cleaner and keep Detergent on hand and store with steam to safely wash hard floors 4X Concentrated For best results, use your carpet. To prevent project interruption, keep your carpets. Hoover ® Cleaning Solution Guide Expert Carpet Solutions: Professional Grade Expert Clean™ Carpet Washer Detergent Powerful, professional strength cleaner lifts dirt and removes allergens for our deepest, extreme clean 1X Concentrated Expert Clean™ Spot...
Product Manual
Page 40
... rental services), improper maintenance of the product, damage due to correct any replacement or repair performed under the laws of the state of purchase. THIS WARRANTY IS THE EXCLUSIVE WARRANTY AND REMEDY PROVIDED BY HOOVER®. This warranty gives you , to misuse, acts of God, nature, vandalism or other acts beyond the control of Hoover®, owner's acts or omissions, use and...
... rental services), improper maintenance of the product, damage due to correct any replacement or repair performed under the laws of the state of purchase. THIS WARRANTY IS THE EXCLUSIVE WARRANTY AND REMEDY PROVIDED BY HOOVER®. This warranty gives you , to misuse, acts of God, nature, vandalism or other acts beyond the control of Hoover®, owner's acts or omissions, use and...


