
Product Manual
Page 2
...944-9200 to find the Hoover® authorized dealer nearest you or call 1-800944-9200 for video instruction fot this owner's manual. Mon- CODE Hint: Attach your sales receipt to speak with a customer service representative; Please enter the complete model and Manufacturing Code in ...the spaces provided. Follow the authorized dealer locator link to register by phone. Verification of date of purchase may be required for choosing a HOOVER® product. Be sure to register your ...
...944-9200 to find the Hoover® authorized dealer nearest you or call 1-800944-9200 for video instruction fot this owner's manual. Mon- CODE Hint: Attach your sales receipt to speak with a customer service representative; Please enter the complete model and Manufacturing Code in ...the spaces provided. Follow the authorized dealer locator link to register by phone. Verification of date of purchase may be required for choosing a HOOVER® product. Be sure to register your ...

Product Manual
Page 5
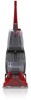
Water/Solution Tank C. SpinScrub® Brush Assembly (Pre-assembled in Mesh Bag G. Accessory Hose 5 Actual model may be purchased separately by visiting hoover.com. 1 B H D A G C F E A. CARTON CONTENTS REMOVE ALL PARTS FROM CARTON AND IDENTIFY EACH ITEM SHOWN. Handle Screws E. Upholstery Tool H. MAKE SURE ALL PARTS ARE LOCATED BEFORE DISPOSING OF PACKING MATERIALS. *Available on select models only. Upper Handle D. Mesh Tool Storage Bag* Tools Included in unit) F. Accessories not included with your model may vary from images shown. Carpet Washer B.
Water/Solution Tank C. SpinScrub® Brush Assembly (Pre-assembled in Mesh Bag G. Accessory Hose 5 Actual model may be purchased separately by visiting hoover.com. 1 B H D A G C F E A. CARTON CONTENTS REMOVE ALL PARTS FROM CARTON AND IDENTIFY EACH ITEM SHOWN. Handle Screws E. Upholstery Tool H. MAKE SURE ALL PARTS ARE LOCATED BEFORE DISPOSING OF PACKING MATERIALS. *Available on select models only. Upper Handle D. Mesh Tool Storage Bag* Tools Included in unit) F. Accessories not included with your model may vary from images shown. Carpet Washer B.

Product Manual
Page 6
... and slide down into Mesh Tool Storage bag provided. 7. PLACE SOLUTION/ WATER TANK 3. Wrap cord around cord hooks for convenient storage. Check to cord. 2 3 4 5 6 Actual model may vary from images shown. 6 Push tank handle while supporting back of tank onto Carpet Washer (Fig. 4). 6. HOW TO ASSEMBLE NOTE: PHILLIPS SCREWDRIVER NEEDED FOR...
... and slide down into Mesh Tool Storage bag provided. 7. PLACE SOLUTION/ WATER TANK 3. Wrap cord around cord hooks for convenient storage. Check to cord. 2 3 4 5 6 Actual model may vary from images shown. 6 Push tank handle while supporting back of tank onto Carpet Washer (Fig. 4). 6. HOW TO ASSEMBLE NOTE: PHILLIPS SCREWDRIVER NEEDED FOR...

Product Manual
Page 7
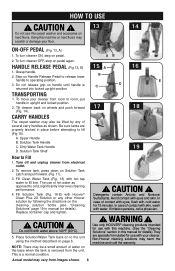
Cord Storage Hook (Does not rotate) 11. Clean Water/Solution Tank 4. Dirty Water Tank Latch 6. Cord Clip 7 Actual model may vary from images shown. Solution Tube Connection Port 10 2 11 BACK 7. ON/OFF Pedal 3. Dirty Water Tank 5. Solution Trigger: Press to release cleaning solution 2. Accessory Hose Connection Port 9. Cord Storage Hook 10. 12 3 FEATURES 1 12 9 4 5 6 7 8 FRONT LIST OF FEATURES 1. Nozzle 8. Handle Release Pedal 12.
Cord Storage Hook (Does not rotate) 11. Clean Water/Solution Tank 4. Dirty Water Tank Latch 6. Cord Clip 7 Actual model may vary from images shown. Solution Tube Connection Port 10 2 11 BACK 7. ON/OFF Pedal 3. Dirty Water Tank 5. Solution Trigger: Press to release cleaning solution 2. Accessory Hose Connection Port 9. Cord Storage Hook 10. 12 3 FEATURES 1 12 9 4 5 6 7 8 FRONT LIST OF FEATURES 1. Nozzle 8. Handle Release Pedal 12.
Product Manual
Page 8
...in this machine on hard floors. Replace container cap and tighten. ! This is returned into locked upright position TRANSPORTING 1. Use only HOOVER® cleaning products intended for use with cold water for details). To move your floor. A. The use this carpet washer and ... off and unplug cleaner from images shown. 8 AB 15 A 16 B E C D 17 18 19 ! Actual model may harm the machine and void the warranty. Non-Hoover cleaning solutions may vary from electrical outlet. 2. Grasp handle. 2. Using this manual for details) They are properly latched in...
...in this machine on hard floors. Replace container cap and tighten. ! This is returned into locked upright position TRANSPORTING 1. Use only HOOVER® cleaning products intended for use with cold water for details). To move your floor. A. The use this carpet washer and ... off and unplug cleaner from images shown. 8 AB 15 A 16 B E C D 17 18 19 ! Actual model may harm the machine and void the warranty. Non-Hoover cleaning solutions may vary from electrical outlet. 2. Grasp handle. 2. Using this manual for details) They are properly latched in...
Product Manual
Page 9
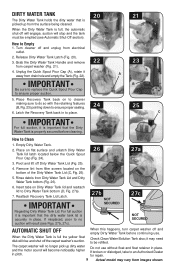
... it is important that the dirty water tank lid is securely in place. If broken or dislodged, take to an Authorized Dealer for repair. 9 Actual model may need to place. 24 25 C IMPORTANT For full suction, it is important that the Dirty Water Tank is properly secured before continuing use without...
... it is important that the dirty water tank lid is securely in place. If broken or dislodged, take to an Authorized Dealer for repair. 9 Actual model may need to place. 24 25 C IMPORTANT For full suction, it is important that the Dirty Water Tank is properly secured before continuing use without...

Product Manual
Page 10
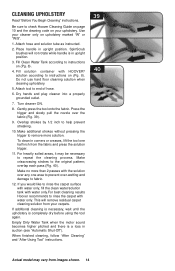
... to instructions (Pg. 8). 2. HOW TO CLEAN BEFORE YOU BEGIN CLEANING 1. Vacuum thoroughly - Vacuum upholstery with a vacuum cleaner with an appropriate Hoover Cleaning Solutions, see "Cleaning Solutions" section. Do not use the carpet cleaner as a dry vacuum cleaner. 2. For upholstery, check cleaning code ...- Test for color removal or bleed with your model. 6. Wait ten minutes and check for colorfastness - For furniture too heavy to protect wood or metal surfaces from images shown. 10...
... to instructions (Pg. 8). 2. HOW TO CLEAN BEFORE YOU BEGIN CLEANING 1. Vacuum thoroughly - Vacuum upholstery with a vacuum cleaner with an appropriate Hoover Cleaning Solutions, see "Cleaning Solutions" section. Do not use the carpet cleaner as a dry vacuum cleaner. 2. For upholstery, check cleaning code ...- Test for color removal or bleed with your model. 6. Wait ten minutes and check for colorfastness - For furniture too heavy to protect wood or metal surfaces from images shown. 10...

Product Manual
Page 11
For best cleaning results and to soak up drips. 11 Actual model may puddle. NOTE: It is best to alternate wet and dry strokes as a towel) to aid in suction (see arrow below). ! See "Dirty Water Tank: ... higher pitched and there is completely dry. Release trigger and slowly push cleaner forward over area just sprayed with dry strokes. For best cleaning results, Hoover recommends to Clean" page 9. To avoid damage to wood and laminate flooring and to help prevent matting and resoiling the carpet, keep children and pets...
For best cleaning results and to soak up drips. 11 Actual model may puddle. NOTE: It is best to alternate wet and dry strokes as a towel) to aid in suction (see arrow below). ! See "Dirty Water Tank: ... higher pitched and there is completely dry. Release trigger and slowly push cleaner forward over area just sprayed with dry strokes. For best cleaning results, Hoover recommends to Clean" page 9. To avoid damage to wood and laminate flooring and to help prevent matting and resoiling the carpet, keep children and pets...
Product Manual
Page 12
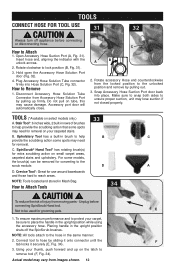
...the accessory hose. How to lock position (B, Fig. 31). 3. Plug Accessory Hose Solution Tube connector firmly into place. Do not pull on select models only.) A. Upholstery Tool has a built-in rows of injury from images shown. 12 SpinScrub® Hand Tool* has rotating brush(s) for removal.... end, aligning the indicator with the unlock arrows. 2. Hold open the Accessory Hose Solution Port door (Fig. 32). 4. B. How to Remove 1. Actual model may vary from moving parts - TOOLS CONNECT HOSE FOR TOOL USE ! How to Attach Tools 33 B D ! TOOLS (*Available on tube, this may need...
...the accessory hose. How to lock position (B, Fig. 31). 3. Plug Accessory Hose Solution Tube connector firmly into place. Do not pull on select models only.) A. Upholstery Tool has a built-in rows of injury from images shown. 12 SpinScrub® Hand Tool* has rotating brush(s) for removal.... end, aligning the indicator with the unlock arrows. 2. Hold open the Accessory Hose Solution Port door (Fig. 32). 4. B. How to Remove 1. Actual model may vary from moving parts - TOOLS CONNECT HOSE FOR TOOL USE ! How to Attach Tools 33 B D ! TOOLS (*Available on tube, this may need...

Product Manual
Page 13
Do not press trigger. ! Replace Hose and tools in sink and raising the trigger end at the hose nozzle above your head (Fig. 35). Drain suction hose by placing round end in the Mesh Storage Bag. 13 Actual model may vary from cleaner. 3. Drain solution tube by turning cleaner ON and 35 holding nozzle up for several minutes. Disconnect hose and solution tube from images shown. CAUTION ! After Using Tool 1. Always turn off appliance before connecting or disconnecting hose. 2. Press the trigger to release air and fluid.. 4.
Do not press trigger. ! Replace Hose and tools in sink and raising the trigger end at the hose nozzle above your head (Fig. 35). Drain suction hose by placing round end in the Mesh Storage Bag. 13 Actual model may vary from cleaner. 3. Drain solution tube by turning cleaner ON and 35 holding nozzle up for several minutes. Disconnect hose and solution tube from images shown. CAUTION ! After Using Tool 1. Always turn off appliance before connecting or disconnecting hose. 2. Press the trigger to release air and fluid.. 4.
Product Manual
Page 14
...one area to repeat the cleaning process. When finished cleaning, follow "After Cleaning" and "After Using Tool" instructions. 39 40 Actual model may be necessary to prevent over the fabric (Fig. 39). 9. SpinScrub brushes will remove residual carpet cleaning solution from images shown....the clean water/solution tank with water only. Overlap strokes by 1/2 inch to rinse the carpet with water only.For best cleaning results Hoover recommends to help prevent streaking. 10. Place handle in upright position. 3. Turn cleaner ON. 8. To clean in suction (see "...
...one area to repeat the cleaning process. When finished cleaning, follow "After Cleaning" and "After Using Tool" instructions. 39 40 Actual model may be necessary to prevent over the fabric (Fig. 39). 9. SpinScrub brushes will remove residual carpet cleaning solution from images shown....the clean water/solution tank with water only. Overlap strokes by 1/2 inch to rinse the carpet with water only.For best cleaning results Hoover recommends to help prevent streaking. 10. Place handle in upright position. 3. Turn cleaner ON. 8. To clean in suction (see "...

Product Manual
Page 15
... nozzle slightly to align the tabs at the bottom of your cleaner will ensure continued cleaning effectiveness. BRUSHES: How to snap into place. 15 Actual model may vary from foot of injury from nozzle. 7. Unplug cleaner before servicing. 1. To prevent possible leaking, remove Clean Water Tank and Dirty Water Tank. 2. With...
... nozzle slightly to align the tabs at the bottom of your cleaner will ensure continued cleaning effectiveness. BRUSHES: How to snap into place. 15 Actual model may vary from foot of injury from nozzle. 7. Unplug cleaner before servicing. 1. To prevent possible leaking, remove Clean Water Tank and Dirty Water Tank. 2. With...
Product Manual
Page 16
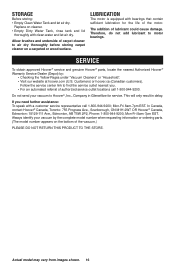
... and let air dry. SERVICE To obtain approved Hoover® service and genuine Hoover® parts, locate the nearest Authorized Hoover® Warranty Service Dealer (Depot) by the complete model number when requesting information or ordering parts. (The model number appears on cleaner. • Empty Dirty ... contain sufficient lubrication for service. Actual model may vary from images shown. 16 Follow the service center link to air dry thoroughly before storing carpet cleaner on a carpeted or wood surface. Therefore, do not add lubricant to Hoover®, Inc., Company in delay....
... and let air dry. SERVICE To obtain approved Hoover® service and genuine Hoover® parts, locate the nearest Authorized Hoover® Warranty Service Dealer (Depot) by the complete model number when requesting information or ordering parts. (The model number appears on cleaner. • Empty Dirty ... contain sufficient lubrication for service. Actual model may vary from images shown. 16 Follow the service center link to air dry thoroughly before storing carpet cleaner on a carpeted or wood surface. Therefore, do not add lubricant to Hoover®, Inc., Company in delay....
Product Manual
Page 17
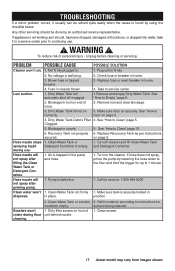
... empty. 1. See "How to Use" on securely. If appliance is on page 9. 4. Fuse in wall plug. 3. Remove tool and clear blockage. 3. Clean screen. 17 Actual model may vary from images shown. PROBLEM POSSIBLE CAUSE POSSIBLE SOLUTION Cleaner won 't dispense. 2. Hose nozzle stops spraying liquid during floor cleaning. 2. Dirty Water Tank full...
... empty. 1. See "How to Use" on securely. If appliance is on page 9. 4. Fuse in wall plug. 3. Remove tool and clear blockage. 3. Clean screen. 17 Actual model may vary from images shown. PROBLEM POSSIBLE CAUSE POSSIBLE SOLUTION Cleaner won 't dispense. 2. Hose nozzle stops spraying liquid during floor cleaning. 2. Dirty Water Tank full...


