
Product Manual
Page 1
THIS PRODUCT IS INTENDED FOR HOUSEHOLD USE ONLY. OWNER'S MANUAL Operating and Servicing Instructions Español - IMPORTANT: READ CAREFULLY BEFORE ASSEMBLY AND USE. Questions or concerns? For assistance, please call Customer Service at 1-800-944-9200 Mon-Fri 8am-7pm EST before returning this cleaner. IF USED COMMERCIALLY WARRANTY IS VOID. ©2013 Techtronic Floor Care Technology Limited. página E1 / Frances - All rights reserved. #961151062 ID106115-R2 pag F1 www.hoover.com Please visit Hoover.com for video instructions for this product to the store.
THIS PRODUCT IS INTENDED FOR HOUSEHOLD USE ONLY. OWNER'S MANUAL Operating and Servicing Instructions Español - IMPORTANT: READ CAREFULLY BEFORE ASSEMBLY AND USE. Questions or concerns? For assistance, please call Customer Service at 1-800-944-9200 Mon-Fri 8am-7pm EST before returning this cleaner. IF USED COMMERCIALLY WARRANTY IS VOID. ©2013 Techtronic Floor Care Technology Limited. página E1 / Frances - All rights reserved. #961151062 ID106115-R2 pag F1 www.hoover.com Please visit Hoover.com for video instructions for this product to the store.

Product Manual
Page 2
.... MANUFACTURING CODE (Label located on rear of cleaner) CONTENTS Important Safeguards 3 Carton Contents...5 How To Assemble...6 Features...7 How To Use...8 On-Off Pedal...8 Handle Release Pedal 8 Transporting...8 Carry Handles...8 Clean Water/Solution Tank 8 Dirty Water Tank 9 How To Clean...10 Tools...12 Maintenance...15 Nozzle...15 Brushes...15 Service...16 Troubleshooting...17 Cleaning Solutions...18 Warranty...19 If you need assistance: Visit our website at Hoover.com or call 1-800944-9200 for choosing a HOOVER® product. MODEL 1-800...
.... MANUFACTURING CODE (Label located on rear of cleaner) CONTENTS Important Safeguards 3 Carton Contents...5 How To Assemble...6 Features...7 How To Use...8 On-Off Pedal...8 Handle Release Pedal 8 Transporting...8 Carry Handles...8 Clean Water/Solution Tank 8 Dirty Water Tank 9 How To Clean...10 Tools...12 Maintenance...15 Nozzle...15 Brushes...15 Service...16 Troubleshooting...17 Cleaning Solutions...18 Warranty...19 If you need assistance: Visit our website at Hoover.com or call 1-800944-9200 for choosing a HOOVER® product. MODEL 1-800...
Product Manual
Page 3
... machine. (See the "Cleaning Products" section of stairs or on floor. See Grounding Instructions. • Unplug before connecting SpinScrub® Hand Tool. • Do not pick up flammable or combustible materials, such as cigarettes, matches, or hot ashes. • Do not use without Tanks or Filters in . Use only on carpet moistened by children age 12 and under. Use only manufacturer's recommended attachments and products. • Do not use...
... machine. (See the "Cleaning Products" section of stairs or on floor. See Grounding Instructions. • Unplug before connecting SpinScrub® Hand Tool. • Do not pick up flammable or combustible materials, such as cigarettes, matches, or hot ashes. • Do not use without Tanks or Filters in . Use only on carpet moistened by children age 12 and under. Use only manufacturer's recommended attachments and products. • Do not use...
Product Manual
Page 4
...; Do not store extractor with solution in tanks. • With brushes on, do not leave the product on wood and laminate surfaces and remove to a hard surface and (b) place unit on absorbent material (such as a towel) to connect this machine on hard floors without proper attachment may scratch or damage your floor. • Water will not fit the outlet, have a proper outlet installed by a qualified...
...; Do not store extractor with solution in tanks. • With brushes on, do not leave the product on wood and laminate surfaces and remove to a hard surface and (b) place unit on absorbent material (such as a towel) to connect this machine on hard floors without proper attachment may scratch or damage your floor. • Water will not fit the outlet, have a proper outlet installed by a qualified...

Product Manual
Page 5
Handle Screws E. Mesh Tool Storage Bag* Tools Included in unit) F. Upper Handle D. Accessories not included with your model may vary from images shown. Water/Solution Tank C. Accessory Hose 5 Actual model may be purchased separately by visiting hoover.com. 1 B H D A G C F E A. MAKE SURE ALL PARTS ARE LOCATED BEFORE DISPOSING OF PACKING MATERIALS. *Available on select models only. Upholstery Tool H. Carpet Washer B. SpinScrub® Brush Assembly (Pre-assembled in Mesh Bag G. CARTON CONTENTS REMOVE ALL PARTS FROM CARTON AND IDENTIFY EACH ITEM SHOWN.
Handle Screws E. Mesh Tool Storage Bag* Tools Included in unit) F. Upper Handle D. Accessories not included with your model may vary from images shown. Water/Solution Tank C. Accessory Hose 5 Actual model may be purchased separately by visiting hoover.com. 1 B H D A G C F E A. MAKE SURE ALL PARTS ARE LOCATED BEFORE DISPOSING OF PACKING MATERIALS. *Available on select models only. Upholstery Tool H. Carpet Washer B. SpinScrub® Brush Assembly (Pre-assembled in Mesh Bag G. CARTON CONTENTS REMOVE ALL PARTS FROM CARTON AND IDENTIFY EACH ITEM SHOWN.

Product Manual
Page 6
... shown. 6 PLACE SOLUTION/ WATER TANK 3. CORD STORAGE 9. Insert both screws and tighten with other hand until Solution Tank clicks into place (Fig. 5). 5. Position bottom of cleaner with screwdriver (Fig. 3). Attach the plug end to make sure tank is in use. 8. HOW TO ASSEMBLE NOTE: PHILLIPS SCREWDRIVER NEEDED FOR ASSEMBLY. Place tools and hose into carpet washer base (Fig. 2) 2. Push tank handle while supporting back of tank onto Carpet Washer (Fig. 4). 6. Mesh Tool Storage Bag...
... shown. 6 PLACE SOLUTION/ WATER TANK 3. CORD STORAGE 9. Insert both screws and tighten with other hand until Solution Tank clicks into place (Fig. 5). 5. Position bottom of cleaner with screwdriver (Fig. 3). Attach the plug end to make sure tank is in use. 8. HOW TO ASSEMBLE NOTE: PHILLIPS SCREWDRIVER NEEDED FOR ASSEMBLY. Place tools and hose into carpet washer base (Fig. 2) 2. Push tank handle while supporting back of tank onto Carpet Washer (Fig. 4). 6. Mesh Tool Storage Bag...

Product Manual
Page 7
Solution Trigger: Press to release cleaning solution 2. Accessory Hose Connection Port 9. Cord Storage Hook 10. ON/OFF Pedal 3. Dirty Water Tank 5. Nozzle 8. Cord Storage Hook (Does not rotate) 11. Cord Clip 7 Actual model may vary from images shown. Solution Tube Connection Port 10 2 11 BACK 7. Handle Release Pedal 12. Clean Water/Solution Tank 4. 12 3 FEATURES 1 12 9 4 5 6 7 8 FRONT LIST OF FEATURES 1. Dirty Water Tank Latch 6.
Solution Trigger: Press to release cleaning solution 2. Accessory Hose Connection Port 9. Cord Storage Hook 10. ON/OFF Pedal 3. Dirty Water Tank 5. Nozzle 8. Cord Storage Hook (Does not rotate) 11. Cord Clip 7 Actual model may vary from images shown. Solution Tube Connection Port 10 2 11 BACK 7. Handle Release Pedal 12. Clean Water/Solution Tank 4. 12 3 FEATURES 1 12 9 4 5 6 7 8 FRONT LIST OF FEATURES 1. Dirty Water Tank Latch 6.
Product Manual
Page 8
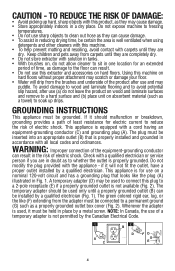
.... 14). CARRY HANDLES The carpet washer may be lifted by following the directions on the cleaning solution bottle (see "Cleaning Solutions" page 19 in manual for use with this machine on handle until handle is returned into locked upright position TRANSPORTING 1. Turn off and unplug cleaner from images shown. 8 AB 15 A 16 B E C D 17 18 19 ! Dirty Water Tank Handle D. If irritation persists, call a physician. ! Actual model may harm the machine and void...
.... 14). CARRY HANDLES The carpet washer may be lifted by following the directions on the cleaning solution bottle (see "Cleaning Solutions" page 19 in manual for use with this machine on handle until handle is returned into locked upright position TRANSPORTING 1. Turn off and unplug cleaner from images shown. 8 AB 15 A 16 B E C D 17 18 19 ! Dirty Water Tank Handle D. If irritation persists, call a physician. ! Actual model may harm the machine and void...
Product Manual
Page 9
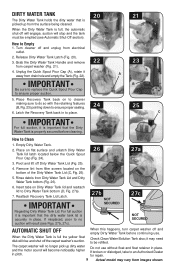
... Dealer for repair. 9 Actual model may need to Empty 1. Empty Dirty Water Tank. 2. Reattach Recovery Tank Lid Latch. Do not use . If broken or dislodged, take to place. 24 25 C IMPORTANT For full suction, it may vary from drain hole and empty the Tank (Fig. 22). Latch the Recovery Tank back in place. Check Clean Water/Solution Tank also; Remove lint from the surface being cleaned. How to Dirty Water Tank bottom...
... Dealer for repair. 9 Actual model may need to Empty 1. Empty Dirty Water Tank. 2. Reattach Recovery Tank Lid Latch. Do not use . If broken or dislodged, take to place. 24 25 C IMPORTANT For full suction, it may vary from drain hole and empty the Tank (Fig. 22). Latch the Recovery Tank back in place. Check Clean Water/Solution Tank also; Remove lint from the surface being cleaned. How to Dirty Water Tank bottom...

Product Manual
Page 10
... draperies. 5. Follow Directions on handle release pedal and lower handle to operating position. To avoid wetting and possible damage to wood floors underneath area rugs/carpet, either move area rugs/ carpet to instructions (Pg. 8). 2. Fill Clean Water Tank according to a non-wood hard floor surface or place waterproof material (e.g. Squeeze trigger to reach into a properly grounded outlet. ! Use a crevice tool to apply cleaning solution and slowly push cleaner forward (equals one...
... draperies. 5. Follow Directions on handle release pedal and lower handle to operating position. To avoid wetting and possible damage to wood floors underneath area rugs/carpet, either move area rugs/ carpet to instructions (Pg. 8). 2. Fill Clean Water Tank according to a non-wood hard floor surface or place waterproof material (e.g. Squeeze trigger to reach into a properly grounded outlet. ! Use a crevice tool to apply cleaning solution and slowly push cleaner forward (equals one...

Product Manual
Page 11
...: Let Dirty Water Tank and Dirty Water Tank Lid air dry before the carpet is dry, place plastic or aluminum foil under legs of the product after use (a) do not use straight, parallel strokes. Remove lint from the brushes and underside of furniture so metal slides or wood finishes will remove residual carpet cleaning solution from images shown. Water will drip from filter screen located behind the nozzle (see "Automatic...
...: Let Dirty Water Tank and Dirty Water Tank Lid air dry before the carpet is dry, place plastic or aluminum foil under legs of the product after use (a) do not use straight, parallel strokes. Remove lint from the brushes and underside of furniture so metal slides or wood finishes will remove residual carpet cleaning solution from images shown. Water will drip from filter screen located behind the nozzle (see "Automatic...
Product Manual
Page 12
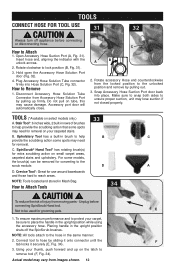
..., carpeted stairs and upholstery. C. Insert hose end, aligning the indicator with the unlock arrows. 2. SpinScrub® Hand Tool* has rotating brush(s) for converting to unsure proper suction, unit may cause damage. D. How to Attach 1. Plug Accessory Hose Solution Tube connector firmly into place. Disconnect Accessory Hose Solution Tube Connector from images shown. 12 Rotate accessory Hose end counterclockwise from moving parts - NOTE: Tools located and stored in the same manner: 2. F 3. How to Attach Tools 33 B D ! Using your carpeted stairs...
..., carpeted stairs and upholstery. C. Insert hose end, aligning the indicator with the unlock arrows. 2. SpinScrub® Hand Tool* has rotating brush(s) for converting to unsure proper suction, unit may cause damage. D. How to Attach 1. Plug Accessory Hose Solution Tube connector firmly into place. Disconnect Accessory Hose Solution Tube Connector from images shown. 12 Rotate accessory Hose end counterclockwise from moving parts - NOTE: Tools located and stored in the same manner: 2. F 3. How to Attach Tools 33 B D ! Using your carpeted stairs...

Product Manual
Page 13
Drain suction hose by placing round end in the Mesh Storage Bag. 13 Actual model may vary from cleaner. 3. Always turn off appliance before connecting or disconnecting hose. 2. Press the trigger to release air and fluid.. 4. Replace Hose and tools in sink and raising the trigger end at the hose nozzle above your head (Fig. 35). Drain solution tube by turning cleaner ON and 35 holding nozzle up for several minutes. Disconnect hose and solution tube from images shown. CAUTION ! Do not press trigger. ! After Using Tool 1.
Drain suction hose by placing round end in the Mesh Storage Bag. 13 Actual model may vary from cleaner. 3. Always turn off appliance before connecting or disconnecting hose. 2. Press the trigger to release air and fluid.. 4. Replace Hose and tools in sink and raising the trigger end at the hose nozzle above your head (Fig. 35). Drain solution tube by turning cleaner ON and 35 holding nozzle up for several minutes. Disconnect hose and solution tube from images shown. CAUTION ! Do not press trigger. ! After Using Tool 1.
Product Manual
Page 14
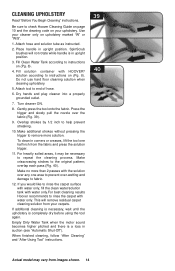
... Hoover recommends to instructions on (Pg. 8). Place handle in upright position. 3. To clean in suction (see "Automatic Shut-Off"). Fill Clean Water Tank according to rinse the carpet with the solution over any one half inch from the fabric and press the solution trigger. 11. Press the trigger and slowly pull the nozzle over -wetting and damage to remove more than 2 passes with water only. Attach hose and solution tube as instructed. 2. Turn cleaner...
... Hoover recommends to instructions on (Pg. 8). Place handle in upright position. 3. To clean in suction (see "Automatic Shut-Off"). Fill Clean Water Tank according to rinse the carpet with the solution over any one half inch from the fabric and press the solution trigger. 11. Press the trigger and slowly pull the nozzle over -wetting and damage to remove more than 2 passes with water only. Attach hose and solution tube as instructed. 2. Turn cleaner...

Product Manual
Page 15
... servicing. Be sure the nozzle does not get caught on the floor. 3. Rotate nozzle latch to continuing use and care of injury from moving parts - BRUSHES: How to unsnap nozzle from foot of brush assembly with the hexagonal hole (D). To reduce the risk of the nozzle with the notches on nozzle slightly to Change and Clean Your cleaner is not working as proper use . With handle in upright position, tilt carpet washer...
... servicing. Be sure the nozzle does not get caught on the floor. 3. Rotate nozzle latch to continuing use and care of injury from moving parts - BRUSHES: How to unsnap nozzle from foot of brush assembly with the hexagonal hole (D). To reduce the risk of the nozzle with the notches on nozzle slightly to Change and Clean Your cleaner is not working as proper use . With handle in upright position, tilt carpet washer...
Product Manual
Page 16
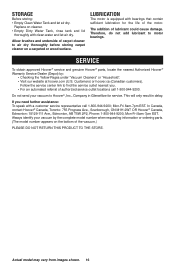
... an automated referral of carpet cleaner to Hoover®, Inc., Company in delay. SERVICE To obtain approved Hoover® service and genuine Hoover® parts, locate the nearest Authorized Hoover® Warranty Service Dealer (Depot) by the complete model number when requesting information or ordering parts. (The model number appears on cleaner. • Empty Dirty Water Tank, rinse tank and lid thoroughly with clean water and let air dry. Allow brushes and underside of authorized...
... an automated referral of carpet cleaner to Hoover®, Inc., Company in delay. SERVICE To obtain approved Hoover® service and genuine Hoover® parts, locate the nearest Authorized Hoover® Warranty Service Dealer (Depot) by the complete model number when requesting information or ordering parts. (The model number appears on cleaner. • Empty Dirty Water Tank, rinse tank and lid thoroughly with clean water and let air dry. Allow brushes and underside of authorized...
Product Manual
Page 17
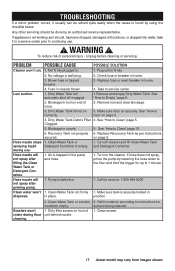
... the trigger for up to Empty" page 9. 2. Clean Water Tank or solution container empty. 1. Dirty filter screen on page 9. 1. To reduce risk of hose. 3. Hose nozzle will not spray after filling the Clean Water Tank or Detergent Container. Dirty Water Tank Debris Filter Clogged. 5. Make sure tank is defective. 1. PROBLEM POSSIBLE CAUSE POSSIBLE SOLUTION Cleaner won 't dispense. 2. Recovery Tank not properly secured. 1. Turn on securely. Brushes won't rotate during use . ! Any other servicing should , has been dropped, damaged, left outdoors, or...
... the trigger for up to Empty" page 9. 2. Clean Water Tank or solution container empty. 1. Dirty filter screen on page 9. 1. To reduce risk of hose. 3. Hose nozzle will not spray after filling the Clean Water Tank or Detergent Container. Dirty Water Tank Debris Filter Clogged. 5. Make sure tank is defective. 1. PROBLEM POSSIBLE CAUSE POSSIBLE SOLUTION Cleaner won 't dispense. 2. Recovery Tank not properly secured. 1. Turn on securely. Brushes won't rotate during use . ! Any other servicing should , has been dropped, damaged, left outdoors, or...
Product Manual
Page 18
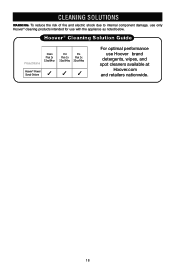
CLEANING SOLUTIONS WARNING: To reduce the risk of fire and electric shock due to internal component damage, use only Hoover® cleaning products intended for use with the appliance as noted below. ® Hoover Cleaning Solution Guide Product Name Clean Plus 2x 32oz/64oz Pet Pro Plus 2x Plus 2x 32oz/64oz 32oz/64oz Hoover® Power Scrub Deluxe ✓ ✓ ✓ For optimal performance use HooverÆ brand detergents, wipes, and spot cleaners available at Hoover.com and retailers nationwide. 18
CLEANING SOLUTIONS WARNING: To reduce the risk of fire and electric shock due to internal component damage, use only Hoover® cleaning products intended for use with the appliance as noted below. ® Hoover Cleaning Solution Guide Product Name Clean Plus 2x 32oz/64oz Pet Pro Plus 2x Plus 2x 32oz/64oz 32oz/64oz Hoover® Power Scrub Deluxe ✓ ✓ ✓ For optimal performance use HooverÆ brand detergents, wipes, and spot cleaners available at Hoover.com and retailers nationwide. 18
Product Manual
Page 19
...-9200 OR visit Hoover® online at no cost to you, to you specific rights; WHAT THIS WARRANTY DOES NOT COVER This Warranty does not cover: use of the product in a commercial operation (such as warranted, take or send the product to either a Hoover® Sales and Service Center or Hoover® Authorized Warranty Service Dealer along with the Owner's Manual, your product to a Hoover® Sales and Service Center for a full...
...-9200 OR visit Hoover® online at no cost to you, to you specific rights; WHAT THIS WARRANTY DOES NOT COVER This Warranty does not cover: use of the product in a commercial operation (such as warranted, take or send the product to either a Hoover® Sales and Service Center or Hoover® Authorized Warranty Service Dealer along with the Owner's Manual, your product to a Hoover® Sales and Service Center for a full...


