Product Manual
Page 3
...only attachments recommended by Hoover®; Keep cord away from heated surfaces. • Do not use cord as a handle, close door on cord or pull cord around sharp edges or corners. Turn off all controls before unplugging. • Unplug before servicing the carpet cleaner. • Do ...not unplug by pulling on cord. Do not immerse product. • Connect to an Authorized Hoover® Warranty Service Dealer. • Close supervision is necessary when any time. &#...
...only attachments recommended by Hoover®; Keep cord away from heated surfaces. • Do not use cord as a handle, close door on cord or pull cord around sharp edges or corners. Turn off all controls before unplugging. • Unplug before servicing the carpet cleaner. • Do ...not unplug by pulling on cord. Do not immerse product. • Connect to an Authorized Hoover® Warranty Service Dealer. • Close supervision is necessary when any time. &#...
Product Manual
Page 4
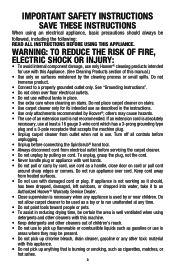
...place by a qualified electrician. A temporary adapter (D) may reduce air flow. • To help prevent matting and resoiling, avoid contact with the carpet cleaner. NOTE: In Canada, the use on a nominal 120 volt circuit and has a grounding plug that may be connected to a permanent ground ... electrician or service person if you are in doubt as a properly grounded outlet box cover (Fig. 2). • Avoid picking up hard, sharp objects with carpets until they are completely dry. • Store in a dry place. if it should be installed by the Canadian Electrical Code. 1 A 2 E D...
...place by a qualified electrician. A temporary adapter (D) may reduce air flow. • To help prevent matting and resoiling, avoid contact with the carpet cleaner. NOTE: In Canada, the use on a nominal 120 volt circuit and has a grounding plug that may be connected to a permanent ground ... electrician or service person if you are in doubt as a properly grounded outlet box cover (Fig. 2). • Avoid picking up hard, sharp objects with carpets until they are completely dry. • Store in a dry place. if it should be installed by the Canadian Electrical Code. 1 A 2 E D...

Product Manual
Page 5
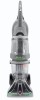
Handle Bolts and Nuts (Three nuts may be purchased separately by visiting hoover.com. Bolts and nuts located in bag but only two or need for assembly. Hose/Cord Hook E. F. Attach handle ... may vary from carton and identify each item shown. SpinScrub® Hand Tool* *Available on select models only. Cleaner B. Upper Handle C. NOTE: Phillips screwdriver needed for assembly. 1. Cleaner ASSEMBLY Carton contents 1.1 Carpet Upholstery Cleaner Bare floor cleaner PreCleaner G C H D F I . Make sure all parts from images shown. Hose/Tool Caddy* G Hose H Stair...
Handle Bolts and Nuts (Three nuts may be purchased separately by visiting hoover.com. Bolts and nuts located in bag but only two or need for assembly. Hose/Cord Hook E. F. Attach handle ... may vary from carton and identify each item shown. SpinScrub® Hand Tool* *Available on select models only. Cleaner B. Upper Handle C. NOTE: Phillips screwdriver needed for assembly. 1. Cleaner ASSEMBLY Carton contents 1.1 Carpet Upholstery Cleaner Bare floor cleaner PreCleaner G C H D F I . Make sure all parts from images shown. Hose/Tool Caddy* G Hose H Stair...
Product Manual
Page 8
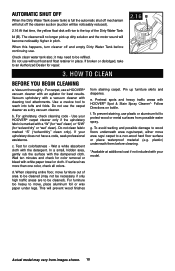
... the unit with Hoover® Carpet/Upholstery Detergent. How to the water tank. To remove tank, press down on each side of the tank to rinse the carpet or floor. They are specially formulated for picking up spills or cleaning carpets and hard floors when brushing is permanently attached to Fill Unplug cleaner from images...
... the unit with Hoover® Carpet/Upholstery Detergent. How to the water tank. To remove tank, press down on each side of the tank to rinse the carpet or floor. They are specially formulated for picking up spills or cleaning carpets and hard floors when brushing is permanently attached to Fill Unplug cleaner from images...
Product Manual
Page 10
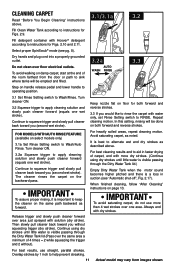
...Do not use without float and float retainer in pitch. Wet a white absorbent cloth with HOOVER® Spot & Stain Spray Cleaner*- Follow Directions on bottle. plastic) underneath them before continuing use. For carpet, use plastic or aluminum foil to an Authorized Dealer for best results. Use a crevice...folds. For upholstery, check cleaning code - If your model. d. Actual model may vary from images shown. 10 Use your HOOVER® carpet cleaner only if the upholstery fabric is full the automatic shut off mechanism will rise to the top of area to be cleaned (...
...Do not use without float and float retainer in pitch. Wet a white absorbent cloth with HOOVER® Spot & Stain Spray Cleaner*- Follow Directions on bottle. plastic) underneath them before continuing use. For carpet, use plastic or aluminum foil to an Authorized Dealer for best results. Use a crevice...folds. For upholstery, check cleaning code - If your model. d. Actual model may vary from images shown. 10 Use your HOOVER® carpet cleaner only if the upholstery fabric is full the automatic shut off mechanism will rise to the top of area to be cleaned (...
Product Manual
Page 11
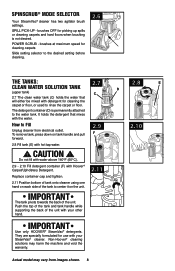
... solution (dry stroke). In this setting, rinsing will be done on the backward pass. Continue to instructions for Figs. 2.9. The cleaner rinses the carpet on both forward and reverse strokes. 3.3 If you (second wet stroke). It is visible passing through the Dirty Water Tank lid ...for both forward and reverse strokes. Always end with Hoover® detergent according to apply cleaning solution and slowly push cleaner forward (equals one wet stroke). IMPORTANT To assure proper rinsing, it is a loss in faster drying of carpet, end with water only, set Rinse Setting switch...
... solution (dry stroke). In this setting, rinsing will be done on the backward pass. Continue to instructions for Figs. 2.9. The cleaner rinses the carpet on both forward and reverse strokes. 3.3 If you (second wet stroke). It is visible passing through the Dirty Water Tank lid ...for both forward and reverse strokes. Always end with Hoover® detergent according to apply cleaning solution and slowly push cleaner forward (equals one wet stroke). IMPORTANT To assure proper rinsing, it is a loss in faster drying of carpet, end with water only, set Rinse Setting switch...
Product Manual
Page 12
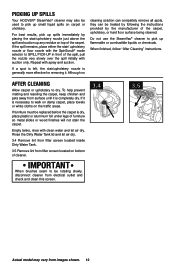
.... If it is dry, place plastic or aluminum foil under legs of cleaner. For best results, pick up spills immediately by the manufacturer of the carpet, upholstery, or hard floor surface being cleaned. Picking up spills Your HOOVER® SteamVac® cleaner may vary from images shown. 12 If the spill remains, place either...
.... If it is dry, place plastic or aluminum foil under legs of cleaner. For best results, pick up spills immediately by the manufacturer of the carpet, upholstery, or hard floor surface being cleaned. Picking up spills Your HOOVER® SteamVac® cleaner may vary from images shown. 12 If the spill remains, place either...

Product Manual
Page 13
... 13 Actual model may need for converting to Remove 4.2 Squeeze latches (C) on select models only) B. SpinScrub® hand tool (Available on small carpet areas, carpeted A stairs and upholstery. Snap door into solution connection port (B). CAUTION ! To reduce the risk of hose. Push hose into port and lock in... tools A. For some spots may vary from port. Close door. TOOLS Attach hose ! Remove solution tube from moving parts, unplug cleaner. 4.1 A How to help provide the scrubbing action some models, the brushes can be removed for removal. How to Reattach Tool Cover...
... 13 Actual model may need for converting to Remove 4.2 Squeeze latches (C) on select models only) B. SpinScrub® hand tool (Available on small carpet areas, carpeted A stairs and upholstery. Snap door into solution connection port (B). CAUTION ! To reduce the risk of hose. Push hose into port and lock in... tools A. For some spots may vary from port. Close door. TOOLS Attach hose ! Remove solution tube from moving parts, unplug cleaner. 4.1 A How to help provide the scrubbing action some models, the brushes can be removed for removal. How to Reattach Tool Cover...

Product Manual
Page 15
... Setting switch to WASH. Attach tool to end of carpet. Dry hands and plug cleaner into carpet pile. Pull tool slowly over the carpet (second wet stroke). It is completely dry before using the tool again. Always end with HOOVER® detergent according to instructions for Figs. 2.9 to...4.10 A B Position tool against the riser and slightly press it against riser. To avoid saturating carpet, do not use extra caution when cleaning on stairs. Turn cleaner ON. 4.9 Pre-spray the carpeted stair by 1/2 inch to help prevent streaking. Overlap strokes by holding the tool (A) or (B) ...
... Setting switch to WASH. Attach tool to end of carpet. Dry hands and plug cleaner into carpet pile. Pull tool slowly over the carpet (second wet stroke). It is completely dry before using the tool again. Always end with HOOVER® detergent according to instructions for Figs. 2.9 to...4.10 A B Position tool against the riser and slightly press it against riser. To avoid saturating carpet, do not use extra caution when cleaning on stairs. Turn cleaner ON. 4.9 Pre-spray the carpeted stair by 1/2 inch to help prevent streaking. Overlap strokes by holding the tool (A) or (B) ...
Product Manual
Page 18
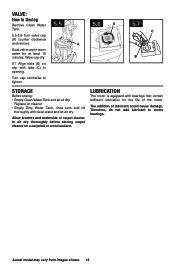
...; Empty Dirty Water Tank, rinse tank and lid thoroughly with tabs (C) in warm water for the life of carpet cleaner to tighten. 5.5 5.6 A A 5.7 C B Storage Before storing: • Empty Clean Water Tank and let air dry. valve: How to motor bearings. Allow brushes and underside of the ... Tank. 5.5-5.6 Turn valve cap (A) counter clockwise and remove. Actual model may vary from images shown. 18 Turn cap clockwise to air dry thoroughly before storing carpet cleaner on a carpeted or wood surface. Soak valve cap in opening. The addition of lubricant could cause damage.
...; Empty Dirty Water Tank, rinse tank and lid thoroughly with tabs (C) in warm water for the life of carpet cleaner to tighten. 5.5 5.6 A A 5.7 C B Storage Before storing: • Empty Clean Water Tank and let air dry. valve: How to motor bearings. Allow brushes and underside of the ... Tank. 5.5-5.6 Turn valve cap (A) counter clockwise and remove. Actual model may vary from images shown. 18 Turn cap clockwise to air dry thoroughly before storing carpet cleaner on a carpeted or wood surface. Soak valve cap in opening. The addition of lubricant could cause damage.
Product Manual
Page 19
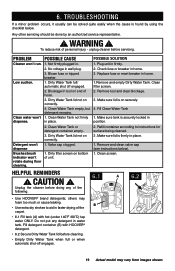
...; Use extra dry strokes to instructions for surface being cleaned. 3 .Make sure lid is on correctly. 4. To reduce risk of the carpet. • 6.1 Fill tank (A) with HOOVER® detergent. • 6.2 Secure Dirty Water Tank lid before cleaning. • Empty Dirty Water Tank when full or when automatic shut... voltage in home. 3. Check fuse or breaker in wall plug. 3. Clean Water Tank or detergent container empty. 3. Unplug the cleaner before servicing. Do not put any of unit. 1. Make sure lid is firmly in faster drying of personal injury - unplug...
...; Use extra dry strokes to instructions for surface being cleaned. 3 .Make sure lid is on correctly. 4. To reduce risk of the carpet. • 6.1 Fill tank (A) with HOOVER® detergent. • 6.2 Secure Dirty Water Tank lid before cleaning. • Empty Dirty Water Tank when full or when automatic shut... voltage in home. 3. Check fuse or breaker in wall plug. 3. Clean Water Tank or detergent container empty. 3. Unplug the cleaner before servicing. Do not put any of unit. 1. Make sure lid is firmly in faster drying of personal injury - unplug...


