
Product Manual
Page 3
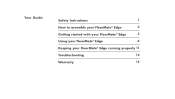
Your Guide: Safety Instructions 1 How to assemble your FloorMate® Edge 3 Getting started with your FloorMate® Edge 5 Using your FloorMate® Edge 6 Keeping your FloorMate® Edge running properly 11 Troubleshooting 14 Warranty 15
Your Guide: Safety Instructions 1 How to assemble your FloorMate® Edge 3 Getting started with your FloorMate® Edge 5 Using your FloorMate® Edge 6 Keeping your FloorMate® Edge running properly 11 Troubleshooting 14 Warranty 15
Product Manual
Page 6
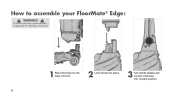
It'll click. 2 Lock handle into place. 3 Turn handle release dial counter-clockwise into the base. How to assemble your FloorMate® Edge: ! To reduce the risk of personal injury Unplug before cleaning or servicing. 1 Place the body into 'locked' position. 3 WARNING !
It'll click. 2 Lock handle into place. 3 Turn handle release dial counter-clockwise into the base. How to assemble your FloorMate® Edge: ! To reduce the risk of personal injury Unplug before cleaning or servicing. 1 Place the body into 'locked' position. 3 WARNING !
Product Manual
Page 7
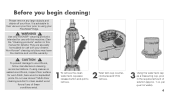
...wood floors, follow manufacturer's cleaning recommendations. WARNING ! per quart of solution (approx. 1 oz. Use only HOOVER® cleaning products intended for use with your cleaner. Do not use with this machine. (See the ..."Cleaning products" section in the required amount of water). 4 If using your floor. Non-Hoover® cleaning solutions may harm the machine and void the warranty. ! To prevent damage to remove. 3 ...sealed wood floors, inspect floor surface for use Hoover® Multi-Floor cleaning solution to clean sealed wood floors if any large objects and...
...wood floors, follow manufacturer's cleaning recommendations. WARNING ! per quart of solution (approx. 1 oz. Use only HOOVER® cleaning products intended for use with your cleaner. Do not use with this machine. (See the ..."Cleaning products" section in the required amount of water). 4 If using your floor. Non-Hoover® cleaning solutions may harm the machine and void the warranty. ! To prevent damage to remove. 3 ...sealed wood floors, inspect floor surface for use Hoover® Multi-Floor cleaning solution to clean sealed wood floors if any large objects and...
Product Manual
Page 8
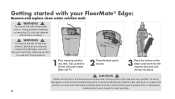
... Injury-Unplug before cleaning or servicing. Top up drips. 5 To reduce the risk of fire and electric shock due to internal component damage, use only Hoover® hard floor cleaning solution for use cleaner without tank in place. ! WARNING ! Do not use with warm water (Max 100°F). 2 Twist the tank...
... Injury-Unplug before cleaning or servicing. Top up drips. 5 To reduce the risk of fire and electric shock due to internal component damage, use only Hoover® hard floor cleaning solution for use cleaner without tank in place. ! WARNING ! Do not use with warm water (Max 100°F). 2 Twist the tank...
Product Manual
Page 9
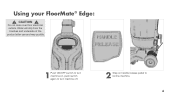
Using your FloorMate® Edge: ! CAUTION ! Water will drip from the brushes and underside of the product after use and may puddle. 1 Push ON/OFF switch to turn machine on, push switch again to turn machine off. 2 Step on handle release pedal to recline machine. 6 Do not clean over floor electrical outlets.
Using your FloorMate® Edge: ! CAUTION ! Water will drip from the brushes and underside of the product after use and may puddle. 1 Push ON/OFF switch to turn machine on, push switch again to turn machine off. 2 Step on handle release pedal to recline machine. 6 Do not clean over floor electrical outlets.
Product Manual
Page 10
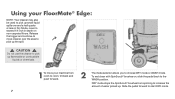
Release the trigger and continue to move cleaner over the area to pick up flammable or combustible liquids or chemicals. 1To move your FloorMate® Edge: NOTE: Your cleaner may also be used to pick up . To wet clean with SpinScrub® brushes on non-carpeted floors. Do not use the ...
Release the trigger and continue to move cleaner over the area to pick up flammable or combustible liquids or chemicals. 1To move your FloorMate® Edge: NOTE: Your cleaner may also be used to pick up . To wet clean with SpinScrub® brushes on non-carpeted floors. Do not use the ...
Product Manual
Page 11
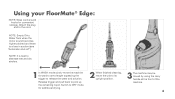
... in suction (see "Automatic shut-off"). Switch to DRY mode for convenient storage. Attach the plug end to pick up the remaining liquid. Using your FloorMate® Edge: NOTE: Wrap cord around hooks for additional drying. 2 When finished cleaning, return the unit to release the water and solution. Release trigger and pull...
... in suction (see "Automatic shut-off"). Switch to DRY mode for convenient storage. Attach the plug end to pick up the remaining liquid. Using your FloorMate® Edge: NOTE: Wrap cord around hooks for additional drying. 2 When finished cleaning, return the unit to release the water and solution. Release trigger and pull...
Product Manual
Page 12
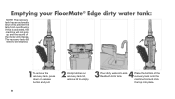
If this is activated, the machine will not pick up and the sound of the recovery tank onto the machine first and click the top into sink. Place the bottom of the motor will need to be emptied. 1To remove the recovery tank, press down on release button and pull. 2 Unclip latches on recovery tank lid, remove lid to empty. 3 4 Pour dirty water into place. 9 The recovery tank will change. Emptying your FloorMate® Edge dirty water tank: NOTE: The recovery tank has an automatic shut off to tank. Reattach lid to prevent the tank from overflowing.
If this is activated, the machine will not pick up and the sound of the recovery tank onto the machine first and click the top into sink. Place the bottom of the motor will need to be emptied. 1To remove the recovery tank, press down on release button and pull. 2 Unclip latches on recovery tank lid, remove lid to empty. 3 4 Pour dirty water into place. 9 The recovery tank will change. Emptying your FloorMate® Edge dirty water tank: NOTE: The recovery tank has an automatic shut off to tank. Reattach lid to prevent the tank from overflowing.
Product Manual
Page 13
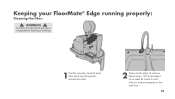
Keeping your FloorMate® Edge running properly: Cleaning the filter: ! WARNING ! To reduce the risk of personal injury Unplug before cleaning or servicing. 1Pull the recovery tank lid open after each use and gently remove the filter. 2 Rinse under water to remove debris (max. 100°F) and leave for at least 24 hours or until fully dry before replacing in the machine. 10
Keeping your FloorMate® Edge running properly: Cleaning the filter: ! WARNING ! To reduce the risk of personal injury Unplug before cleaning or servicing. 1Pull the recovery tank lid open after each use and gently remove the filter. 2 Rinse under water to remove debris (max. 100°F) and leave for at least 24 hours or until fully dry before replacing in the machine. 10
Product Manual
Page 14
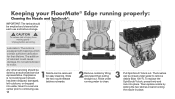
... use . 11 2 Remove nozzle by tilting downward then pulling straight out. Slide is equipped with bearings which contain sufficient lubrication for easy cleaning. Keeping your FloorMate® Edge running water to clean. 3 Pull SpinScrub® block out. If appliance Nozzle can be rinsed under running properly: Cleaning the Nozzle and SpinScrub®...
... use . 11 2 Remove nozzle by tilting downward then pulling straight out. Slide is equipped with bearings which contain sufficient lubrication for easy cleaning. Keeping your FloorMate® Edge running water to clean. 3 Pull SpinScrub® block out. If appliance Nozzle can be rinsed under running properly: Cleaning the Nozzle and SpinScrub®...
Product Manual
Page 15
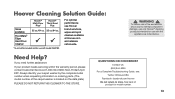
... to store. bottle included and for model number. 12 WARNING ! Mon-Fri 8am-7pm EST. Hoover Cleaning Solution Guide: Sizes available FloorMate® Edge Hard Floor Cleaner Hoover® Multi-Floor Plus* Hoover® Tile & Grout Plus 32 oz./64 oz. 32 oz./64 oz. *16 oz. ... Twitter: @HooverUSA Facebook: facebook.com/hoover Do not return to internal component damage, use only Hoover® cleaning products intended for use Hoover brand solutions, wipes and spot cleaners available at 1-800-944-9200; For optimal performance use with model FH40190. See back of product for use...
... to store. bottle included and for model number. 12 WARNING ! Mon-Fri 8am-7pm EST. Hoover Cleaning Solution Guide: Sizes available FloorMate® Edge Hard Floor Cleaner Hoover® Multi-Floor Plus* Hoover® Tile & Grout Plus 32 oz./64 oz. 32 oz./64 oz. *16 oz. ... Twitter: @HooverUSA Facebook: facebook.com/hoover Do not return to internal component damage, use only Hoover® cleaning products intended for use Hoover brand solutions, wipes and spot cleaners available at 1-800-944-9200; For optimal performance use with model FH40190. See back of product for use...

