Product Manual
Page 1
Questions or concerns? OWNER'S Manual Operating and Servicing Instructions www.hoover.com FH40150 Series FH40160 Series Please visit Hoover.com for video instructions for this product to the store. IMPORTANT: READ CAREFULLY BEFORE ASSEMBLY AND USE. For assistance, please call Customer Service at 1-800-944-9200 Mon-Fri 8am-7pm EST before returning this cleaner. All rights reserved. #961151072 ID106402-R0 IF USED COMMERCIALLY WARRANTY IS VOID. ©2013 Techtronic Floor Care Technology Limited. THIS PRODUCT IS INTENDED FOR HOUSEHOLD USE ONLY.
Questions or concerns? OWNER'S Manual Operating and Servicing Instructions www.hoover.com FH40150 Series FH40160 Series Please visit Hoover.com for video instructions for this product to the store. IMPORTANT: READ CAREFULLY BEFORE ASSEMBLY AND USE. For assistance, please call Customer Service at 1-800-944-9200 Mon-Fri 8am-7pm EST before returning this cleaner. All rights reserved. #961151072 ID106402-R0 IF USED COMMERCIALLY WARRANTY IS VOID. ©2013 Techtronic Floor Care Technology Limited. THIS PRODUCT IS INTENDED FOR HOUSEHOLD USE ONLY.
Product Manual
Page 2
... Operation...7 Clean Water/Solution Tank 7 How To Use...8 On-Off Switch...8 Handle Release Pedal 8 Transporting...8 Carry Handle...8 How To Use...8 Dirty Water Tank 8 How To Clean...9 Maintenance...11 Nozzle...11 Brushes...11 Storage...12 Troubleshooting...13 Service...14 Warranty...15 If you need assistance: Visit our website at hoover.com for more information or for video instruction for choosing a HOOVER® product. only) or to register by phone. Please do not return this product to this Hard Floor Cleaner...
... Operation...7 Clean Water/Solution Tank 7 How To Use...8 On-Off Switch...8 Handle Release Pedal 8 Transporting...8 Carry Handle...8 How To Use...8 Dirty Water Tank 8 How To Clean...9 Maintenance...11 Nozzle...11 Brushes...11 Storage...12 Troubleshooting...13 Service...14 Warranty...15 If you need assistance: Visit our website at hoover.com for more information or for video instruction for choosing a HOOVER® product. only) or to register by phone. Please do not return this product to this Hard Floor Cleaner...
Product Manual
Page 3
... HOOVER® cleaning products intended for use with this machine. (See the "Cleaning Products" section of this manual. Not intended for use on carpets. • Do not pick up flammable or combustible materials, such as it may result in injury or damage. • Do not use without Tanks or Filters in . To avoid injury or damage, keep free of California to prevent the cleaner from heated...
... HOOVER® cleaning products intended for use with this machine. (See the "Cleaning Products" section of this manual. Not intended for use on carpets. • Do not pick up flammable or combustible materials, such as it may result in injury or damage. • Do not use without Tanks or Filters in . To avoid injury or damage, keep free of California to prevent the cleaner from heated...

Product Manual
Page 4
... certain the area is well ventilated when using detergents and other cleaners with a qualified electrician or service person if you are in doubt as a properly grounded outlet box cover (Fig. 2). Caution - Do not expose machine to freezing temperatures. • Do not use sharp objects to clean out hose as they can be connected to a permanent ground (G) such as to reduce...
... certain the area is well ventilated when using detergents and other cleaners with a qualified electrician or service person if you are in doubt as a properly grounded outlet box cover (Fig. 2). Caution - Do not expose machine to freezing temperatures. • Do not use sharp objects to clean out hose as they can be connected to a permanent ground (G) such as to reduce...
Product Manual
Page 5
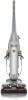
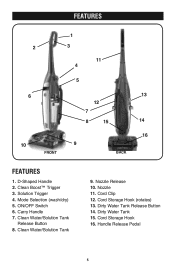
FEATURES 1 2 3 11 4 5 6 10 FRONT 13 12 7 8 15 14 16 9 BACK FEATURES 1. Solution Trigger 4. Clean Boost™ Trigger 3. Carry Handle 7. Nozzle 11. Cord Storage Hook (rotates) 13. Dirty Water Tank Release Button 14. Dirty Water Tank 15. Cord Storage Hook 16. Mode Selection (wash/dry) 5. ON/OFF Switch 6. Nozzle Release 10. D-Shaped Handle 2. Clean Water/Solution Tank Release Button 8. Clean Water/Solution Tank 9. Cord Clip 12. Handle Release Pedal 5
FEATURES 1 2 3 11 4 5 6 10 FRONT 13 12 7 8 15 14 16 9 BACK FEATURES 1. Solution Trigger 4. Clean Boost™ Trigger 3. Carry Handle 7. Nozzle 11. Cord Storage Hook (rotates) 13. Dirty Water Tank Release Button 14. Dirty Water Tank 15. Cord Storage Hook 16. Mode Selection (wash/dry) 5. ON/OFF Switch 6. Nozzle Release 10. D-Shaped Handle 2. Clean Water/Solution Tank Release Button 8. Clean Water/Solution Tank 9. Cord Clip 12. Handle Release Pedal 5
Product Manual
Page 6
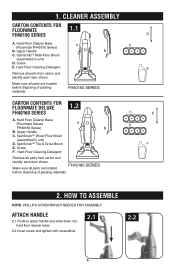
...; Tile & Grout Brush E. Hard Floor Cleaning Detergent D B Remove all parts from carton and identify each item shown. D E E F 2. Screw E. Hard Floor Cleaner Base (Floormate Deluxe A FH40160 Series) B. Upper Handle C. Attach handle 2.1 Position upper handle and slide down into hard floor cleaner base. 2.2 Insert screw and tighten with screwdriver. 2.1 2.2 6 Hard Floor Cleaning Detergent C B Remove all parts from carton and identify each item shown. Screw F. HOW TO ASSEMBLe NOTE: Phillips screwdriver needed for fLOORMATE Deluxe 1.2 FH40160 SERIES...
...; Tile & Grout Brush E. Hard Floor Cleaning Detergent D B Remove all parts from carton and identify each item shown. D E E F 2. Screw E. Hard Floor Cleaner Base (Floormate Deluxe A FH40160 Series) B. Upper Handle C. Attach handle 2.1 Position upper handle and slide down into hard floor cleaner base. 2.2 Insert screw and tighten with screwdriver. 2.1 2.2 6 Hard Floor Cleaning Detergent C B Remove all parts from carton and identify each item shown. Screw F. HOW TO ASSEMBLe NOTE: Phillips screwdriver needed for fLOORMATE Deluxe 1.2 FH40160 SERIES...
Product Manual
Page 7
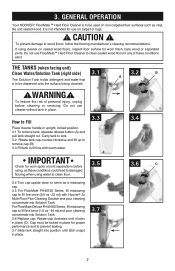
... pour cleaning concentrate into Solution Tank. 3.6 Replace cap. If using , as these conditions exist. Do not use FloorMate™ Hard Floor Cleaner to be used on carpet or rugs. ! Do not use on non-carpeted floor surfaces such as a measuring cap. 3.5 For FloorMate FH40150 Series, fill measuring cap to prevent leaking. 3.7 Slide tank straight into Solution Tank. 3. The tanks (when facing unit) Clean Water/Solution Tank (right side) The Solution Tank holds detergent and water that is not intended for worn finish, bare...
... pour cleaning concentrate into Solution Tank. 3.6 Replace cap. If using , as these conditions exist. Do not use FloorMate™ Hard Floor Cleaner to be used on carpet or rugs. ! Do not use on non-carpeted floor surfaces such as a measuring cap. 3.5 For FloorMate FH40150 Series, fill measuring cap to prevent leaking. 3.7 Slide tank straight into Solution Tank. 3. The tanks (when facing unit) Clean Water/Solution Tank (right side) The Solution Tank holds detergent and water that is not intended for worn finish, bare...
Product Manual
Page 8
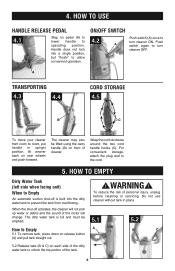
... before cleaning or servicing. When the shut-off is full and must be lifted using the carry handle (B) on pedal (A) to lower handle to turn cleaner ON. How to unlock the top portion of the motor will not pick up water or debris and the sound of the tank. 8 Do not use cleaner without tank in upright position, tilt cleaner back on release button (A) and pull tank...
... before cleaning or servicing. When the shut-off is full and must be lifted using the carry handle (B) on pedal (A) to lower handle to turn cleaner ON. How to unlock the top portion of the motor will not pick up water or debris and the sound of the tank. 8 Do not use cleaner without tank in upright position, tilt cleaner back on release button (A) and pull tank...
Product Manual
Page 9
... your cleaner. Do not use FloorMateTM Hard Floor Cleaner to clean sealed wood floors if any type of these conditions exist. 6.1 Vacuum floor to remove loose dirt, hair and debris. 6.2 Fill Clean Water Solution Tank with Hoover® 2X Multi-Floor Plus Cleaning solution and water (refer to clean wood floors that have been sealed with a polyurethane coating and can be used to 3.1 thru 3.7). Dry hands and plug cleaner into sink. 5.5 Check foam filter for worn finish, bare wood...
... your cleaner. Do not use FloorMateTM Hard Floor Cleaner to clean sealed wood floors if any type of these conditions exist. 6.1 Vacuum floor to remove loose dirt, hair and debris. 6.2 Fill Clean Water Solution Tank with Hoover® 2X Multi-Floor Plus Cleaning solution and water (refer to clean wood floors that have been sealed with a polyurethane coating and can be used to 3.1 thru 3.7). Dry hands and plug cleaner into sink. 5.5 Check foam filter for worn finish, bare wood...

Product Manual
Page 10
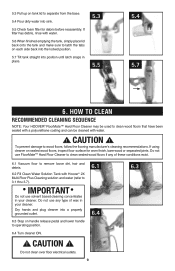
... Do not use and may also be cleaned. Squeeze trigger to a hard surface and B) place unit on the floor. 6.14 Empty dirty water tank when the motor sound becomes higher in depth on non-carpeted floors. The cleaner's suction will drip from the brushes and underside of the product after use A) do not leave the product on wood and laminate surfaces and remove to release solution as you...
... Do not use and may also be cleaned. Squeeze trigger to a hard surface and B) place unit on the floor. 6.14 Empty dirty water tank when the motor sound becomes higher in depth on non-carpeted floors. The cleaner's suction will drip from the brushes and underside of the product after use A) do not leave the product on wood and laminate surfaces and remove to release solution as you...
Product Manual
Page 11
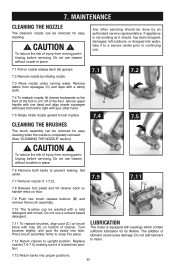
... easy cleaning. ! Do not use cleaner without brushes in place. B LUBRICATION The motor is equipped with hole (D) on nozzle release latch (A) upward. 7.2 Remove nozzle by an authorized service representative. CAUTION ! Secure upper handle with one hand and align nozzle squeegee with base from squeegee (C) and wipe with a mild detergent and rinsed. Do not use . 7.1 7.2 A 7.4 7.5 7.6 Remove both tanks to prevent leaking. Press brush assembly firmly to upright position. Cleaning the brushes The brush assembly can be removed...
... easy cleaning. ! Do not use cleaner without brushes in place. B LUBRICATION The motor is equipped with hole (D) on nozzle release latch (A) upward. 7.2 Remove nozzle by an authorized service representative. CAUTION ! Secure upper handle with one hand and align nozzle squeegee with base from squeegee (C) and wipe with a mild detergent and rinsed. Do not use . 7.1 7.2 A 7.4 7.5 7.6 Remove both tanks to prevent leaking. Press brush assembly firmly to upright position. Cleaning the brushes The brush assembly can be removed...
Product Manual
Page 12
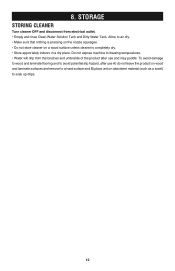
... approriately indoors in a dry place. Do not expose machine to air dry. • Make sure that nothing is pressing on the nozzle squeegee. • Do not store cleaner on absorbent material (such as a towel) to soak up drips. 12 8. Allow to freezing tempuratures. • Water will drip from electrical outlet. • Empty and rinse Clean Water Solution Tank and Dirty Water Tank.
... approriately indoors in a dry place. Do not expose machine to air dry. • Make sure that nothing is pressing on the nozzle squeegee. • Do not store cleaner on absorbent material (such as a towel) to soak up drips. 12 8. Allow to freezing tempuratures. • Water will drip from electrical outlet. • Empty and rinse Clean Water Solution Tank and Dirty Water Tank.
Product Manual
Page 13
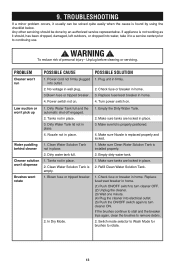
... to Wash Mode for brushes to remove debris. 2. WARNING ! No voltage in home. Power switch not on . Turn power switch on . 4. Empty dirty water tank. Refill Clean Water Solution Tank. 1. Replace fuse/reset breaker in place. 3. If the brushes continue to stall and the breaker trips again, clean the brushes to rotate. 13 Low suction or won 't dispense Brushes wont rotate 1. Make sure tanks are locked in place. 2. Make sure Clean Water Solution Tank is properly positioned. 4. Cleaner solution won 't pick...
... to Wash Mode for brushes to remove debris. 2. WARNING ! No voltage in home. Power switch not on . Turn power switch on . 4. Empty dirty water tank. Refill Clean Water Solution Tank. 1. Replace fuse/reset breaker in place. 3. If the brushes continue to stall and the breaker trips again, clean the brushes to rotate. 13 Low suction or won 't dispense Brushes wont rotate 1. Make sure tanks are locked in place. 2. Make sure Clean Water Solution Tank is properly positioned. 4. Cleaner solution won 't pick...
Product Manual
Page 14
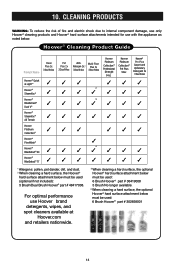
... Carpet and Upholstery Detergent 2x 32oz/64oz ✓✓✓ ✓✓✓ ✓✓✓ ✓✓✓ ✓✓✓ 1 Allergens: pollen, pet dander, dirt, and dust. 2 When cleaning a hard surface, the Hoover® hard surface attachment below . ® Hoover Cleaning Product Guide Product Name Clean Plus 2x 32oz/64oz Hoover® Quick & Light™ ✓ Hoover® SteamVac® ✓ Hoover® MaxExtract® ✓ Dual V® Hoover® SteamVac® ✓ All Terrain Hoover Platinum...
... Carpet and Upholstery Detergent 2x 32oz/64oz ✓✓✓ ✓✓✓ ✓✓✓ ✓✓✓ ✓✓✓ 1 Allergens: pollen, pet dander, dirt, and dust. 2 When cleaning a hard surface, the Hoover® hard surface attachment below . ® Hoover Cleaning Product Guide Product Name Clean Plus 2x 32oz/64oz Hoover® Quick & Light™ ✓ Hoover® SteamVac® ✓ Hoover® MaxExtract® ✓ Dual V® Hoover® SteamVac® ✓ All Terrain Hoover Platinum...
Product Manual
Page 15
... nearest Authorized Hoover® Warranty Service Dealer (Depot) by the complete model number when requesting information or ordering parts. (The model number appears on the bottom of authorized service outlet locations call 1-800-944-9200; This will only result in Glenwillow for service. 11. If you . • For an automated referral of the vacuum.) PLEASE DO NOT RETURN THIS PRODUCT TO THE...
... nearest Authorized Hoover® Warranty Service Dealer (Depot) by the complete model number when requesting information or ordering parts. (The model number appears on the bottom of authorized service outlet locations call 1-800-944-9200; This will only result in Glenwillow for service. 11. If you . • For an automated referral of the vacuum.) PLEASE DO NOT RETURN THIS PRODUCT TO THE...
Product Manual
Page 16
... any such defect in products purchased in a commercial operation (such as warranted, take or send the product to a Hoover® Sales and Service Center for a full two year from date of purchase. HOW TO MAKE A WARRANTY CLAIM If this Warranty. This warranty does not cover products purchased from a party that vary from state to correct any replacement or repair performed under the laws...
... any such defect in products purchased in a commercial operation (such as warranted, take or send the product to a Hoover® Sales and Service Center for a full two year from date of purchase. HOW TO MAKE A WARRANTY CLAIM If this Warranty. This warranty does not cover products purchased from a party that vary from state to correct any replacement or repair performed under the laws...


