Product Manual
Page 1
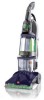
ENGLISH § pp. 1-17 ESPAÑOL § pág. 18-28 TM ® All Terrain Carpet and Hard Floor Cleaner with Auto Rinse™ Feature The Easy to Use Carpet and Hard Floor Cleaner SteamVac™ All Terrain™ Cleaner cleans carpet fibers and hard floors by applying, scrubbing and removing hot tap water and cleaning solution. www.hoover.com
ENGLISH § pp. 1-17 ESPAÑOL § pág. 18-28 TM ® All Terrain Carpet and Hard Floor Cleaner with Auto Rinse™ Feature The Easy to Use Carpet and Hard Floor Cleaner SteamVac™ All Terrain™ Cleaner cleans carpet fibers and hard floors by applying, scrubbing and removing hot tap water and cleaning solution. www.hoover.com
Product Manual
Page 2
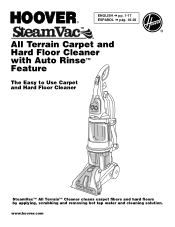
..., lint, hair, and anything that is properly grounded. If appliance is used as a toy or to a Hoover Sales and Service Center or Authorized Hoover Warranty Service Dealer. • Close supervision is necessary when any time. • Do not point tools toward people or pets. • Use only commercially available Hoover SteamVac™ cleaners intended for electrical current to a 2-pole receptacle (E) if a properly grounded...
..., lint, hair, and anything that is properly grounded. If appliance is used as a toy or to a Hoover Sales and Service Center or Authorized Hoover Warranty Service Dealer. • Close supervision is necessary when any time. • Do not point tools toward people or pets. • Use only commercially available Hoover SteamVac™ cleaners intended for electrical current to a 2-pole receptacle (E) if a properly grounded...
Product Manual
Page 3
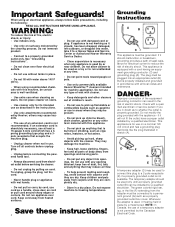
...needed for use Before you begin 10 After cleaning 11 Cleaning carpet 12 Cleaning hard floors 12-13 Using the tools 14-15 Cleaning carpeted stairs. . . . . 15 Cleaning upholstery 15 Maintenance 16 Removing brushes 16 If you have a problem 17 Lubrication 16 Service 17 Storage 16 Warranty 18 Parts & accessories mail order form 29 1. Cleaner B. Upper handle C. Hose/tool caddy F. Stair/upholstery nozzle Carpet Upholstery Cleaner Bare floor cleaner HI J K L H. Hard Floor Cleaning Solution J. Thank you for warranty service of your Hoover product. The model and serial numbers...
...needed for use Before you begin 10 After cleaning 11 Cleaning carpet 12 Cleaning hard floors 12-13 Using the tools 14-15 Cleaning carpeted stairs. . . . . 15 Cleaning upholstery 15 Maintenance 16 Removing brushes 16 If you have a problem 17 Lubrication 16 Service 17 Storage 16 Warranty 18 Parts & accessories mail order form 29 1. Cleaner B. Upper handle C. Hose/tool caddy F. Stair/upholstery nozzle Carpet Upholstery Cleaner Bare floor cleaner HI J K L H. Hard Floor Cleaning Solution J. Thank you for warranty service of your Hoover product. The model and serial numbers...
Product Manual
Page 4
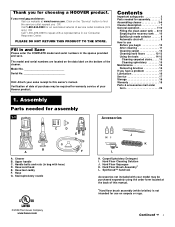
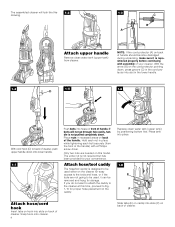
... like this 1-2 drawing. 1-3 C B A Attach upper handle Remove clean water tank (upper tank) from the front of handle. If you do not want to attach the caddy to the cleaner at this model. Press tank into place. 1-8 E F Attach hose/cord hook Insert tabs on hook into slots (F) on this time, proceed to be used, it is designed to be used either on the cleaner for proper hose placement on back of...
... like this 1-2 drawing. 1-3 C B A Attach upper handle Remove clean water tank (upper tank) from the front of handle. If you do not want to attach the caddy to the cleaner at this model. Press tank into place. 1-8 E F Attach hose/cord hook Insert tabs on hook into slots (F) on this time, proceed to be used, it is designed to be used either on the cleaner for proper hose placement on back of...

Product Manual
Page 5
... the hose parts before using the tool, open tool door. Bring hose up and over top of caddy again. Loop hose at bottom of cleaner and press into opposite side of caddy. L Loop hose over top of caddy. 1-12 1-13 1-14 M K Press hose into top of hook (K). Press solution tube (J) into hose clip. Slide caddy down into caddy. Slide hose clip (L) toward cleaner handle. SpinScrub™ hand tool The SpinScrub™ hand tool...
... the hose parts before using the tool, open tool door. Bring hose up and over top of caddy again. Loop hose at bottom of cleaner and press into opposite side of caddy. L Loop hose over top of caddy. 1-12 1-13 1-14 M K Press hose into top of hook (K). Press solution tube (J) into hose clip. Slide caddy down into caddy. Slide hose clip (L) toward cleaner handle. SpinScrub™ hand tool The SpinScrub™ hand tool...

Product Manual
Page 6
Snap door into place. 6 How to reattach tool cover The tool cover is designed with holes on sides of cover with a breakaway feature which allows it to snap free if it is pushed open too far. To reattach, align hinges of tool storage area. To reposition the tool, reverse this procedure. 1-18 1-19 Pull tool down and outward.
Snap door into place. 6 How to reattach tool cover The tool cover is designed with holes on sides of cover with a breakaway feature which allows it to snap free if it is pushed open too far. To reattach, align hinges of tool storage area. To reposition the tool, reverse this procedure. 1-18 1-19 Pull tool down and outward.

Product Manual
Page 7
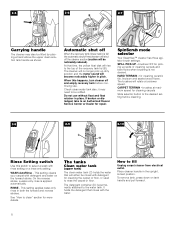
.... Recovery tank latches 13. Operate cleaner only at voltage specified on data plate on wheels and push forward. Rinse Setting switch 5. Recovery tank handle 11. Continued § 7 Cord/hose hook 24. A Handle release pedal Step on pedal (A) to lower handle to room, put handle in upright and locked position, tilt cleaner back on back of nozzle to release cleaning solution 3. SpinScrub mode selector 14. Plug cleaner into a single position but "floats" to use . Clean water tank 9. Hose...
.... Recovery tank latches 13. Operate cleaner only at voltage specified on data plate on wheels and push forward. Rinse Setting switch 5. Recovery tank handle 11. Continued § 7 Cord/hose hook 24. A Handle release pedal Step on pedal (A) to lower handle to room, put handle in upright and locked position, tilt cleaner back on back of nozzle to release cleaning solution 3. SpinScrub mode selector 14. Plug cleaner into a single position but "floats" to use . Clean water tank 9. Hose...
Product Manual
Page 8
... top of the recovery tank lid (B). If broken or dislodged, take to an Authorized Hoover Service Center or Dealer for cleaning the carpet or floor, or used to rinse the carpet or floor. This setting applies water-only rinse in place. It holds the detergent that time, the yellow float disk will be mixed with the water. SpinScrub mode selector Your SteamVac™ cleaner has three agitator brush settings. Place cleaner handle in pitch. SPILL...
... top of the recovery tank lid (B). If broken or dislodged, take to an Authorized Hoover Service Center or Dealer for cleaning the carpet or floor, or used to rinse the carpet or floor. This setting applies water-only rinse in place. It holds the detergent that time, the yellow float disk will be mixed with the water. SpinScrub mode selector Your SteamVac™ cleaner has three agitator brush settings. Place cleaner handle in pitch. SPILL...
Product Manual
Page 9
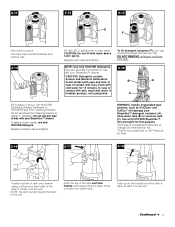
..., call a physician. Do not use only HOOVER detergent. WARNING: Certain oxygenated-type cleaners, such as OxiClean* and TuffOxi** will damage your SteamVac™ cleaner. Turn tank cap counterclockwise and remove cap. 2-14 Fill tank (E) (1 gallon) with HOOVER Carpet/Upholstery Detergent or HOOVER Hard Floor Cleaning Solution. In case of the unit with water. Replace tank cap and tighten. To assure proper results, use Hard Floor Cleaning Solution on the unit. Use only HOOVER SteamVac™ Oxy detergent for this purpose. *OxiClean...
..., call a physician. Do not use only HOOVER detergent. WARNING: Certain oxygenated-type cleaners, such as OxiClean* and TuffOxi** will damage your SteamVac™ cleaner. Turn tank cap counterclockwise and remove cap. 2-14 Fill tank (E) (1 gallon) with HOOVER Carpet/Upholstery Detergent or HOOVER Hard Floor Cleaning Solution. In case of the unit with water. Replace tank cap and tighten. To assure proper results, use Hard Floor Cleaning Solution on the unit. Use only HOOVER SteamVac™ Oxy detergent for this purpose. *OxiClean...
Product Manual
Page 10
... base when the tank is removed from the surface being cleaned. For full suction, it is important that is picked up Spot & Stain Spray Cleaner and spot. areas. Use your model. g. set tank aside (do not set tank on tank handle and pulling forward; Vacuum thoroughly - Vacuum upholstery with a vacuum cleaner with HOOVER ® Spot & Stain Spray Cleaner*- Use a crevice tool to pick up from the unit. material (e.g. Choose the proper brush assembly for best results. When cleaning entire floor, move furniture...
... base when the tank is removed from the surface being cleaned. For full suction, it is important that is picked up Spot & Stain Spray Cleaner and spot. areas. Use your model. g. set tank aside (do not set tank on tank handle and pulling forward; Vacuum thoroughly - Vacuum upholstery with a vacuum cleaner with HOOVER ® Spot & Stain Spray Cleaner*- Use a crevice tool to pick up from the unit. material (e.g. Choose the proper brush assembly for best results. When cleaning entire floor, move furniture...

Product Manual
Page 11
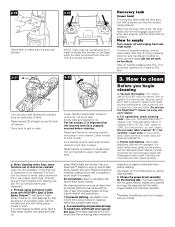
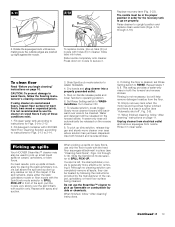
... the carpet is completely dry. Remove lint from electrical outlet. e. Allow carpet or upholstery to upright position. Return cleaner to dry. Replace recovery tank (Fig. 2-22). With handle in cleaner. Any unused detergent may be left by the cleaner's brushes. To clean nozzle If lint or other debris becomes lodged in the detergent container for the recovery tank to walk on damp carpet, place towels or white cloths on the floor.
... the carpet is completely dry. Remove lint from electrical outlet. e. Allow carpet or upholstery to upright position. Return cleaner to dry. Replace recovery tank (Fig. 2-22). With handle in cleaner. Any unused detergent may be left by the cleaner's brushes. To clean nozzle If lint or other debris becomes lodged in the detergent container for the recovery tank to walk on damp carpet, place towels or white cloths on the floor.
Product Manual
Page 12
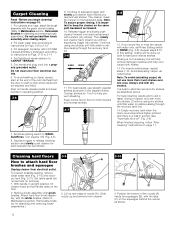
...Rinse Setting switch to CARPET TERRAIN. 5. Continue using dry strokes until little water is visible passing through the recovery tank lid. 3-6 WASH RINSE 11. Fill clean water tank according to instructions for attaching and removing brush assemblies.) 3-9 A 3. Set tanks aside (do not use straight, parallel strokes as forward. 10. Fill detergent container with solution (dry stroke). Rinse ON OFF WASH AUTO RINSE Carpet Cleaning Read "Before you begin cleaning" instructions on furniture). 1. Do not clean over area just sprayed with HOOVER Carpet/Upholstery Detergent...
...Rinse Setting switch to CARPET TERRAIN. 5. Continue using dry strokes until little water is visible passing through the recovery tank lid. 3-6 WASH RINSE 11. Fill clean water tank according to instructions for attaching and removing brush assemblies.) 3-9 A 3. Set tanks aside (do not use straight, parallel strokes as forward. 10. Fill detergent container with solution (dry stroke). Rinse ON OFF WASH AUTO RINSE Carpet Cleaning Read "Before you begin cleaning" instructions on furniture). 1. Do not clean over area just sprayed with HOOVER Carpet/Upholstery Detergent...
Product Manual
Page 13
... and lower handle to HARD TERRAIN. 4. To replace nozzle, line up flammable or combustible liquids or chemicals. When finished cleaning, follow "After cleaning" instructions. Fill detergent container with the SpinScrub mode selector to 2-12. 2. To release solution, press trigger. Repeat with holes (E) in front of the carpet. The nozzle must be cleaned. Slide nozzle completely onto cleaner. This setting provides a water-only rinse in order for the recovery tank to WASHAutoRinse. Water and detergent will...
... and lower handle to HARD TERRAIN. 4. To replace nozzle, line up flammable or combustible liquids or chemicals. When finished cleaning, follow "After cleaning" instructions. Fill detergent container with the SpinScrub mode selector to 2-12. 2. To release solution, press trigger. Repeat with holes (E) in front of the carpet. The nozzle must be cleaned. Slide nozzle completely onto cleaner. This setting provides a water-only rinse in order for the recovery tank to WASHAutoRinse. Water and detergent will...
Product Manual
Page 14
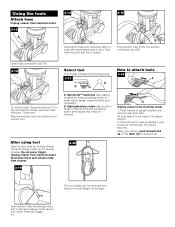
... remove hose: Squeeze latches (C) on hose with same-sized slots in brush to remove tool. Remove hose from solution connection port. SpinScrub™ hand tool has rotating brushes for extra scrubbing action on the latch (G) to help provide the scrubbing action some spots may need for removal. After using tool Drain suction hose by sliding it onto connector until the tab (F) locks it securely. Drain solution tube by placing round end in upright position and remove hose from rack. Stair/upholstery nozzle...
... remove hose: Squeeze latches (C) on hose with same-sized slots in brush to remove tool. Remove hose from solution connection port. SpinScrub™ hand tool has rotating brushes for extra scrubbing action on the latch (G) to help provide the scrubbing action some spots may need for removal. After using tool Drain suction hose by sliding it onto connector until the tab (F) locks it securely. Drain solution tube by placing round end in upright position and remove hose from rack. Stair/upholstery nozzle...
Product Manual
Page 15
... corners or creases, lift the tool one area. Vacuum up the solution with detergent. 3-23 3-24 8. The hose will only dispense water mixed with HOOVER Carpet/Upholstery Detergent according to instructions for Figs 2-13 to 3-14. 2. Attach hose and solution tube as instructed in suction (see "Automatic shut-off ", Fig. 2-6). Fill clean water tank according to instructions for Figs. 2-9 to the original pattern; Do not use more than 4 wet strokes over the carpet (second wet stroke).
... corners or creases, lift the tool one area. Vacuum up the solution with detergent. 3-23 3-24 8. The hose will only dispense water mixed with HOOVER Carpet/Upholstery Detergent according to instructions for Figs 2-13 to 3-14. 2. Attach hose and solution tube as instructed in suction (see "Automatic shut-off ", Fig. 2-6). Fill clean water tank according to instructions for Figs. 2-9 to the original pattern; Do not use more than 4 wet strokes over the carpet (second wet stroke).
Product Manual
Page 16
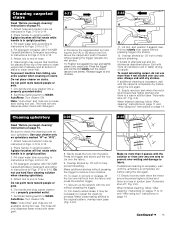
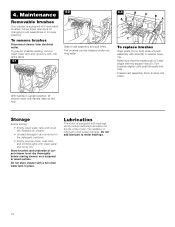
... changing brush assemblies or for the life of brush assembly with clean water and let air dry. To prevent possible leaking, remove clean water tank and recovery tank. Set tanks aside. 4-1 4-2 Grab brush assembly and pull firmly. Replace on both ends of the motor. Maintenance Removable brushes Your cleaner is equipped with a full clean water tank in upright position, tilt cleaner back until post fits easily into place. Make sure that the square post (C) also aligns with removable brushes. Turn brushes slightly until handle...
... changing brush assemblies or for the life of brush assembly with clean water and let air dry. To prevent possible leaking, remove clean water tank and recovery tank. Set tanks aside. 4-1 4-2 Grab brush assembly and pull firmly. Replace on both ends of the motor. Maintenance Removable brushes Your cleaner is equipped with a full clean water tank in upright position, tilt cleaner back until post fits easily into place. Make sure that the square post (C) also aligns with removable brushes. Turn brushes slightly until handle...
Product Manual
Page 17
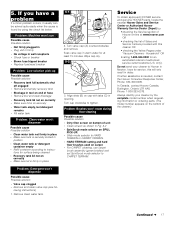
... carpet • For CARPET cleaning, use carpet brush assembly (green bristles) and set SpinScrub mode selector to tighten. If further assistance is found by using the check list below. Remove clean water tank. Align slots (B) on securely • Water tank empty, but detergent remains • Fill water tank Problem: Clean water won 't dispense Possible cause Possible solution • Valve cap clogged • Remove and clean valve cap (see fol- Do not send your cleaner by : • checking the Service section of Hoover...
... carpet • For CARPET cleaning, use carpet brush assembly (green bristles) and set SpinScrub mode selector to tighten. If further assistance is found by using the check list below. Remove clean water tank. Align slots (B) on securely • Water tank empty, but detergent remains • Fill water tank Problem: Clean water won 't dispense Possible cause Possible solution • Valve cap clogged • Remove and clean valve cap (see fol- Do not send your cleaner by : • checking the Service section of Hoover...
Product Manual
Page 18
... a Hoover Sales and Service Center for a period of one full year from date of parts only. For an automated referral of purchase will be paid one way. S. This warranty only applies when the product is in use , in accordance with the Owner's Manual against original defects in material and workmanship for warranty service, transportation will be required before service is rendered. 1. Warranty service...
... a Hoover Sales and Service Center for a period of one full year from date of parts only. For an automated referral of purchase will be paid one way. S. This warranty only applies when the product is in use , in accordance with the Owner's Manual against original defects in material and workmanship for warranty service, transportation will be required before service is rendered. 1. Warranty service...
Product Manual
Page 30
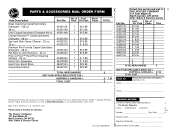
... & HANDLING + TOTAL COST TOTAL $ $ 7.50 $ Replacement parts and accessory items may be purchased from your name and address carefully in ink. PARTS & ACCESSORIES MAIL ORDER FORM ® Item Description Deep Cleansing Carpet/Upholstery Detergent - 128 oz. 48 oz. Spot and Stain Spray Cleaner - 32 oz. 16 oz. Date________ u Name on -line at www.hoover.com, or by completing this section and mail to -Floor™ Hard Floor Cleaning Solution...
... & HANDLING + TOTAL COST TOTAL $ $ 7.50 $ Replacement parts and accessory items may be purchased from your name and address carefully in ink. PARTS & ACCESSORIES MAIL ORDER FORM ® Item Description Deep Cleansing Carpet/Upholstery Detergent - 128 oz. 48 oz. Spot and Stain Spray Cleaner - 32 oz. 16 oz. Date________ u Name on -line at www.hoover.com, or by completing this section and mail to -Floor™ Hard Floor Cleaning Solution...

Product Manual
Page 33
HOOVER y ®son marcas registradas HOOVER and ® are registered trademarks R1 3-06 F7452900 Printed in Mexico 56518-193
HOOVER y ®son marcas registradas HOOVER and ® are registered trademarks R1 3-06 F7452900 Printed in Mexico 56518-193


