Product Manual
Page 1
Questions or concerns? For assistance, please call Customer Service at 1-800-944-9200 Mon-Fri 8am-7pm EST. PLEASE DO NOT RETURN THIS PRODUCT TO THE STORE. All rights reserved. #56518217 ID100262-R2 THIS PRODUCT IS INTENDED FOR HOUSEHOLD USE ONLY. IF USED COMMERCIALLY WARRANTY IS VOID. ©2011 Techtronic Floor Care Technology Limited. Owner's Manual Operating and Servicing Instructions Español - página E1 www.hoover.com IMPORTANT: READ CAREFULLY BEFORE ASSEMBLY AND USE.
Questions or concerns? For assistance, please call Customer Service at 1-800-944-9200 Mon-Fri 8am-7pm EST. PLEASE DO NOT RETURN THIS PRODUCT TO THE STORE. All rights reserved. #56518217 ID100262-R2 THIS PRODUCT IS INTENDED FOR HOUSEHOLD USE ONLY. IF USED COMMERCIALLY WARRANTY IS VOID. ©2011 Techtronic Floor Care Technology Limited. Owner's Manual Operating and Servicing Instructions Español - página E1 www.hoover.com IMPORTANT: READ CAREFULLY BEFORE ASSEMBLY AND USE.
Product Manual
Page 2
...; authorized dealer locations (U.S. Follow the authorized dealer locator link to the store. 2 Model 1-800-944-9200 MFG. CODE Hint: Attach your HOOVER® product. Mon- Verification of date of purchase may be required for warranty service of cleaner) Contents Important Safeguards 3 Cleaner Assembly...5 How To Use...7 Cleaner Description 7 The Tanks...8 How to register by phone. Fri 8am- 7pm EST. Please enter the complete...
...; authorized dealer locations (U.S. Follow the authorized dealer locator link to the store. 2 Model 1-800-944-9200 MFG. CODE Hint: Attach your HOOVER® product. Mon- Verification of date of purchase may be required for warranty service of cleaner) Contents Important Safeguards 3 Cleaner Assembly...5 How To Use...7 Cleaner Description 7 The Tanks...8 How to register by phone. Fri 8am- 7pm EST. Please enter the complete...

Product Manual
Page 3
... INSTRUCTIONS When using detergents and other cleaners with this machine. • Keep detergents and other toxic material with this manual.) • Use only on stairs. See "Grounding Instructions". • Do not clean over cord. others may be present. • Do not pick up anything that accepts the machine plug. • Unplug carpet cleaner from heated surfaces. • Do not use as it to an Authorized Hoover® Warranty Service...
... INSTRUCTIONS When using detergents and other cleaners with this machine. • Keep detergents and other toxic material with this manual.) • Use only on stairs. See "Grounding Instructions". • Do not clean over cord. others may be present. • Do not pick up anything that accepts the machine plug. • Unplug carpet cleaner from heated surfaces. • Do not use as it to an Authorized Hoover® Warranty Service...

Product Manual
Page 4
... free of body away from carpets until they are completely dry. • Store in the risk of a temporary adapter is properly installed and grounded in sketch (Fig. 1). Check with carpets until they are in . • DO NOT USE THIS EXTRACTOR ON HARD FLOORS UNLESS YOU HAVE THE PROPER HARD FLOOR ATTACHMENT. They may be plugged into openings. This appliance is used to connect this...
... free of body away from carpets until they are completely dry. • Store in the risk of a temporary adapter is properly installed and grounded in sketch (Fig. 1). Check with carpets until they are in . • DO NOT USE THIS EXTRACTOR ON HARD FLOORS UNLESS YOU HAVE THE PROPER HARD FLOOR ATTACHMENT. They may be plugged into openings. This appliance is used to connect this...

Product Manual
Page 5
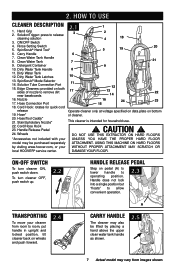
...® Brush Assembly Remove all parts are located before disposing of packing materials. NOTE: Phillips screwdriver needed for assembly. Make sure all parts from images shown. F. Accessories not included with hose) D. Cleaner B. Hose/Cord Hook E. SpinScrub® Hand Tool* *Available on select models only. Cleaner ASSEMBLY Carton contents 1.1 Carpet Upholstery Cleaner Bare floor cleaner PreCleaner G C H D F I . Attach handle 1.2 Remove tank. 1.3 Position cord protector. 1.4 Slide handle down. 1.5 Insert bolts and attach nuts. Hose/Tool Caddy* G Hose H Stair...
...® Brush Assembly Remove all parts are located before disposing of packing materials. NOTE: Phillips screwdriver needed for assembly. Make sure all parts from images shown. F. Accessories not included with hose) D. Cleaner B. Hose/Cord Hook E. SpinScrub® Hand Tool* *Available on select models only. Cleaner ASSEMBLY Carton contents 1.1 Carpet Upholstery Cleaner Bare floor cleaner PreCleaner G C H D F I . Attach handle 1.2 Remove tank. 1.3 Position cord protector. 1.4 Slide handle down. 1.5 Insert bolts and attach nuts. Hose/Tool Caddy* G Hose H Stair...
Product Manual
Page 7
Detergent Container 9 10. Dirty Water Tank Handle 8 11. Dirty Water Tank Latches 10 13. Nozzle 17. Hose* of nozzle to remove dirt 17 near baseboards 12 13 14 22 16. Wheels DO NOT USE THIS EXTRACTOR ON HARD FLOORS *Accessories not included with your UNLESS YOU HAVE THE PROPER HARD FLOOR model may vary from room to operating position. To turn cleaner ON, push switch down. Rinse Setting Switch 5. Clean Water Tank Handle 8. SpinScrub® Mode Selector 14. Cord/Hose Hook 23. Handle Release Pedal ! USING THIS...
Detergent Container 9 10. Dirty Water Tank Handle 8 11. Dirty Water Tank Latches 10 13. Nozzle 17. Hose* of nozzle to remove dirt 17 near baseboards 12 13 14 22 16. Wheels DO NOT USE THIS EXTRACTOR ON HARD FLOORS *Accessories not included with your UNLESS YOU HAVE THE PROPER HARD FLOOR model may vary from room to operating position. To turn cleaner ON, push switch down. Rinse Setting Switch 5. Clean Water Tank Handle 8. SpinScrub® Mode Selector 14. Cord/Hose Hook 23. Handle Release Pedal ! USING THIS...
Product Manual
Page 8
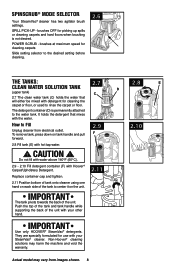
... machine and void the warranty. Replace container cap and tighten. 2.11 Position bottom of tank onto cleaner using one hand on each side of the tank to center it on tank handle and pull forward. 2.9 F 2.10 2.8 Fill tank (E) with your other hand. IMPORTANT Use only HOOVER® SteamVac® detergents. brushes at maximum speed for cleaning carpets Slide setting selector to rinse the carpet or floor. Push the top of the tank and tank handle while supporting...
... machine and void the warranty. Replace container cap and tighten. 2.11 Position bottom of tank onto cleaner using one hand on each side of the tank to center it on tank handle and pull forward. 2.9 F 2.10 2.8 Fill tank (E) with your other hand. IMPORTANT Use only HOOVER® SteamVac® detergents. brushes at maximum speed for cleaning carpets Slide setting selector to rinse the carpet or floor. Push the top of the tank and tank handle while supporting...
Product Manual
Page 9
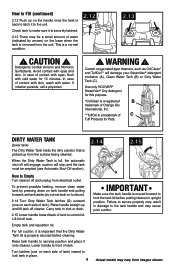
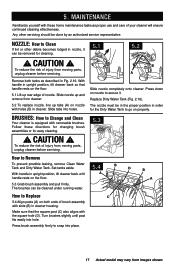
... of C Tuff Products for Pets. In case of contact with eyes, flush with water. To prevent possible leaking, remove clean water tank by pressing down on the base when the tank is picked up and lift tank off will engage, suction will damage your SteamVac® detergent container (A), Clean Water Tank (B) or Dirty Water Tank (C). Failure to secure properly may result in upright position. Lower handle to unlock lid. Detergents contain Anionic...
... of C Tuff Products for Pets. In case of contact with eyes, flush with water. To prevent possible leaking, remove clean water tank by pressing down on the base when the tank is picked up and lift tank off will engage, suction will damage your SteamVac® detergent container (A), Clean Water Tank (B) or Dirty Water Tank (C). Failure to secure properly may result in upright position. Lower handle to unlock lid. Detergents contain Anionic...

Product Manual
Page 10
... agitator for best results. e. g. Actual model may vary from staining carpet. The cleaner will rise to the top of area to be cleaned (may need to be refilled. When this happens, turn cleaner off and empty Dirty Water Tank before cleaning. *Available at additional cost if not included with the dampened cloth. Vacuum upholstery with a vacuum cleaner with a "W" (for "wet" clean) or "S/W" (for color removal or bleed with HOOVER® Spot & Stain Spray Cleaner*- Use...
... agitator for best results. e. g. Actual model may vary from staining carpet. The cleaner will rise to the top of area to be cleaned (may need to be refilled. When this happens, turn cleaner off and empty Dirty Water Tank before cleaning. *Available at additional cost if not included with the dampened cloth. Vacuum upholstery with a vacuum cleaner with a "W" (for "wet" clean) or "S/W" (for color removal or bleed with HOOVER® Spot & Stain Spray Cleaner*- Use...

Product Manual
Page 11
... cleaner forward over floor electrical outlets. Select proper SpinScrub® mode (see "Automatic shut-off", Fig. 2.17). Do not clean over area just sprayed with solution (dry stroke). Avoid saturating carpet, as described above . 3.1/3.1a 3.2 Rinse ON AUWTAOSRIHNSE OFF Fill Clean Water Tank according to Wash/Rinse. For best cleaning results and to aid in suction (see pg. 8). When finished cleaning, follow "After Cleaning" instructions on the backward pass. For best...
... cleaner forward over floor electrical outlets. Select proper SpinScrub® mode (see "Automatic shut-off", Fig. 2.17). Do not clean over area just sprayed with solution (dry stroke). Avoid saturating carpet, as described above . 3.1/3.1a 3.2 Rinse ON AUWTAOSRIHNSE OFF Fill Clean Water Tank according to Wash/Rinse. For best cleaning results and to aid in suction (see pg. 8). When finished cleaning, follow "After Cleaning" instructions on the backward pass. For best...

Product Manual
Page 12
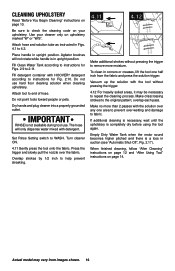
.... 3.4 Remove lint from filter screen located inside Dirty Water Tank. 3.5 Remove lint from images shown. 12 If the spill remains, place either the stair/ upholstery nozzle or floor nozzle with suction only. Repeat with clean water and let air dry. If a spot is left, the stair/upholstery nozzle is dry, place plastic or aluminum foil under legs of the carpet, upholstery, or hard floor surface being cleaned. Picking up spills Your HOOVER® SteamVac® cleaner...
.... 3.4 Remove lint from filter screen located inside Dirty Water Tank. 3.5 Remove lint from images shown. 12 If the spill remains, place either the stair/ upholstery nozzle or floor nozzle with suction only. Repeat with clean water and let air dry. If a spot is left, the stair/upholstery nozzle is dry, place plastic or aluminum foil under legs of the carpet, upholstery, or hard floor surface being cleaned. Picking up spills Your HOOVER® SteamVac® cleaner...
Product Manual
Page 13
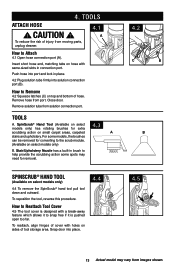
... solution tube firmly into place. 4.4 4.2 C B B 4.5 13 Actual model may need for extra 4.3 scrubbing action on sides of hose. How to Attach 4.1 Open hose connection port (A). To reattach, align hinges of injury from images shown. SpinScrub® Hand Tool (Available on select models only) has rotating brushes for removal. For some spots may vary from moving parts, unplug cleaner. 4.1 A How to Remove 4.2 Squeeze latches (C) on select models only) 4.4 To remove the SpinScrub® hand tool pull tool...
... solution tube firmly into place. 4.4 4.2 C B B 4.5 13 Actual model may need for extra 4.3 scrubbing action on sides of hose. How to Attach 4.1 Open hose connection port (A). To reattach, align hinges of injury from images shown. SpinScrub® Hand Tool (Available on select models only) has rotating brushes for removal. For some spots may vary from moving parts, unplug cleaner. 4.1 A How to Remove 4.2 Squeeze latches (C) on select models only) 4.4 To remove the SpinScrub® hand tool pull tool...

Product Manual
Page 14
... (H) to Attach Tools ! How to remove tool. CAUTION ! Disconnect hose and solution tube from rack. Place handle in upright position and remove hose from cleaner. 4.7 Drain solution tube by placing round end in the same manner: H 4.6 Connect tool to hose by turning cleaner ON and holding nozzle up on the cleaner. 4.7 4.8 Actual model may vary from moving parts, unplug cleaner. CAUTION ! 4.6 G To reduce the risk of injury from images shown. 14 After Using Tool Drain suction hose by...
... (H) to Attach Tools ! How to remove tool. CAUTION ! Disconnect hose and solution tube from rack. Place handle in upright position and remove hose from cleaner. 4.7 Drain solution tube by placing round end in the same manner: H 4.6 Connect tool to hose by turning cleaner ON and holding nozzle up on the cleaner. 4.7 4.8 Actual model may vary from moving parts, unplug cleaner. CAUTION ! 4.6 G To reduce the risk of injury from images shown. 14 After Using Tool Drain suction hose by...
Product Manual
Page 15
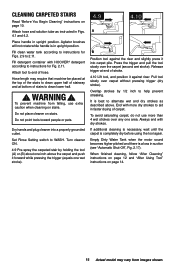
... bottom of hose. To prevent machine from falling, use more dry strokes to 2.11. Set Rinse Setting switch to help prevent streaking. End with dry strokes. Place handle in Figs. 4.1 and 4.2. Do not point tools toward people or pets. Attach hose and solution tube as described above the carpet and push it forward while pressing the trigger (equals one area. Turn cleaner ON. 4.9 Pre-spray the carpeted stair by...
... bottom of hose. To prevent machine from falling, use more dry strokes to 2.11. Set Rinse Setting switch to help prevent streaking. End with dry strokes. Place handle in Figs. 4.1 and 4.2. Do not point tools toward people or pets. Attach hose and solution tube as described above the carpet and push it forward while pressing the trigger (equals one area. Turn cleaner ON. 4.9 Pre-spray the carpeted stair by...
Product Manual
Page 16
Use your upholstery. Attach hose and solution tube as instructed in Figs. 4.1 to 2.11. Fill Clean Water Tank according to instructions for Fig. 2.10. Do not point tools toward people or pets. The hose will not rotate while handle is completely dry before using the tool again. Set Rinse Setting switch to remove more than 2 passes with detergent. Overlap strokes by 1/2 inch to help prevent streaking. 4.11 4.12 Make additional strokes without pressing the...
Use your upholstery. Attach hose and solution tube as instructed in Figs. 4.1 to 2.11. Fill Clean Water Tank according to instructions for Fig. 2.10. Do not point tools toward people or pets. The hose will not rotate while handle is completely dry before using the tool again. Set Rinse Setting switch to remove more than 2 passes with detergent. Overlap strokes by 1/2 inch to help prevent streaking. 4.11 4.12 Make additional strokes without pressing the...
Product Manual
Page 17
... servicing. Replace Dirty Water Tank (Fig. 2.16). With handle in upright position, tilt cleaner back so that the square post (C) also aligns with removable brushes. To reduce the risk of brush assembly with holes (B) in Fig. 2.16. B A Slide nozzle completely onto cleaner. Make sure that handle rests on the floor. 5.1 Lift up tabs (A) on both tanks as proper use and care of nozzle. Press brush assembly firmly to Remove To prevent possible leaking, remove Clean Water Tank...
... servicing. Replace Dirty Water Tank (Fig. 2.16). With handle in upright position, tilt cleaner back so that the square post (C) also aligns with removable brushes. To reduce the risk of brush assembly with holes (B) in Fig. 2.16. B A Slide nozzle completely onto cleaner. Make sure that handle rests on the floor. 5.1 Lift up tabs (A) on both tanks as proper use and care of nozzle. Press brush assembly firmly to Remove To prevent possible leaking, remove Clean Water Tank...
Product Manual
Page 19
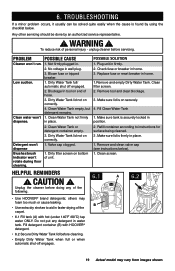
... Reminders 6.1 ! unplug cleaner before servicing. Plug unit in home. 1.Remove and empty Dirty Water Tank. PROBLEM POSSIBLE CAUSE Cleaner won 't dispense. 2. Clean water won 't run. 1. Remove tool and clear blockage. 3. Fill Clean Water Tank 1. Clean screen. Dirty Water Tank full/ automatic shut off engages. 19 Actual model may foam too much or cause leaking. Dirty filter screen on end of personal injury - 6. Low suction. Clean Water Tank empty, but detergent remains. 1. Detergent won't dispense Brushes/brush indicator won't rotate during floor cleaning. 1.
... Reminders 6.1 ! unplug cleaner before servicing. Plug unit in home. 1.Remove and empty Dirty Water Tank. PROBLEM POSSIBLE CAUSE Cleaner won 't dispense. 2. Clean water won 't run. 1. Remove tool and clear blockage. 3. Fill Clean Water Tank 1. Clean screen. Dirty Water Tank full/ automatic shut off engages. 19 Actual model may foam too much or cause leaking. Dirty filter screen on end of personal injury - 6. Low suction. Clean Water Tank empty, but detergent remains. 1. Detergent won't dispense Brushes/brush indicator won't rotate during floor cleaning. 1.

Product Manual
Page 20
... vacuum to find the service outlet nearest you need further assistance: To speak with a customer service representative call 1-800-944-9200. Follow the service center link to Hoover®, Inc., Company in delay. Service To obtain approved Hoover® service and genuine Hoover® parts, locate the nearest Authorized Hoover® Warranty Service Dealer (Depot) by the complete model number when requesting information or ordering parts. (The model number...
... vacuum to find the service outlet nearest you need further assistance: To speak with a customer service representative call 1-800-944-9200. Follow the service center link to Hoover®, Inc., Company in delay. Service To obtain approved Hoover® service and genuine Hoover® parts, locate the nearest Authorized Hoover® Warranty Service Dealer (Depot) by the complete model number when requesting information or ordering parts. (The model number...

Product Manual
Page 21
... damage, use only Hoover® cleaning products and Hoover® hard surface attachments intended for use Hoover® brand detergents, wipes, and spot cleaners available at Hoover.com and retailers nationwide. 21 Hoover® Cleaning Product Guide Deep Product Name Cleansing Premium Pet Oxy Hoover® Quick & Light™ Hoover® SteamVac® Hoover® MaxExtractTM Dual V® Hoover® MaxExtractTM Dual V® All Terrain Hoover Platinum ...
... damage, use only Hoover® cleaning products and Hoover® hard surface attachments intended for use Hoover® brand detergents, wipes, and spot cleaners available at Hoover.com and retailers nationwide. 21 Hoover® Cleaning Product Guide Deep Product Name Cleansing Premium Pet Oxy Hoover® Quick & Light™ Hoover® SteamVac® Hoover® MaxExtractTM Dual V® Hoover® MaxExtractTM Dual V® All Terrain Hoover Platinum ...
Product Manual
Page 22
... Warranty Service Dealer along with the Owner's Manual, your product to authorized service outlets in the United States, U.S. This warranty gives you , to misuse, acts of God, nature, vandalism or other acts beyond the control of Hoover®, owner's acts or omissions, use and in accordance with proof of Ohio. WHAT THIS WARRANTY DOES NOT COVER This Warranty does not cover: use of the product in a commercial operation...
... Warranty Service Dealer along with the Owner's Manual, your product to authorized service outlets in the United States, U.S. This warranty gives you , to misuse, acts of God, nature, vandalism or other acts beyond the control of Hoover®, owner's acts or omissions, use and in accordance with proof of Ohio. WHAT THIS WARRANTY DOES NOT COVER This Warranty does not cover: use of the product in a commercial operation...


