Manual
Page 1
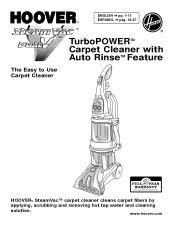
ENGLISH § pp. 1-17 ESPAÑOL § pág. 18-27 ™ ® ™ TurboPOWER™ Carpet Cleaner with Auto Rinse™ Feature The Easy to Use Carpet Cleaner HOOVER® SteamVac™ carpet cleaner cleans carpet fibers by applying, scrubbing and removing hot tap water and cleaning solution. www.hoover.com
ENGLISH § pp. 1-17 ESPAÑOL § pág. 18-27 ™ ® ™ TurboPOWER™ Carpet Cleaner with Auto Rinse™ Feature The Easy to Use Carpet Cleaner HOOVER® SteamVac™ carpet cleaner cleans carpet fibers by applying, scrubbing and removing hot tap water and cleaning solution. www.hoover.com
Manual
Page 2
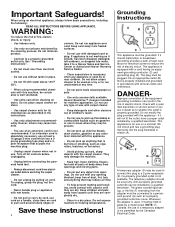
... pets. • Use only commercially available Hoover SteamVac™ cleaners intended for its intended use with carpets until they are dry. Do not modify the plug provided with damaged cord or plug. This appliance is not available. Important Safeguards! corners. Keep cord away from the adapter must be installed by the cleaning process. Turn off all local codes and ordinances. Save these instructions! 2 Grounding Instructions...
... pets. • Use only commercially available Hoover SteamVac™ cleaners intended for its intended use with carpets until they are dry. Do not modify the plug provided with damaged cord or plug. This appliance is not available. Important Safeguards! corners. Keep cord away from the adapter must be installed by the cleaning process. Turn off all local codes and ordinances. Save these instructions! 2 Grounding Instructions...
Manual
Page 3
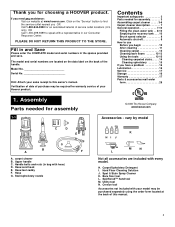
... be required for warranty service of this owner's manual. Hose/tool caddy F. Crevice tool Accessories not included with hose) D. Fill in and Save Please enter the COMPLETE model and serial numbers in bag with your Hoover product. Assembly Parts needed for an automated referral of the handle. SpinScrub™ hand tool M. Handle bolts and nuts (in the spaces provided and save. Spot & Stain Spray Cleaner K. H. Thank you for assembly 1-1 © 2006 The Hoover Company www.hoover.com Accessories - Hard Floor Cleaning Solution J.
... be required for warranty service of this owner's manual. Hose/tool caddy F. Crevice tool Accessories not included with hose) D. Fill in and Save Please enter the COMPLETE model and serial numbers in bag with your Hoover product. Assembly Parts needed for an automated referral of the handle. SpinScrub™ hand tool M. Handle bolts and nuts (in the spaces provided and save. Spot & Stain Spray Cleaner K. H. Thank you for assembly 1-1 © 2006 The Hoover Company www.hoover.com Accessories - Hard Floor Cleaning Solution J.
Manual
Page 4
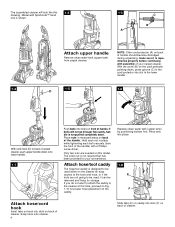
... of cleaner. Replace clean water tank (upper tank) by positioning bottom first. Attach hose/tool caddy The hose/tool caddy is designed to be removed and hung for your carpet cleaner. Press tank into place. 1-8 E F Attach hose/cord hook Insert tabs on hook into holes on this 1-2 drawing. Only two nuts are not going to the tools and hose, or if the tools are needed on front of your convenience. Model with SpinScrub™ hand tool is...
... of cleaner. Replace clean water tank (upper tank) by positioning bottom first. Attach hose/tool caddy The hose/tool caddy is designed to be removed and hung for your carpet cleaner. Press tank into place. 1-8 E F Attach hose/cord hook Insert tabs on hook into holes on this 1-2 drawing. Only two nuts are not going to the tools and hose, or if the tools are needed on front of your convenience. Model with SpinScrub™ hand tool is...
Manual
Page 5
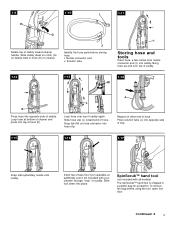
J Identify the hose parts before using the tool, open tool door. I ), into hose clip. Bring hose up and over top of caddy again. Press solution tube (J) into opposite side of caddy. Slide hose clip (L) toward cleaner handle. To remove the bag before storing hose. 1-9 H 1-10 I 1-11 G Rotate top of caddy toward end of hose. Nozzle connector end J. J Repeat on caddy. Slide tool down so notch (G) on caddy rests in...
J Identify the hose parts before using the tool, open tool door. I ), into hose clip. Bring hose up and over top of caddy again. Press solution tube (J) into opposite side of caddy. Slide hose clip (L) toward cleaner handle. To remove the bag before storing hose. 1-9 H 1-10 I 1-11 G Rotate top of caddy toward end of hose. Nozzle connector end J. J Repeat on caddy. Slide tool down so notch (G) on caddy rests in...

Manual
Page 6
To reattach, align hinges of tool storage area. Snap door into place. 6 1-18 1-19 Pull tool down and outward. How to reattach tool cover The tool cover is designed with holes on sides of cover with a breakaway feature which allows it to snap free if it is pushed open too far. To reposition the tool, reverse this procedure.
To reattach, align hinges of tool storage area. Snap door into place. 6 1-18 1-19 Pull tool down and outward. How to reattach tool cover The tool cover is designed with holes on sides of cover with a breakaway feature which allows it to snap free if it is pushed open too far. To reposition the tool, reverse this procedure.
Manual
Page 7
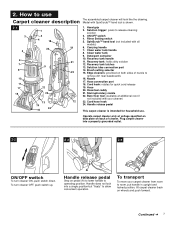
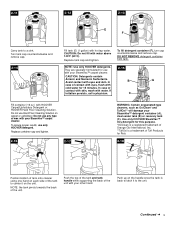
... remove dirt near baseboards 16. ON/OFF switch 4. Edge cleaners: provided on back of nozzle to use . 2. Rinse Setting switch 5. Carrying handle 7. Brush setting selector 15. Cord/hose hook 24. Recovery tank latches 13. Nozzle 17. Handle does not lock into a properly grounded outlet. 2-2 2-3 2-4 WASH AUTO RINSE OFF Rinse ON ON/OFF switch To turn cleaner OFF, push switch up. Recovery tank: holds dirty solution 12. Hose 20. Plug carpet cleaner into a single position but "floats" to release cleaning solution 3. Detergent...
... remove dirt near baseboards 16. ON/OFF switch 4. Edge cleaners: provided on back of nozzle to use . 2. Rinse Setting switch 5. Carrying handle 7. Brush setting selector 15. Cord/hose hook 24. Recovery tank latches 13. Nozzle 17. Handle does not lock into a properly grounded outlet. 2-2 2-3 2-4 WASH AUTO RINSE OFF Rinse ON ON/OFF switch To turn cleaner OFF, push switch up. Recovery tank: holds dirty solution 12. Hose 20. Plug carpet cleaner into a single position but "floats" to release cleaning solution 3. Detergent...
Manual
Page 8
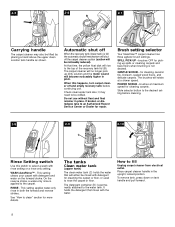
... cleaning carpets and bare floors when brushing is applied to the water tank. When this happens, turn carpet cleaner off and empty recovery tank before cleaning. 2-8 2-9 2-10 WASH AUTO RINSE OFF C D Rinse ON Rinse Setting switch Use this switch to select a wash with detergent for more details. for repair. WASH-AutoRinse™ - This setting applies water-only rinse in the upright, locked position. See "How to fill Unplug carpet cleaner from electrical outlet. Automatic shut off the carpet cleaner suction (suction...
... cleaning carpets and bare floors when brushing is applied to the water tank. When this happens, turn carpet cleaner off and empty recovery tank before cleaning. 2-8 2-9 2-10 WASH AUTO RINSE OFF C D Rinse ON Rinse Setting switch Use this switch to select a wash with detergent for more details. for repair. WASH-AutoRinse™ - This setting applies water-only rinse in the upright, locked position. See "How to fill Unplug carpet cleaner from electrical outlet. Automatic shut off the carpet cleaner suction (suction...
Manual
Page 9
... your SteamVac™ carpet cleaner. Turn tank cap counterclockwise and remove cap. 2-14 Fill tank (E) (1 gallon) with HOOVER Carpet/Upholstery Detergent or HOOVER Hard Floor Cleaning Solution. In case of the tank to center it to the unit. Do not use only HOOVER detergent. Continued § 9 2-11 2-12 2-13 E F Carry tank to latch it on each side of contact with eyes, flush with your SteamVac™ detergent container (A), clean water tank (B) or recovery tank (C). To fill detergent container (F), turn cap...
... your SteamVac™ carpet cleaner. Turn tank cap counterclockwise and remove cap. 2-14 Fill tank (E) (1 gallon) with HOOVER Carpet/Upholstery Detergent or HOOVER Hard Floor Cleaning Solution. In case of the tank to center it to the unit. Do not use only HOOVER detergent. Continued § 9 2-11 2-12 2-13 E F Carry tank to latch it on each side of contact with eyes, flush with your SteamVac™ detergent container (A), clean water tank (B) or recovery tank (C). To fill detergent container (F), turn cap...
Manual
Page 10
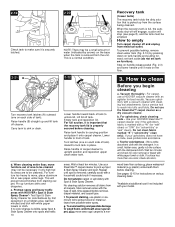
... when the tank is removed from staining carpet. carefully scrub with white paper towels or cloth. Do not saturate carpet or upholstery with cleaning tool attachments. When the recovery tank is removed; To prevent possible leaking, remove clean water tank (Fig. 2-10) by first spraying it onto carpet cleaner. Vacuum thoroughly - Vacuum upholstery with a vacuum cleaner with Spot & Stain Spray Cleaner. Do not use plastic or aluminum foil to move furniture out of tank to unlock lid. If your model. Wet a white...
... when the tank is removed from staining carpet. carefully scrub with white paper towels or cloth. Do not saturate carpet or upholstery with cleaning tool attachments. When the recovery tank is removed; To prevent possible leaking, remove clean water tank (Fig. 2-10) by first spraying it onto carpet cleaner. Vacuum thoroughly - Vacuum upholstery with a vacuum cleaner with Spot & Stain Spray Cleaner. Do not use plastic or aluminum foil to move furniture out of tank to unlock lid. If your model. Wet a white...

Manual
Page 11
... future use. 3-1 c. Remove lint from electical outlet and check and clean this screen. Wipe off screen and push frame back into holes. Replace recovery tank (Fig. 2-22). Empty tanks, rinse with holes (B) in upright position, tilt cleaner back so that handle rests on nozzle with clear water and let air dry. Any unused detergent may be rotating slowly, disconnect carpet cleaner from filter screen located inside recovery tank. 3-2 d. Note: When brushes...
... future use. 3-1 c. Remove lint from electical outlet and check and clean this screen. Wipe off screen and push frame back into holes. Replace recovery tank (Fig. 2-22). Empty tanks, rinse with holes (B) in upright position, tilt cleaner back so that handle rests on nozzle with clear water and let air dry. Any unused detergent may be rotating slowly, disconnect carpet cleaner from filter screen located inside recovery tank. 3-2 d. Note: When brushes...

Manual
Page 12
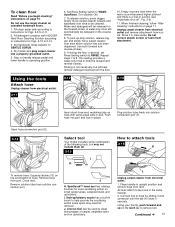
... diagram below . Step on handle release pedal and lower handle to POWER SCRUB. 4. Then slowly pull carpet cleaner back toward ¬¬¬ you would like to upright position and reposition clean water tank. It is best to alternate wet and dry strokes as forward. 9. TEFLOOR ON ¬¬¬ Cleaning bare floors How to rotate and snap attachment into place.) 4. Lower handle and replace recovery tank. 5. Continue using dry strokes until little water...
... diagram below . Step on handle release pedal and lower handle to POWER SCRUB. 4. Then slowly pull carpet cleaner back toward ¬¬¬ you would like to upright position and reposition clean water tank. It is best to alternate wet and dry strokes as forward. 9. TEFLOOR ON ¬¬¬ Cleaning bare floors How to rotate and snap attachment into place.) 4. Lower handle and replace recovery tank. 5. Continue using dry strokes until little water...
Manual
Page 13
... carpet cleaner over area to be used to operating position. If rinsing the floor is not necessary, but may need for Figs. 2-12 to 2-11. 2. When finished cleaning, follow "After cleaning" instructions on the forward stroke. Do not remove plastic screen or foam from electrical outlet. 1. SpinScrub™ hand tool has rotating brushes for extra scrubbing action on hose with HOOVER Hard Floor Cleaning Solution according to instructions for removal. J. Connect tool to help remove detergent residue from solution connection port. A water-only rinse...
... carpet cleaner over area to be used to operating position. If rinsing the floor is not necessary, but may need for Figs. 2-12 to 2-11. 2. When finished cleaning, follow "After cleaning" instructions on the forward stroke. Do not remove plastic screen or foam from electrical outlet. 1. SpinScrub™ hand tool has rotating brushes for extra scrubbing action on hose with HOOVER Hard Floor Cleaning Solution according to instructions for removal. J. Connect tool to help remove detergent residue from solution connection port. A water-only rinse...
Manual
Page 14
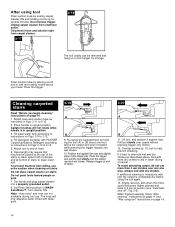
... your head. Empty recovery tank when the motor sound becomes higher pitched and there is in suction (see "Automatic shut-off", Fig. 2-6). When finished cleaning, follow "After cleaning" instructions on stairs. End with detergent. 3-19 A B 9. Pre-spray the carpeted stair by placing round end in upright position. After using tool Drain suction hose by 1/2 inch to help prevent streaking. Unplug carpet cleaner from falling, use . Drain solution tube by holding nozzle up for storage...
... your head. Empty recovery tank when the motor sound becomes higher pitched and there is in suction (see "Automatic shut-off", Fig. 2-6). When finished cleaning, follow "After cleaning" instructions on stairs. End with detergent. 3-19 A B 9. Pre-spray the carpeted stair by placing round end in upright position. After using tool Drain suction hose by 1/2 inch to help prevent streaking. Unplug carpet cleaner from falling, use . Drain solution tube by holding nozzle up for storage...
Manual
Page 15
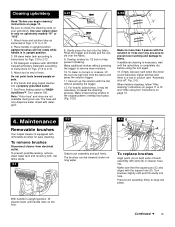
... upright position. 3. If additional cleaning is completely dry before using tool" instructions on both ends of hose. Empty recovery tank when the motor sound becomes higher pitched and there is equipped with the square hole (D). With handle in cleaner housing. Place handle in suction (see "Automatic shut-off", Fig. 2-6). Vacuum up the solution with detergent. 3-21 8. For heavily soiled areas, it may be cleaned under running water. 4-3 B A C D B A To replace brushes...
... upright position. 3. If additional cleaning is completely dry before using tool" instructions on both ends of hose. Empty recovery tank when the motor sound becomes higher pitched and there is equipped with the square hole (D). With handle in cleaner housing. Place handle in suction (see "Automatic shut-off", Fig. 2-6). Vacuum up the solution with detergent. 3-21 8. For heavily soiled areas, it may be cleaned under running water. 4-3 B A C D B A To replace brushes...
Manual
Page 16
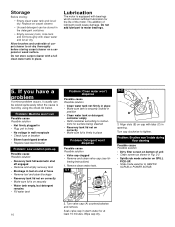
... is on carpet cleaner. • Unused detergent can be stored in the detergent container. • Empty recovery tank, rinse tank and lid thoroughly with bearings which contain sufficient lubrication for the life of unit • Clean screen as shown in Fig. 3-2 • SpinScrub mode selector on cap with a full clean water tank in opening. Problem: Brushes won 't dispense Possible cause Possible solution • Valve cap clogged • Remove and clean valve...
... is on carpet cleaner. • Unused detergent can be stored in the detergent container. • Empty recovery tank, rinse tank and lid thoroughly with bearings which contain sufficient lubrication for the life of unit • Clean screen as shown in Fig. 3-2 • SpinScrub mode selector on cap with a full clean water tank in opening. Problem: Brushes won 't dispense Possible cause Possible solution • Valve cap clogged • Remove and clean valve...
Manual
Page 17
... this appliance in correct operating condition during the warranted period. Warranty service can only be obtained by presenting the appliance to you mail your cleaner by the complete model number when requesting information or ordering parts. (The model number appears on the back of the handle.) Full Two Year Warranty (Domestic Use) Your HOOVER® appliance is needed , contact the Hoover Consumer Response Center, Phone...
... this appliance in correct operating condition during the warranted period. Warranty service can only be obtained by presenting the appliance to you mail your cleaner by the complete model number when requesting information or ordering parts. (The model number appears on the back of the handle.) Full Two Year Warranty (Domestic Use) Your HOOVER® appliance is needed , contact the Hoover Consumer Response Center, Phone...


