
Manual
Page 1
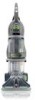
ENGLISH § pp. 1-17 ESPAÑOL § pág. 18-27 ™ ® ™ TurboPOWER™ Carpet Cleaner with Auto Rinse™ Feature The Easy to Use Carpet Cleaner HOOVER® SteamVac™ carpet cleaner cleans carpet fibers by applying, scrubbing and removing hot tap water and cleaning solution. www.hoover.com
ENGLISH § pp. 1-17 ESPAÑOL § pág. 18-27 ™ ® ™ TurboPOWER™ Carpet Cleaner with Auto Rinse™ Feature The Easy to Use Carpet Cleaner HOOVER® SteamVac™ carpet cleaner cleans carpet fibers by applying, scrubbing and removing hot tap water and cleaning solution. www.hoover.com

Manual
Page 2
... a grounding plug that is for machine application. WARNING: To reduce the risk of an extension cord is absolutely necessary, use . Do not place carpet cleaner on stairs. • Do not point tools toward people or pets. • Use only commercially available Hoover SteamVac™ cleaners intended for use on surfaces moistened by the Canadian Electrical Code. Turn off all local codes and ordinances. If it will...
... a grounding plug that is for machine application. WARNING: To reduce the risk of an extension cord is absolutely necessary, use . Do not place carpet cleaner on stairs. • Do not point tools toward people or pets. • Use only commercially available Hoover SteamVac™ cleaners intended for use on surfaces moistened by the Canadian Electrical Code. Turn off all local codes and ordinances. If it will...

Manual
Page 3
... After cleaning 11 Cleaning carpet 12 Cleaning bare floors 12-13 Using the tools 13-15 Cleaning carpeted stairs. . . . . 14 Cleaning upholstery 15 If you have a problem 16 Lubrication 16 Service 17 Storage 16 Warranty 17 Parts & accessories mail order form 29 1. H. Crevice tool Accessories not included with your model may be purchased separately using the order form located at www.hoover.com. only) OR Call 1-330-499-9499 to this manual. 3 Assembly Parts needed for warranty service of...
... After cleaning 11 Cleaning carpet 12 Cleaning bare floors 12-13 Using the tools 13-15 Cleaning carpeted stairs. . . . . 14 Cleaning upholstery 15 If you have a problem 16 Lubrication 16 Service 17 Storage 16 Warranty 17 Parts & accessories mail order form 29 1. H. Crevice tool Accessories not included with your model may be purchased separately using the order form located at www.hoover.com. only) OR Call 1-330-499-9499 to this manual. 3 Assembly Parts needed for warranty service of...

Manual
Page 4
... SpinScrub™ hand tool is shown. 1-3 C B A Attach upper handle Remove clean water tank (upper tank) from carpet cleaner. Replace clean water tank (upper tank) by positioning bottom first. Snap hook onto cleaner. 4 Slide tabs (E) on caddy into slots on the caddy. With the arrow (B) on the cord protector pointing down, press groove (C) in recessed areas on back of the handle. Only two nuts are not going to be used, it is...
... SpinScrub™ hand tool is shown. 1-3 C B A Attach upper handle Remove clean water tank (upper tank) from carpet cleaner. Replace clean water tank (upper tank) by positioning bottom first. Snap hook onto cleaner. 4 Slide tabs (E) on caddy into slots on the caddy. With the arrow (B) on the cord protector pointing down, press groove (C) in recessed areas on back of the handle. Only two nuts are not going to be used, it is...

Manual
Page 5
... cost if not included with all models) The SpinScrub™ hand tool is shipped in hook (H) on other end of clip. 1-15 1-16 1-17 Snap stair/upholstery nozzle onto caddy. Press solution tube (J) into caddy. Solution tube I Storing hose and tools Press hose, a few inches from nozzle connector end (I . J Identify the hose parts before using the tool, open tool door. Nozzle connector end J. L Loop hose over top of hook (K). Slide caddy down into top...
... cost if not included with all models) The SpinScrub™ hand tool is shipped in hook (H) on other end of clip. 1-15 1-16 1-17 Snap stair/upholstery nozzle onto caddy. Press solution tube (J) into caddy. Solution tube I Storing hose and tools Press hose, a few inches from nozzle connector end (I . J Identify the hose parts before using the tool, open tool door. Nozzle connector end J. L Loop hose over top of hook (K). Slide caddy down into top...

Manual
Page 6
To reattach, align hinges of tool storage area. To reposition the tool, reverse this procedure. Snap door into place. 6 1-18 1-19 Pull tool down and outward. How to reattach tool cover The tool cover is designed with holes on sides of cover with a breakaway feature which allows it to snap free if it is pushed open too far.
To reattach, align hinges of tool storage area. To reposition the tool, reverse this procedure. Snap door into place. 6 1-18 1-19 Pull tool down and outward. How to reattach tool cover The tool cover is designed with holes on sides of cover with a breakaway feature which allows it to snap free if it is pushed open too far.

Manual
Page 7
... § 7 Hand grip 2. Hose 20. A Handle release pedal Step on wheels and push forward. To transport To move your cleaner) 23. How to use . Plug carpet cleaner into a single position but "floats" to release cleaning solution 3. Recovery tank latches 13. Edge cleaners: provided on back of nozzle to operating position. Stair/upholstery nozzle 22. 2. Model with all models) 6. ON/OFF switch 4. Rinse Setting switch 5. Detergent container 10. Solution tube connection port 14. Hose/tool caddy 21. Bare floor tool (available...
... § 7 Hand grip 2. Hose 20. A Handle release pedal Step on wheels and push forward. To transport To move your cleaner) 23. How to use . Plug carpet cleaner into a single position but "floats" to release cleaning solution 3. Recovery tank latches 13. Edge cleaners: provided on back of nozzle to operating position. Stair/upholstery nozzle 22. 2. Model with all models) 6. ON/OFF switch 4. Rinse Setting switch 5. Detergent container 10. Solution tube connection port 14. Hose/tool caddy 21. Bare floor tool (available...

Manual
Page 8
... clean solution tank handle as shown. Brush setting selector Your SteamVac™ carpet cleaner has three agitator brush settings. SPILL PICK-UP - The brushes will become noticeably higher in the upright, locked position. WASH-AutoRinse™ - This setting cleans your carpet with the water. The tanks Clean water tank (upper tank) The clean water tank (C) holds the water that will rise to the top of the recovery tank lid (B). To remove tank, press down on the forward stroke. 2-5 2-6 2-7 B Carrying handle The carpet cleaner may need...
... clean solution tank handle as shown. Brush setting selector Your SteamVac™ carpet cleaner has three agitator brush settings. SPILL PICK-UP - The brushes will become noticeably higher in the upright, locked position. WASH-AutoRinse™ - This setting cleans your carpet with the water. The tanks Clean water tank (upper tank) The clean water tank (C) holds the water that will rise to the top of the recovery tank lid (B). To remove tank, press down on the forward stroke. 2-5 2-6 2-7 B Carrying handle The carpet cleaner may need...
Manual
Page 9
... HOOVER detergents. To fill detergent container (F), turn cap counterclockwise and remove cap. 2-11 2-12 2-13 E F Carry tank to latch it on the unit. Replace tank cap and tighten. Turn tank cap counterclockwise and remove cap. 2-14 Fill tank (E) (1 gallon) with your SteamVac™ carpet cleaner. DO NOT REMOVE detergent container from tank. 2-15 B A C Fill container (16 oz.) with your SteamVac™ detergent container (A), clean water tank (B) or recovery tank (C). To assure proper results, use Hard Floor Cleaning Solution on the handle...
... HOOVER detergents. To fill detergent container (F), turn cap counterclockwise and remove cap. 2-11 2-12 2-13 E F Carry tank to latch it on the unit. Replace tank cap and tighten. Turn tank cap counterclockwise and remove cap. 2-14 Fill tank (E) (1 gallon) with your SteamVac™ carpet cleaner. DO NOT REMOVE detergent container from tank. 2-15 B A C Fill container (16 oz.) with your SteamVac™ detergent container (A), clean water tank (B) or recovery tank (C). To assure proper results, use Hard Floor Cleaning Solution on the handle...

Manual
Page 10
... agitator for "solvent/dry" or "wet" clean). Raise tank handle to a non- To avoid wetting and possible damage to wood floors underneath area rugs/carpet, either move area rugs/ carpet to carrying position and place it on a hidden area; To prevent possible leaking, remove clean water tank (Fig. 2-10) by first spraying it onto carpet cleaner. How to sink or drain. For carpet, use a HOOVER vacuum cleaner with a "W" (for "wet" clean) or "S/W" (for best results. Use your model. Carry tank...
... agitator for "solvent/dry" or "wet" clean). Raise tank handle to a non- To avoid wetting and possible damage to wood floors underneath area rugs/carpet, either move area rugs/ carpet to carrying position and place it on a hidden area; To prevent possible leaking, remove clean water tank (Fig. 2-10) by first spraying it onto carpet cleaner. How to sink or drain. For carpet, use a HOOVER vacuum cleaner with a "W" (for "wet" clean) or "S/W" (for best results. Use your model. Carry tank...

Manual
Page 11
... upright position and replace clean water tank (Fig. 2-16). Return cleaner to dry. To clean nozzle If lint or other debris becomes lodged in upright position, tilt cleaner back so that handle rests on floor. Slide tabs into place. Replace recovery tank (Fig. 2-22). Continued § 11 After cleaning a. Empty tanks, rinse with holes (B) in order for the recovery tank to secure it. Remove lint from cleaner. Slide nozzle completely onto cleaner. Vacuum thoroughly after carpet...
... upright position and replace clean water tank (Fig. 2-16). Return cleaner to dry. To clean nozzle If lint or other debris becomes lodged in upright position, tilt cleaner back so that handle rests on floor. Slide tabs into place. Replace recovery tank (Fig. 2-22). Continued § 11 After cleaning a. Empty tanks, rinse with holes (B) in order for the recovery tank to secure it. Remove lint from cleaner. Slide nozzle completely onto cleaner. Vacuum thoroughly after carpet...

Manual
Page 12
... to attach bare floor attachment (Available at the end of the room farthest from electrical outlet. Continue using dry strokes until little water is visible passing through the recovery tank lid. 3-6 WASH RINSE 10. For heavily soiled areas, repeat steps 6-9. Push attachment against nozzle while rotating attachment downward until both forward and reverse strokes. Set SpinScrub mode selector to upright position and reposition clean water tank. To avoid walking on handle...
... to attach bare floor attachment (Available at the end of the room farthest from electrical outlet. Continue using dry strokes until little water is visible passing through the recovery tank lid. 3-6 WASH RINSE 10. For heavily soiled areas, repeat steps 6-9. Push attachment against nozzle while rotating attachment downward until both forward and reverse strokes. Set SpinScrub mode selector to upright position and reposition clean water tank. To avoid walking on handle...
Manual
Page 13
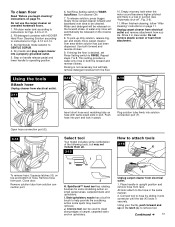
... hose in upright position and remove hose from electrical outlet. 3-11 E 6. SpinScrub™ hand tool has rotating brushes for Figs. 2-9 to remove tool. Place handle in the same manner: 2. Using the tools Attach hose Unplug cleaner from rack. Fill clean water tank according to instructions for extra scrubbing action on handle release pedal and lower handle to instructions for removal. Continued § 13 Step on small carpet areas, carpeted stairs and upholstery. A water-only rinse will be released on hose with HOOVER Hard Floor Cleaning Solution according to operating...
... hose in upright position and remove hose from electrical outlet. 3-11 E 6. SpinScrub™ hand tool has rotating brushes for Figs. 2-9 to remove tool. Place handle in the same manner: 2. Using the tools Attach hose Unplug cleaner from rack. Fill clean water tank according to instructions for extra scrubbing action on handle release pedal and lower handle to instructions for removal. Continued § 13 Step on small carpet areas, carpeted stairs and upholstery. A water-only rinse will be released on hose with HOOVER Hard Floor Cleaning Solution according to operating...

Manual
Page 14
... pets. 7. Dry hands and plug carpet cleaner into carpet pile. Do not press trigger. Note: "Auto-rinse" and rinse are not available during tool use more dry strokes to 2-12. 4. The hose will not rotate while handle is completely dry before using the tool again. 13. Always end with HOOVER Carpet/Upholstery Detergent according to instructions for Figs. 2-9 to aid in upright position. When finished cleaning, follow "After cleaning" instructions on page 11 and "After using tool" instructions...
... pets. 7. Dry hands and plug carpet cleaner into carpet pile. Do not press trigger. Note: "Auto-rinse" and rinse are not available during tool use more dry strokes to 2-12. 4. The hose will not rotate while handle is completely dry before using the tool again. 13. Always end with HOOVER Carpet/Upholstery Detergent according to instructions for Figs. 2-9 to aid in upright position. When finished cleaning, follow "After cleaning" instructions on page 11 and "After using tool" instructions...

Manual
Page 15
.... 7. Turn brushes slightly until the upholstery is a loss in upright position, tilt cleaner back until handle rests on page 10. Attach hose and solution tube as instructed in upright position. Gently press the tool onto the fabric. Be sure to WASHAutoRinse™. Use your upholstery. Set Rinse Setting switch to check the cleaning code on your carpet cleaner only on page 14. 4. Turn cleaner ON. Note: "Auto-rinse" and rinse are not available during tool use. Empty recovery tank when the motor...
.... 7. Turn brushes slightly until the upholstery is a loss in upright position, tilt cleaner back until handle rests on page 10. Attach hose and solution tube as instructed in upright position. Gently press the tool onto the fabric. Be sure to WASHAutoRinse™. Use your upholstery. Set Rinse Setting switch to check the cleaning code on your carpet cleaner only on page 14. 4. Turn cleaner ON. Note: "Auto-rinse" and rinse are not available during tool use. Empty recovery tank when the motor...

Manual
Page 16
... remove. Problem: Brushes won 't dispense Possible cause Possible solution • Valve cap clogged • Remove and clean valve cap (see fol- Replace on end of carpet cleaner to instruc- Align slots (B) on bottom of lubricant could cause damage. Allow brushes and underside of hose • Remove tool and clear blockage • Recovery tank lid not on correctly • Make sure lid is on securely • Water tank empty, but detergent...
... remove. Problem: Brushes won 't dispense Possible cause Possible solution • Valve cap clogged • Remove and clean valve cap (see fol- Replace on end of carpet cleaner to instruc- Align slots (B) on bottom of lubricant could cause damage. Allow brushes and underside of hose • Remove tool and clear blockage • Recovery tank lid not on correctly • Make sure lid is on securely • Water tank empty, but detergent...

Manual
Page 17
... authorized warranty service outlets. If further assistance is needed , contact the Hoover Consumer Response Center, Phone: 330-499-9499. Service To obtain approved HOOVER service and genuine HOOVER parts, locate the nearest Hoover Sales and Service Center or Authorized Hoover Warranty Service Dealer (Depot) by the complete model number when requesting information or ordering parts. (The model number appears on the back of the handle.) Full Two Year Warranty (Domestic Use) Your HOOVER...
... authorized warranty service outlets. If further assistance is needed , contact the Hoover Consumer Response Center, Phone: 330-499-9499. Service To obtain approved HOOVER service and genuine HOOVER parts, locate the nearest Hoover Sales and Service Center or Authorized Hoover Warranty Service Dealer (Depot) by the complete model number when requesting information or ordering parts. (The model number appears on the back of the handle.) Full Two Year Warranty (Domestic Use) Your HOOVER...

Manual
Page 28
... 1 $ 7.99 1 $ 7.99 TOTAL TOTAL MERCHANDISE ADD YOUR APPLICABLE STATE TAX + SHIPPING & HANDLING + TOTAL COST $ $ 7.50 $ Replacement parts and accessory items may be purchased from your name and address carefully in ink. Bare Floor Cleaning Tool Part No. No. Premium Pet Formula Carpet/Upholstery Detergent - 48 oz. Floor-to : The Hoover Company u Visa u MasterCard u Discover Number Exp. in Cost/ No.of Per Pack Packs Total $21.99...
... 1 $ 7.99 1 $ 7.99 TOTAL TOTAL MERCHANDISE ADD YOUR APPLICABLE STATE TAX + SHIPPING & HANDLING + TOTAL COST $ $ 7.50 $ Replacement parts and accessory items may be purchased from your name and address carefully in ink. Bare Floor Cleaning Tool Part No. No. Premium Pet Formula Carpet/Upholstery Detergent - 48 oz. Floor-to : The Hoover Company u Visa u MasterCard u Discover Number Exp. in Cost/ No.of Per Pack Packs Total $21.99...

Manual
Page 30
HOOVER and ® are registered trademarks HOOVER y ®son marcas registradas R1 6-06 F7427-900 Printed in Mexico 56518-198
HOOVER and ® are registered trademarks HOOVER y ®son marcas registradas R1 6-06 F7427-900 Printed in Mexico 56518-198


