
Manual
Page 2
...use of an extension cord is used by or near children. This appliance is equipped with water above 140˚F (60˚C). • Use extra care when cleaning on a nominal... anything that accepts the machine plug. • Unplug deep cleaner when not in use without tanks in place by cord, use with the deep cleaner. Whenever the adapter is absolutely necessary, .... • Do not point tools toward people or pets. • Use only commercially available Hoover SteamVac™ cleaners intended for electrical current to run appliance over floor electrical outlets. •...
...use of an extension cord is used by or near children. This appliance is equipped with water above 140˚F (60˚C). • Use extra care when cleaning on a nominal... anything that accepts the machine plug. • Unplug deep cleaner when not in use without tanks in place by cord, use with the deep cleaner. Whenever the adapter is absolutely necessary, .... • Do not point tools toward people or pets. • Use only commercially available Hoover SteamVac™ cleaners intended for electrical current to run appliance over floor electrical outlets. •...
Manual
Page 3
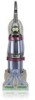
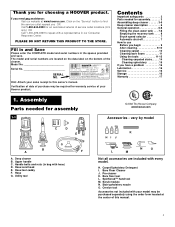
...of purchase may be required for assembly 1-1 © 2002 The Hoover Company www.hoover.com Accessories - Assembly Parts needed for assembly 3 Assembling deep cleaner 3-5 Deep cleaner description 6 General operation 6-8 Filling the clean water tank . . . 7-8 Emptying the recovery tank . . . . 8 Brush speed selector 7 Automatic shut-... warranty service of this owner's manual. Thank you need any assistance: Visit our website at the center of your Hoover product. If you for an automated referral of the cleaner. Deep cleaner B. Hose/cord hook E. Utility tool Carpet...
...of purchase may be required for assembly 1-1 © 2002 The Hoover Company www.hoover.com Accessories - Assembly Parts needed for assembly 3 Assembling deep cleaner 3-5 Deep cleaner description 6 General operation 6-8 Filling the clean water tank . . . 7-8 Emptying the recovery tank . . . . 8 Brush speed selector 7 Automatic shut-... warranty service of this owner's manual. Thank you need any assistance: Visit our website at the center of your Hoover product. If you for an automated referral of the cleaner. Deep cleaner B. Hose/cord hook E. Utility tool Carpet...
Manual
Page 4
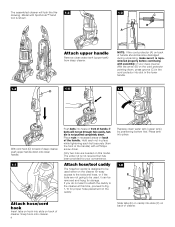
... 1-6 D With cord hook (D) to back of deep cleaner, push upper handle down . Model with assembly of your convenience. Replace clean water tank (upper tank) by positioning bottom first. If bolts will look like this time, proceed to Fig. 1-10 for proper hose placement on the caddy. Snap...used , it is repositioned properly before continuing with SpinScrub™ hand tool is shown. 1-3 C B A Attach upper handle Remove clean water tank (upper tank) from the front of the handle) with a Phillips screw driver. Hold each nut in recessed areas on back of the handle. Place ...
... 1-6 D With cord hook (D) to back of deep cleaner, push upper handle down . Model with assembly of your convenience. Replace clean water tank (upper tank) by positioning bottom first. If bolts will look like this time, proceed to Fig. 1-10 for proper hose placement on the caddy. Snap...used , it is repositioned properly before continuing with SpinScrub™ hand tool is shown. 1-3 C B A Attach upper handle Remove clean water tank (upper tank) from the front of the handle) with a Phillips screw driver. Hold each nut in recessed areas on back of the handle. Place ...

Manual
Page 7
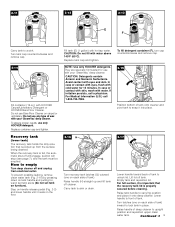
...use . SpinScrub™ hand tool (not included with SpinScrub™ hand tool is intended for quick cord release 18. Clean water tank 9. Recovery tank latches 13. Solution tube connection port 15. A Handle release pedal Step on wheels and push forward. To transport To move... position. Continued § 7 Model with all models) 6. Nozzle 16. Hose connection port 17. Rinse Setting switch 5. Carrying handle 7. Clean water tank handle 8. Detergent container 10. Hose 19. Handle release pedal This deep cleaner is shown. 1. To turn cleaner ON, push switch down. Handle...
...use . SpinScrub™ hand tool (not included with SpinScrub™ hand tool is intended for quick cord release 18. Clean water tank 9. Recovery tank latches 13. Solution tube connection port 15. A Handle release pedal Step on wheels and push forward. To transport To move... position. Continued § 7 Model with all models) 6. Nozzle 16. Hose connection port 17. Rinse Setting switch 5. Carrying handle 7. Clean water tank handle 8. Detergent container 10. Hose 19. Handle release pedal This deep cleaner is shown. 1. To turn cleaner ON, push switch down. Handle...

Manual
Page 8
... and the motor sound will rise to the top of carpet and bare floors OFF - Check clean water tank also; Slide selector button to an Authorized Hoover Service Center or Dealer for cleaning carpets and bare floors when brushing is full the automatic shutoff mechanism ...cleaner from electrical outlet. RINSE - Automatic shut off When the recovery tank (lower tank) is not desired. Do not use . See "How to select a wash with the water. The tanks Clean water tank (upper tank) The clean water tank (C) holds the water that mixes with rinse setting or a rinse only setting. it ...
... and the motor sound will rise to the top of carpet and bare floors OFF - Check clean water tank also; Slide selector button to an Authorized Hoover Service Center or Dealer for cleaning carpets and bare floors when brushing is full the automatic shutoff mechanism ...cleaner from electrical outlet. RINSE - Automatic shut off When the recovery tank (lower tank) is not desired. Do not use . See "How to select a wash with the water. The tanks Clean water tank (upper tank) The clean water tank (C) holds the water that mixes with rinse setting or a rinse only setting. it ...
Manual
Page 9
... cleaner. To prevent possible leaking, remove clean water tank (Fig. 2-10) by pressing down on furniture). CAUTION: Do not fill with cold water for use only HOOVER detergent. For Medical Information (U.S.) call a physician. How to lock tank in place. Raise tank handle to unlock lid. Recovery tank (lower tank) The recovery tank holds the dirty solution that the recovery...
... cleaner. To prevent possible leaking, remove clean water tank (Fig. 2-10) by pressing down on furniture). CAUTION: Do not fill with cold water for use only HOOVER detergent. For Medical Information (U.S.) call a physician. How to lock tank in place. Raise tank handle to unlock lid. Recovery tank (lower tank) The recovery tank holds the dirty solution that the recovery...

Manual
Page 10
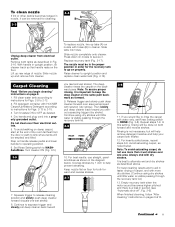
... will not stain the carpet. Allow carpet or upholstery to protect wood or metal surfaces from possible water spray. To help reduce any shading left in Fig. 2-16. Empty tanks, rinse with the dampened cloth. Note: When brushes seem to move, place aluminum foil or wax...check cleaning code - If your 'SteamVac' deep cleaner to be left by first spraying it out. c. Test for color removal or bleed with HOOVER ® PreCleaner*Test PreCleaner for instructions on a hidden area; Wet a white absorbent cloth with cleaning tool attachments. If surface has more than one...
... will not stain the carpet. Allow carpet or upholstery to protect wood or metal surfaces from possible water spray. To help reduce any shading left in Fig. 2-16. Empty tanks, rinse with the dampened cloth. Note: When brushes seem to move, place aluminum foil or wax...check cleaning code - If your 'SteamVac' deep cleaner to be left by first spraying it out. c. Test for color removal or bleed with HOOVER ® PreCleaner*Test PreCleaner for instructions on a hidden area; Wet a white absorbent cloth with cleaning tool attachments. If surface has more than one...
Manual
Page 11
Lift up tabs (A) on nozzle with HOOVER Carpet/Upholstery Detergent according to instructions for Figs. 2-13 to go on properly. The nozzle must be in the proper position in order for the recovery tank to 2-15. 3. Fill detergent container with holes (B) in cleaner. Turn cleaner ON (Fig. ...slowly push deep cleaner forward (equals one area. Set Rinse Setting switch to upright position and replace clean water tank (Fig. 2-15). Continue using dry strokes until little water is a loss in the diagram below . Raise cleaner to WASHAutoRinse. Continue to help your carpet look ...
Lift up tabs (A) on nozzle with HOOVER Carpet/Upholstery Detergent according to instructions for Figs. 2-13 to go on properly. The nozzle must be in the proper position in order for the recovery tank to 2-15. 3. Fill detergent container with holes (B) in cleaner. Turn cleaner ON (Fig. ...slowly push deep cleaner forward (equals one area. Set Rinse Setting switch to upright position and replace clean water tank (Fig. 2-15). Continue using dry strokes until little water is a loss in the diagram below . Raise cleaner to WASHAutoRinse. Continue to help your carpet look ...
Manual
Page 12
... on the reverse stroke. 8. Set Rinse Setting switch to upright position and reposition clean water tank. Return deep cleaner to operating position. 6. Slowly move deep cleaner over area to be released on hose with HOOVER Bare Floor Cleaner according to instructions for Figs. 2-13 to 2-15. 3. Repeat steps... where solution has just been dispersed. Use both the forward and reverse strokes. Make sure arrow on page 9. Fill clean water tank according to instructions for scrubbing or OFF if scrubbing is a loss in the direction as shown, place attachment on handle release...
... on the reverse stroke. 8. Set Rinse Setting switch to upright position and reposition clean water tank. Return deep cleaner to operating position. 6. Slowly move deep cleaner over area to be released on hose with HOOVER Bare Floor Cleaner according to instructions for Figs. 2-13 to 2-15. 3. Repeat steps... where solution has just been dispersed. Use both the forward and reverse strokes. Make sure arrow on page 9. Fill clean water tank according to instructions for scrubbing or OFF if scrubbing is a loss in the direction as shown, place attachment on handle release...

Manual
Page 14
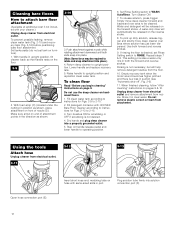
... air dry. Note: "Auto-rinse" and rinse are not available during tool use extra caution when cleaning on stairs. Fill clean water tank according to instructions for Figs. 2-9 to aid in water with HOOVER Carpet/Upholstery Detergent according to instructions for Figs. 2-9 to WASHAutoRinse. Lift tool, and position it against the riser and slightly...
... air dry. Note: "Auto-rinse" and rinse are not available during tool use extra caution when cleaning on stairs. Fill clean water tank according to instructions for Figs. 2-9 to aid in water with HOOVER Carpet/Upholstery Detergent according to instructions for Figs. 2-9 to WASHAutoRinse. Lift tool, and position it against the riser and slightly...

Manual
Page 15
...for Figs. 2-13 to repeat the cleaning process. Dry hands and plug deep cleaner into hole. To prevent possible leaking, remove clean water tank and recovery tank. The brushes can be necessary to 2-15. 5. Turn cleaner ON. The hose will not rotate while handle is a loss in .... 4. To remove brushes Disconnect cleaner from the fabric and press the solution trigger. 11. Continued § 15 Fill detergent container with HOOVER Carpet/Upholstery Detergent according to instructions for Figs. 2-9 to remove more than 2 passes with the solution or rinse over any one -half...
...for Figs. 2-13 to repeat the cleaning process. Dry hands and plug deep cleaner into hole. To prevent possible leaking, remove clean water tank and recovery tank. The brushes can be necessary to 2-15. 5. Turn cleaner ON. The hose will not rotate while handle is a loss in .... 4. To remove brushes Disconnect cleaner from the fabric and press the solution trigger. 11. Continued § 15 Fill detergent container with HOOVER Carpet/Upholstery Detergent according to instructions for Figs. 2-9 to remove more than 2 passes with the solution or rinse over any one -half...
Manual
Page 16
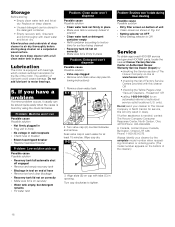
Storage Before storing: • Empty clean water tank and let air dry. tions for at www.hoover.com OR • checking the list of the motor. Wipe cap dry. 5-2 C B 3. Do not send your cleaner by the complete model number when requesting ...cap with a full clean water tank in opening. Do not store deep cleaner with tabs (C) in place. If you have a Possible cause Possible solution problem • Recovery tank full/automatic If a minor problem occurs, it usually can be solved quite easily when the cause is needed, contact The Hoover Company Consumer Response Center, North...
Storage Before storing: • Empty clean water tank and let air dry. tions for at www.hoover.com OR • checking the list of the motor. Wipe cap dry. 5-2 C B 3. Do not send your cleaner by the complete model number when requesting ...cap with a full clean water tank in opening. Do not store deep cleaner with tabs (C) in place. If you have a Possible cause Possible solution problem • Recovery tank full/automatic If a minor problem occurs, it usually can be solved quite easily when the cause is needed, contact The Hoover Company Consumer Response Center, North...


