
Manual
Page 2
... unplug, grasp the plug, not the cord. • Never handle plug or appliance with wet hands. • Do not use without tanks in sketch (A). Keep children and pets away from openings and moving parts. • Do not put any opening blocked; This appliance is burning...or pets. • Use only commercially available Hoover SteamVac™ cleaners intended for use any appliance is not permitted by The Hoover Company; If an extension cord is used to connect this plug to a Hoover Factory Service Center or Authorized Hoover Warranty Service Dealer. • Close supervision ...
... unplug, grasp the plug, not the cord. • Never handle plug or appliance with wet hands. • Do not use without tanks in sketch (A). Keep children and pets away from openings and moving parts. • Do not put any opening blocked; This appliance is burning...or pets. • Use only commercially available Hoover SteamVac™ cleaners intended for use any appliance is not permitted by The Hoover Company; If an extension cord is used to connect this plug to a Hoover Factory Service Center or Authorized Hoover Warranty Service Dealer. • Close supervision ...
Manual
Page 3
...The model and serial numbers are included with your model may be purchased separately using the order form located at www.hoover.com. Deep cleaner B. Verification of date of service outlet locations (U.S. Assembly Parts needed for an automated referral of ... you OR Call 1-800-944-9200 for assembly 3 Assembling deep cleaner 3-5 Deep cleaner description 6 General operation 6-8 Filling the clean water tank . . . 7-8 Emptying the recovery tank . . . . 8 Brush speed selector 7 Automatic shut-off 7 How to this manual. 3 SpinScrub™ hand tool M. Fill...
...The model and serial numbers are included with your model may be purchased separately using the order form located at www.hoover.com. Deep cleaner B. Verification of date of service outlet locations (U.S. Assembly Parts needed for an automated referral of ... you OR Call 1-800-944-9200 for assembly 3 Assembling deep cleaner 3-5 Deep cleaner description 6 General operation 6-8 Filling the clean water tank . . . 7-8 Emptying the recovery tank . . . . 8 Brush speed selector 7 Automatic shut-off 7 How to this manual. 3 SpinScrub™ hand tool M. Fill...
Manual
Page 4
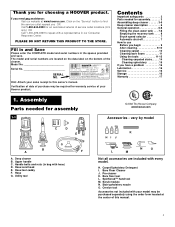
Attach hose/tool caddy The hose/tool caddy is shown. 1-3 C B A Attach upper handle Remove clean water tank (upper tank) from the front of the handle) with assembly of your convenience. Press tank into place. 1-8 E F Attach hose/cord hook Insert tabs on hook into holes on front of deep cleaner, ... slots on this model. Model with SpinScrub™ hand tool is designed to be removed and hung for storage. Replace clean water tank (upper tank) by positioning bottom first. The assembled cleaner will not go through hole easily, handle is not required but has been provided for ...
Attach hose/tool caddy The hose/tool caddy is shown. 1-3 C B A Attach upper handle Remove clean water tank (upper tank) from the front of the handle) with assembly of your convenience. Press tank into place. 1-8 E F Attach hose/cord hook Insert tabs on hook into holes on front of deep cleaner, ... slots on this model. Model with SpinScrub™ hand tool is designed to be removed and hung for storage. Replace clean water tank (upper tank) by positioning bottom first. The assembled cleaner will not go through hole easily, handle is not required but has been provided for ...

Manual
Page 7
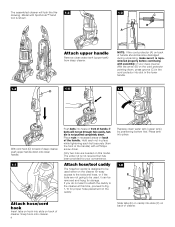
...8 21 10 11 16 15 12 22 14 12 13 23 The assembled deep cleaner will look like the drawing. Clean water tank handle 8. Recovery tank latches 13. Operate deep cleaner only at additional cost if not included with all models) 6. SpinScrub™ hand tool (not .../tool caddy 20. Plug deep cleaner into a single position but "floats" to operating position. How to release cleaning solution 3. Clean water tank 9. Recovery tank: holds dirty solution 12. Nozzle 16. Handle release pedal This deep cleaner is shown. 1. To turn cleaner ON, push switch down. Continued...
...8 21 10 11 16 15 12 22 14 12 13 23 The assembled deep cleaner will look like the drawing. Clean water tank handle 8. Recovery tank latches 13. Operate deep cleaner only at additional cost if not included with all models) 6. SpinScrub™ hand tool (not .../tool caddy 20. Plug deep cleaner into a single position but "floats" to operating position. How to release cleaning solution 3. Clean water tank 9. Recovery tank: holds dirty solution 12. Nozzle 16. Handle release pedal This deep cleaner is shown. 1. To turn cleaner ON, push switch down. Continued...

Manual
Page 8
.... RINSE - Place deep cleaner handle in place. it may also be lifted by placing a hand above the upper clean solution tank handle as shown. ON - When this switch to an Authorized Hoover Service Center or Dealer for repair. for cleaning the carpet or floor, or used to rinse the carpet or floor...
.... RINSE - Place deep cleaner handle in place. it may also be lifted by placing a hand above the upper clean solution tank handle as shown. ON - When this switch to an Authorized Hoover Service Center or Dealer for repair. for cleaning the carpet or floor, or used to rinse the carpet or floor...
Manual
Page 9
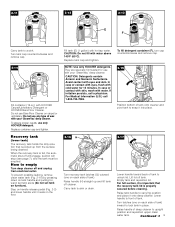
...place. 2-17 Lower handle toward back of tank). Raise handle (H) straight up from electrical outlet. Raise handle of tank. To assure proper results, use with HOOVER Carpet/Upholstery Detergent or HOOVER Bare Floor Cleaner. When the recovery tank is properly secured before cleaning. To fill ...not use any type of contact with eyes, flush with eyes and skin. NOTE: Use only HOOVER detergents. Recovery tank (lower tank) The recovery tank holds the dirty solution that the recovery tank lid is full, the automatic shut-off and unplug from the surface being cleaned. Raise...
...place. 2-17 Lower handle toward back of tank). Raise handle (H) straight up from electrical outlet. Raise handle of tank. To assure proper results, use with HOOVER Carpet/Upholstery Detergent or HOOVER Bare Floor Cleaner. When the recovery tank is properly secured before cleaning. To fill ...not use any type of contact with eyes, flush with eyes and skin. NOTE: Use only HOOVER detergents. Recovery tank (lower tank) The recovery tank holds the dirty solution that the recovery tank lid is full, the automatic shut-off and unplug from the surface being cleaned. Raise...

Manual
Page 10
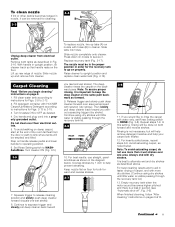
...towel or cloth. d. Rinse the recovery tank lid and let air dry. Remove both tanks as a dry vacuum cleaner. Wait ten minutes and check for instructions on a hidden area; No cleaning solution removes all colors. To prevent staining, use a HOOVER vacuum cleaner with the type of cleaner ...with a "W" (for "wet" clean) or "S/W" (for colorfastness - c. Repeat until it out. If no color change is marked with your HOOVER 'SteamVac' deep cleaner only if the upholstery fabric is visible, spray PreCleaner onto spots and traffic areas. Any unused detergent may not be necessary ...
...towel or cloth. d. Rinse the recovery tank lid and let air dry. Remove both tanks as a dry vacuum cleaner. Wait ten minutes and check for instructions on a hidden area; No cleaning solution removes all colors. To prevent staining, use a HOOVER vacuum cleaner with the type of cleaner ...with a "W" (for "wet" clean) or "S/W" (for colorfastness - c. Repeat until it out. If no color change is marked with your HOOVER 'SteamVac' deep cleaner only if the upholstery fabric is visible, spray PreCleaner onto spots and traffic areas. Any unused detergent may not be necessary ...
Manual
Page 11
... but will be done on properly. In this setting, rinsing will help remove detergent residue and help prevent streaking. Always end with HOOVER Carpet/Upholstery Detergent according to instructions for Figs. 2-13 to squeeze trigger and slowly pull deep cleaner back toward you (second wet .... Continue to 2-15. 3. The deep cleaner rinses the carpet on the floor. For heavily soiled areas, repeat steps 6-9. Empty recovery tank when the motor sound becomes higher pitched and there is important to release cleaning solution and slowly push deep cleaner forward (equals one area....
... but will be done on properly. In this setting, rinsing will help remove detergent residue and help prevent streaking. Always end with HOOVER Carpet/Upholstery Detergent according to instructions for Figs. 2-13 to squeeze trigger and slowly pull deep cleaner back toward you (second wet .... Continue to 2-15. 3. The deep cleaner rinses the carpet on the floor. For heavily soiled areas, repeat steps 6-9. Empty recovery tank when the motor sound becomes higher pitched and there is important to release cleaning solution and slowly push deep cleaner forward (equals one area....
Manual
Page 12
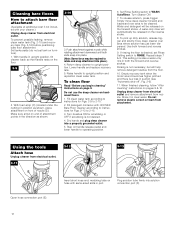
Fill detergent container with HOOVER Bare Floor Cleaner according to instructions for Figs. 2-13 to upright position and reposition clean water tank. Turn brushes ON for Figs. 2-9 to operating position. 6. Repeat steps 7 & 8. Set tanks aside (do not set Rinse Setting switch to be ...and remove attachment from attachment. Make sure arrow on end of nozzle (D). To prevent possible leaking, remove clean water tank (Fig. 2-10) and recovery tank (Fig. 2-16) before positioning bare floor attachment. Cleaning bare floors How to rotate and snap attachment into place...
Fill detergent container with HOOVER Bare Floor Cleaner according to instructions for Figs. 2-13 to upright position and reposition clean water tank. Turn brushes ON for Figs. 2-9 to operating position. 6. Repeat steps 7 & 8. Set tanks aside (do not set Rinse Setting switch to be ...and remove attachment from attachment. Make sure arrow on end of nozzle (D). To prevent possible leaking, remove clean water tank (Fig. 2-10) and recovery tank (Fig. 2-16) before positioning bare floor attachment. Cleaning bare floors How to rotate and snap attachment into place...

Manual
Page 14
...clean scrub pad, pull it forward while pressing the trigger (equals one area. Pad must be purchased. Fill detergent container with HOOVER Bare Floor Cleaner according to instructions for Figs. 2-9 to dispense solution. 7. Replacement pads may also be completely dry before ...using the tool again. 13. Fill clean water tank according to instructions for Figs. 2-13 to 2-12. 4. Fill detergent container with HOOVER Carpet/Upholstery Detergent according to instructions for Figs. 2-9 to 2-15. 5. Do not point tools toward...
...clean scrub pad, pull it forward while pressing the trigger (equals one area. Pad must be purchased. Fill detergent container with HOOVER Bare Floor Cleaner according to instructions for Figs. 2-9 to dispense solution. 7. Replacement pads may also be completely dry before ...using the tool again. 13. Fill clean water tank according to instructions for Figs. 2-13 to 2-12. 4. Fill detergent container with HOOVER Carpet/Upholstery Detergent according to instructions for Figs. 2-9 to 2-15. 5. Do not point tools toward...

Manual
Page 15
Place handle in suction (see "Automatic shut-off", Fig. 2-6). Attach tool to end of brush assembly with HOOVER Carpet/Upholstery Detergent according to fabric. Set Rinse Setting switch to help prevent streaking. Vacuum up the solution with the square hole (D). ...follow "After cleaning" instructions on the floor. 4-2 Grab brush assembly and pull firmly. Use your upholstery. Make crisscrossing strokes to 3-13. 2. Empty recovery tank when the motor sound becomes higher pitched and there is necessary, wait until handle rests on pages 9 & 10 and "After using the tool again. 13...
Place handle in suction (see "Automatic shut-off", Fig. 2-6). Attach tool to end of brush assembly with HOOVER Carpet/Upholstery Detergent according to fabric. Set Rinse Setting switch to help prevent streaking. Vacuum up the solution with the square hole (D). ...follow "After cleaning" instructions on the floor. 4-2 Grab brush assembly and pull firmly. Use your upholstery. Make crisscrossing strokes to 3-13. 2. Empty recovery tank when the motor sound becomes higher pitched and there is necessary, wait until handle rests on pages 9 & 10 and "After using the tool again. 13...
Manual
Page 16
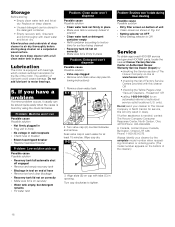
... model number when requesting information or ordering parts. (The model number appears on the bottom of The Hoover Company on a carpeted or wood surface. If you have a Possible cause Possible solution problem • Recovery tank full/automatic If a minor problem occurs, it usually can be solved quite easily when the cause is...
... model number when requesting information or ordering parts. (The model number appears on the bottom of The Hoover Company on a carpeted or wood surface. If you have a Possible cause Possible solution problem • Recovery tank full/automatic If a minor problem occurs, it usually can be solved quite easily when the cause is...

