
Manual
Page 3
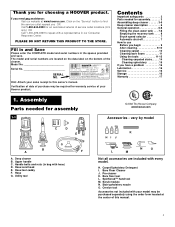
...Accessories not included with every model. Deep cleaner B. H. If you OR Call 1-800-944-9200 for assembly 1-1 © 2002 The Hoover Company www.hoover.com Accessories - only) OR Call 1-330-499-9499 to this manual. 3 Fill in and Save Please enter the COMPLETE model and ...: Attach your model may be purchased separately using the order form located at www.hoover.com. SpinScrub™ hand tool M. Contents Important safeguards 2 Parts needed for an automated referral of your Hoover product. Hose/cord hook E. Model No Serial No SERIAL NO. Handle bolts and nuts (in...
...Accessories not included with every model. Deep cleaner B. H. If you OR Call 1-800-944-9200 for assembly 1-1 © 2002 The Hoover Company www.hoover.com Accessories - only) OR Call 1-330-499-9499 to this manual. 3 Fill in and Save Please enter the COMPLETE model and ...: Attach your model may be purchased separately using the order form located at www.hoover.com. SpinScrub™ hand tool M. Contents Important safeguards 2 Parts needed for an automated referral of your Hoover product. Hose/cord hook E. Model No Serial No SERIAL NO. Handle bolts and nuts (in...
Manual
Page 4
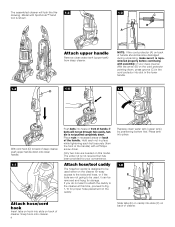
... look like this 1-2 drawing. Place nuts in recessed areas on back of the handle. Attach hose/tool caddy The hose/tool caddy is designed to be used , it is not required but has been provided for proper hose placement on front of deep cleaner, push upper handle down . Snap hook onto cleaner. 4 ... cleaner for storage. Hold each nut in the lower handle. 1-4 1-5 1-6 D With cord hook (D) to be removed and hung for easy access to the tools and hose, or if the tools are needed on this time, proceed to the cleaner at this model. Press tank into place. 1-8 E F Attach...
... look like this 1-2 drawing. Place nuts in recessed areas on back of the handle. Attach hose/tool caddy The hose/tool caddy is designed to be used , it is not required but has been provided for proper hose placement on front of deep cleaner, push upper handle down . Snap hook onto cleaner. 4 ... cleaner for storage. Hold each nut in the lower handle. 1-4 1-5 1-6 D With cord hook (D) to be removed and hung for easy access to the tools and hose, or if the tools are needed on this time, proceed to the cleaner at this model. Press tank into place. 1-8 E F Attach...

Manual
Page 5
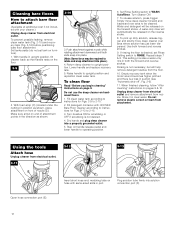
.... SpinScrub™ hand tool (not included with your cleaner) through "loop" on hose connector into opposite side of hose. Continued § 5 Snap tab (M) on caddy. Bring hose up and over top of hook (K). Slide hose clip (L) toward cleaner handle. J Repeat on cleaner. I 1-11 G Rotate top... of bare floor tool (available at bottom of cleaner and press into opposite side of hose. Loop hose at additional cost if not included with all models) The SpinScrub™ hand tool is shipped in hook (H) on other end of clip...
.... SpinScrub™ hand tool (not included with your cleaner) through "loop" on hose connector into opposite side of hose. Continued § 5 Snap tab (M) on caddy. Bring hose up and over top of hook (K). Slide hose clip (L) toward cleaner handle. J Repeat on cleaner. I 1-11 G Rotate top... of bare floor tool (available at bottom of cleaner and press into opposite side of hose. Loop hose at additional cost if not included with all models) The SpinScrub™ hand tool is shipped in hook (H) on other end of clip...

Manual
Page 7
... 8 21 10 11 16 15 12 22 14 12 13 23 The assembled deep cleaner will look like the drawing. Stair/upholstery nozzle 21. Cord/hose hook 23. 2. Clean water tank handle 8. Brush setting selector 14. Plug deep cleaner into a single position but "floats" to use . A Handle ... solution 12. Solution tube connection port 15. Handle release pedal This deep cleaner is shown. 1. Model with all models) 6. Detergent container 10. Hose 19. Bare floor tool (available at voltage specified on data plate on wheels and push forward. Recovery tank latches 13...
... 8 21 10 11 16 15 12 22 14 12 13 23 The assembled deep cleaner will look like the drawing. Stair/upholstery nozzle 21. Cord/hose hook 23. 2. Clean water tank handle 8. Brush setting selector 14. Plug deep cleaner into a single position but "floats" to use . A Handle ... solution 12. Solution tube connection port 15. Handle release pedal This deep cleaner is shown. 1. Model with all models) 6. Detergent container 10. Hose 19. Bare floor tool (available at voltage specified on data plate on wheels and push forward. Recovery tank latches 13...
Manual
Page 12
... to 2-15. 2. Lower handle and replace recovery tank. 5. This setting provides a water-only rins in position as shown. 3-10 3. Open hose connection port (E). 12 Slowly move deep cleaner over area to be required to rotate and snap attachment into place. (Note: Some force may be ...it in suction (see "Automatic shut-off", Fig. 2-6). 11. Do not remove plastic screen or foam from nozzle. Fill detergent container with HOOVER Bare Floor Cleaner according to instructions for scrubbing or OFF if scrubbing is desired, set tank on pages 9 & 10. Water and detergent will...
... to 2-15. 2. Lower handle and replace recovery tank. 5. This setting provides a water-only rins in position as shown. 3-10 3. Open hose connection port (E). 12 Slowly move deep cleaner over area to be required to rotate and snap attachment into place. (Note: Some force may be ...it in suction (see "Automatic shut-off", Fig. 2-6). 11. Do not remove plastic screen or foam from nozzle. Fill detergent container with HOOVER Bare Floor Cleaner according to instructions for scrubbing or OFF if scrubbing is desired, set tank on pages 9 & 10. Water and detergent will...
Manual
Page 13
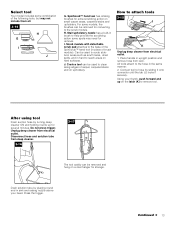
...to help provide the scrubbing action some spots may not include them all. 3-14 H G I . All tools attach to the hose in upright position and remove hose from deep cleaner. 3-16 3-17 The tool caddy can be used to scrub stubborn areas such as scuff marks, dried spills, ...and raising nozzle above your thumb, push forward and up for several minutes. Disconnect hose and solution tube from rack. J. Using your head. Can be removed for storage. After using tool Drain suction hose by placing round end in place of brush module). Unplug deep cleaner from electrical ...
...to help provide the scrubbing action some spots may not include them all. 3-14 H G I . All tools attach to the hose in upright position and remove hose from deep cleaner. 3-16 3-17 The tool caddy can be used to scrub stubborn areas such as scuff marks, dried spills, ...and raising nozzle above your thumb, push forward and up for several minutes. Disconnect hose and solution tube from rack. J. Using your head. Can be removed for storage. After using tool Drain suction hose by placing round end in place of brush module). Unplug deep cleaner from electrical ...

Manual
Page 14
...it off ", Fig. 2-6). Open the tool door and remove the SpinScrub™ hand tool. 2. Grasp the sides of hose. 6. Fill detergent container with HOOVER Carpet/Upholstery Detergent according to instructions for Figs 2-13 to the base. Turn cleaner ON. Using the scrub tool With a ...Ask for Figs. 2-9 to dispense solution. 7. Fill clean water tank according to instructions for HOOVER part no surface change is completely dry before reattaching to help prevent streaking. Hose length may also be completely dry before using tool" instructions on a hidden area before using scrub...
...it off ", Fig. 2-6). Open the tool door and remove the SpinScrub™ hand tool. 2. Grasp the sides of hose. 6. Fill detergent container with HOOVER Carpet/Upholstery Detergent according to instructions for Figs 2-13 to the base. Turn cleaner ON. Using the scrub tool With a ...Ask for Figs. 2-9 to dispense solution. 7. Fill clean water tank according to instructions for HOOVER part no surface change is completely dry before reattaching to help prevent streaking. Hose length may also be completely dry before using tool" instructions on a hidden area before using scrub...

Manual
Page 15
... recovery tank when the motor sound becomes higher pitched and there is in suction (see "Automatic shut-off", Fig. 2-6). Attach hose and solution tube as instructed in upright position, tilt cleaner back until post fits easily into hole. Set Rinse Setting switch to...C To replace brushes Align posts (A) on the floor. 4-2 Grab brush assembly and pull firmly. Make sure that the square post (C) also aligns with HOOVER Carpet/Upholstery Detergent according to instructions for Figs. 2-9 to fabric. Fill detergent container with the square hole (D). Note: "Auto-rinse" and rinse are ...
... recovery tank when the motor sound becomes higher pitched and there is in suction (see "Automatic shut-off", Fig. 2-6). Attach hose and solution tube as instructed in upright position, tilt cleaner back until post fits easily into hole. Set Rinse Setting switch to...C To replace brushes Align posts (A) on the floor. 4-2 Grab brush assembly and pull firmly. Make sure that the square post (C) also aligns with HOOVER Carpet/Upholstery Detergent according to instructions for Figs. 2-9 to fabric. Fill detergent container with the square hole (D). Note: "Auto-rinse" and rinse are ...
Manual
Page 16
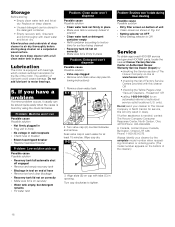
...in opening. Do not add lubricant to tighten. lowing instructions) 1. Align slots (B) on the bottom of the cleaner.) 16 In Canada, contact Hoover Canada, Burlington, Ontario L7R 4A8, Phone: 1-800-263-6376. Lubrication The motor is equipped with bearings which contain sufficient lubrication for an automated...Possible solution • Recovery tank full/automatic shut off engaged • Remove and empty recovery tank • Blockage in tool on end of hose • Remove tool and clear blockage • Recovery tank lid not on correctly • Make sure lid is on securely • Water...
...in opening. Do not add lubricant to tighten. lowing instructions) 1. Align slots (B) on the bottom of the cleaner.) 16 In Canada, contact Hoover Canada, Burlington, Ontario L7R 4A8, Phone: 1-800-263-6376. Lubrication The motor is equipped with bearings which contain sufficient lubrication for an automated...Possible solution • Recovery tank full/automatic shut off engaged • Remove and empty recovery tank • Blockage in tool on end of hose • Remove tool and clear blockage • Recovery tank lid not on correctly • Make sure lid is on securely • Water...


