
Manual
Page 1
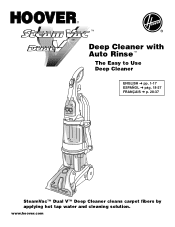
™ ® ™ Deep Cleaner with Auto Rinse™ The Easy to Use Deep Cleaner ENGLISH § pp. 1-17 ESPAÑOL § pág. 18-27 FRANÇAIS § p. 28-37 SteamVac™ Dual V™ Deep Cleaner cleans carpet fibers by applying hot tap water and cleaning solution. www.hoover.com
™ ® ™ Deep Cleaner with Auto Rinse™ The Easy to Use Deep Cleaner ENGLISH § pp. 1-17 ESPAÑOL § pág. 18-27 FRANÇAIS § p. 28-37 SteamVac™ Dual V™ Deep Cleaner cleans carpet fibers by applying hot tap water and cleaning solution. www.hoover.com

Manual
Page 2
... Instructions". • Do not clean over cord. Do not use any time. • Do not point tools toward people or pets. • Use only commercially available Hoover SteamVac™ cleaners intended for use at any type of electric shock. The plug must be grounded. if it must be connected to a 2-pole receptacle (E) if a properly grounded outlet is for machine application. When using detergents and other cleaners...
... Instructions". • Do not clean over cord. Do not use any time. • Do not point tools toward people or pets. • Use only commercially available Hoover SteamVac™ cleaners intended for use at any type of electric shock. The plug must be grounded. if it must be connected to a 2-pole receptacle (E) if a properly grounded outlet is for machine application. When using detergents and other cleaners...
Manual
Page 3
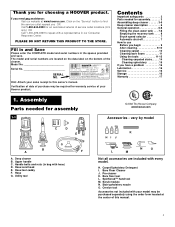
....hoover.com Accessories - vary by model C D E G B A F A. Upper handle C. Handle bolts and nuts (in the spaces provided and save. H. Bare floor tool L. Contents Important safeguards 2 Parts needed for warranty service of service outlet locations (U.S. Hose/cord hook E. Hose G. Bare Floor Cleaner J. Assembly Parts needed for choosing a HOOVER product. Carpet/Upholstery Detergent I. Deep cleaner B. If you OR Call 1-800-944-9200 for an automated referral of your sales receipt to use Before you begin 9 After cleaning 9-10 Cleaning carpet 10 Cleaning bare...
....hoover.com Accessories - vary by model C D E G B A F A. Upper handle C. Handle bolts and nuts (in the spaces provided and save. H. Bare floor tool L. Contents Important safeguards 2 Parts needed for warranty service of service outlet locations (U.S. Hose/cord hook E. Hose G. Bare Floor Cleaner J. Assembly Parts needed for choosing a HOOVER product. Carpet/Upholstery Detergent I. Deep cleaner B. If you OR Call 1-800-944-9200 for an automated referral of your sales receipt to use Before you begin 9 After cleaning 9-10 Cleaning carpet 10 Cleaning bare...
Manual
Page 4
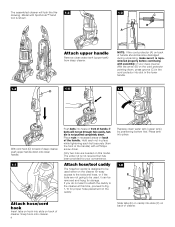
... deep cleaner, push upper handle down . Model with SpinScrub™ hand tool is not required but has been provided for your deep cleaner. Only two nuts are not going to be used, it is not pushed completely down onto lower handle. 1-7 Push bolts into slots (F) on back of the handle. Replace clean water tank (upper tank) by positioning bottom first. Press tank into place. 1-8 E F Attach hose/cord hook Insert tabs on hook...
... deep cleaner, push upper handle down . Model with SpinScrub™ hand tool is not required but has been provided for your deep cleaner. Only two nuts are not going to be used, it is not pushed completely down onto lower handle. 1-7 Push bolts into slots (F) on back of the handle. Replace clean water tank (upper tank) by positioning bottom first. Press tank into place. 1-8 E F Attach hose/cord hook Insert tabs on hook...

Manual
Page 5
... hose clip (L) toward cleaner handle. Press solution tube (J) into hose clip. SpinScrub™ hand tool (not included with your cleaner) through "loop" on hose connector into opposite side of clip. 1-15 1-16 1-17 Snap stair/upholstery nozzle onto caddy. Continued § 5 J Repeat on cleaner. Insert top of bare floor tool (available at bottom of cleaner and press into opposite side of caddy. To remove the bag before storing hose. Slide tool down...
... hose clip (L) toward cleaner handle. Press solution tube (J) into hose clip. SpinScrub™ hand tool (not included with your cleaner) through "loop" on hose connector into opposite side of clip. 1-15 1-16 1-17 Snap stair/upholstery nozzle onto caddy. Continued § 5 J Repeat on cleaner. Insert top of bare floor tool (available at bottom of cleaner and press into opposite side of caddy. To remove the bag before storing hose. Slide tool down...

Manual
Page 6
How to reattach tool cover The tool cover is designed with holes on sides of cover with a breakaway feature which allows it to snap free if it is pushed open too far. Snap door into place. 6 To reattach, align hinges of tool storage area. 1-18 1-19 Pull tool down and outward. To reposition the tool, reverse this procedure.
How to reattach tool cover The tool cover is designed with holes on sides of cover with a breakaway feature which allows it to snap free if it is pushed open too far. Snap door into place. 6 To reattach, align hinges of tool storage area. 1-18 1-19 Pull tool down and outward. To reposition the tool, reverse this procedure.

Manual
Page 7
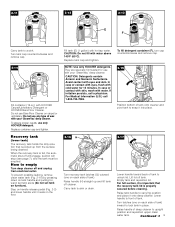
... and push forward. How to operating position. Rinse Setting switch 5. Clean water tank 9. Detergent container 10. Model with all models) 6. SpinScrub™ hand tool (not included with SpinScrub™ hand tool is intended for quick cord release 18. Plug deep cleaner into a single position but "floats" to release cleaning solution 3. To transport To move your cleaner) 22. Hose 19. To turn cleaner ON, push switch down. Hand grip 2. Recovery tank: holds dirty solution 12. Bare floor tool (available at voltage specified...
... and push forward. How to operating position. Rinse Setting switch 5. Clean water tank 9. Detergent container 10. Model with all models) 6. SpinScrub™ hand tool (not included with SpinScrub™ hand tool is intended for quick cord release 18. Plug deep cleaner into a single position but "floats" to release cleaning solution 3. To transport To move your cleaner) 22. Hose 19. To turn cleaner ON, push switch down. Hand grip 2. Recovery tank: holds dirty solution 12. Bare floor tool (available at voltage specified...

Manual
Page 8
... dirty solution and the motor sound will rise to the top of carpet and bare floors OFF - ON - See "How to rinse the carpet or floor. When this happens, turn deep cleaner off and empty recovery tank before cleaning. 2-8 2-9 2-10 WASH AUTO RINSE OFF C D Rinse ON Rinse Setting switch Use this switch to select a wash with detergent for cleaning the carpet or floor, or used to clean" section for repair. WASH-AutoRinse - Brush setting selector Your 'SteamVac' deep cleaner has two agitator brush settings. Slide selector button...
... dirty solution and the motor sound will rise to the top of carpet and bare floors OFF - ON - See "How to rinse the carpet or floor. When this happens, turn deep cleaner off and empty recovery tank before cleaning. 2-8 2-9 2-10 WASH AUTO RINSE OFF C D Rinse ON Rinse Setting switch Use this switch to select a wash with detergent for cleaning the carpet or floor, or used to clean" section for repair. WASH-AutoRinse - Brush setting selector Your 'SteamVac' deep cleaner has two agitator brush settings. Slide selector button...
Manual
Page 9
... up from electrical outlet. Lift lid off cleaner. To assure proper results, use any type of contact with skin, wash with your 'SteamVac' deep cleaner. Turn tank cap counterclockwise and remove cap. 2-14 Fill container (16 oz.) with water above 140°F (60°C). CAUTION: Do not fill with HOOVER Carpet/Upholstery Detergent or HOOVER Bare Floor Cleaner. 2-11 2-12 2-13 E F Carry tank to upright position and reposition upper clean water tank.
... up from electrical outlet. Lift lid off cleaner. To assure proper results, use any type of contact with skin, wash with your 'SteamVac' deep cleaner. Turn tank cap counterclockwise and remove cap. 2-14 Fill container (16 oz.) with water above 140°F (60°C). CAUTION: Do not fill with HOOVER Carpet/Upholstery Detergent or HOOVER Bare Floor Cleaner. 2-11 2-12 2-13 E F Carry tank to upright position and reposition upper clean water tank.

Manual
Page 10
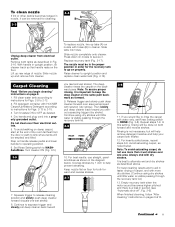
... marked with an agitator for instructions on a hidden area; How to a nonwood bare floor surface or place waterproof material (e.g. Stain removal varies with cleaning tool attachments. For upholstery, check cleaning code - When cleaning entire floor, move area rugs/ carpet to clean Before you begin cleaning a. Pretreat spots and heavy traffic areas with HOOVER ® PreCleaner*Test PreCleaner for colorfastness - Use your upholstery does not have a code, seek professional assistance. Squeeze filter frame, lift...
... marked with an agitator for instructions on a hidden area; How to a nonwood bare floor surface or place waterproof material (e.g. Stain removal varies with cleaning tool attachments. For upholstery, check cleaning code - When cleaning entire floor, move area rugs/ carpet to clean Before you begin cleaning a. Pretreat spots and heavy traffic areas with HOOVER ® PreCleaner*Test PreCleaner for colorfastness - Use your upholstery does not have a code, seek professional assistance. Squeeze filter frame, lift...
Manual
Page 11
... HOOVER Carpet/Upholstery Detergent according to instructions for Figs. 2-13 to WASHAutoRinse. Raise cleaner to 2-12. 2. Fill clean water tank according to instructions for the recovery tank to go on damp carpet, start at the end of carpet, end with solution (dry stroke). Turn cleaner ON (Fig. 3-5). 3-5 7. Continue using dry strokes until little water is a loss in suction (see "Automatic shut-off", Fig. 2-6). Rinsing is visible passing through the recovery tank lid. 3-6 WASH RINSE...
... HOOVER Carpet/Upholstery Detergent according to instructions for Figs. 2-13 to WASHAutoRinse. Raise cleaner to 2-12. 2. Fill clean water tank according to instructions for the recovery tank to go on damp carpet, start at the end of carpet, end with solution (dry stroke). Turn cleaner ON (Fig. 3-5). 3-5 7. Continue using dry strokes until little water is a loss in suction (see "Automatic shut-off", Fig. 2-6). Rinsing is visible passing through the recovery tank lid. 3-6 WASH RINSE...
Manual
Page 12
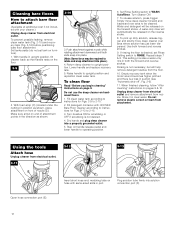
... instructions for Figs. 2-13 to operating position. 6. Dry hands and plug deep cleaner into solution connection port (F). Push attachment against nozzle while rotating attachment downward until both forward and reverse strokes. 9. A water-only rinse will help remove detergent residue from attachment. If rinsing the floor is not necessary, but will automatically be required to upright position and reposition clean water tank. To prevent possible leaking, remove clean water tank (Fig. 2-10) and recovery tank (Fig. 2-16) before positioning bare floor attachment. Lower handle...
... instructions for Figs. 2-13 to operating position. 6. Dry hands and plug deep cleaner into solution connection port (F). Push attachment against nozzle while rotating attachment downward until both forward and reverse strokes. 9. A water-only rinse will help remove detergent residue from attachment. If rinsing the floor is not necessary, but will automatically be required to upright position and reposition clean water tank. To prevent possible leaking, remove clean water tank (Fig. 2-10) and recovery tank (Fig. 2-16) before positioning bare floor attachment. Lower handle...
Manual
Page 13
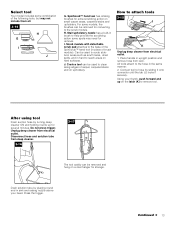
H. I J G. Can be used to help provide the scrubbing action some spots may not include them all. 3-14 H G I . Using your head. After using tool Drain suction hose by turning deep cleaner ON and holding nozzle up on hard surfaces. Do not press trigger. Continued § 13 SpinScrub™ hand tool has rotating brushes for several minutes. J. Disconnect hose and solution tube from electrical outlet. 1. All tools attach to the hose in hard to reach areas on the...
H. I J G. Can be used to help provide the scrubbing action some spots may not include them all. 3-14 H G I . Using your head. After using tool Drain suction hose by turning deep cleaner ON and holding nozzle up on hard surfaces. Do not press trigger. Continued § 13 SpinScrub™ hand tool has rotating brushes for several minutes. J. Disconnect hose and solution tube from electrical outlet. 1. All tools attach to the hose in hard to reach areas on the...

Manual
Page 14
... to WASHAutoRinse. Pre-spray the carpeted stair by 1/2 inch to instructions for HOOVER part no surface change is completely dry before using tool" instructions on the desired surface. End with detergent. Attach hose and solution tube as shown. 3-20 A B 9. Pick up dirty solution with HOOVER Bare Floor Cleaner according to help prevent streaking. Attaching scrub module 3-18 M L 3-19 After using scrub tool To clean scrub pad, pull it off ", Fig. 2-6). Rinse and let air dry. Fill detergent container with squeegee...
... to WASHAutoRinse. Pre-spray the carpeted stair by 1/2 inch to instructions for HOOVER part no surface change is completely dry before using tool" instructions on the desired surface. End with detergent. Attach hose and solution tube as shown. 3-20 A B 9. Pick up dirty solution with HOOVER Bare Floor Cleaner according to help prevent streaking. Attaching scrub module 3-18 M L 3-19 After using scrub tool To clean scrub pad, pull it off ", Fig. 2-6). Rinse and let air dry. Fill detergent container with squeegee...

Manual
Page 15
.... 7. Agitator brushes will only dispense water mixed with HOOVER Carpet/Upholstery Detergent according to prevent over the fabric. 9. Attach tool to WASHAutoRinse. Dry hands and plug deep cleaner into place. Note: "Auto-rinse" and rinse are not available during tool use. Turn brushes slightly until handle rests on the floor. 4-2 Grab brush assembly and pull firmly. Continued § 15 Turn cleaner ON. overlap each pass (Fig. 3-23). 3-23 Make no more moisture. 10. When finished cleaning, follow "After cleaning" instructions...
.... 7. Agitator brushes will only dispense water mixed with HOOVER Carpet/Upholstery Detergent according to prevent over the fabric. 9. Attach tool to WASHAutoRinse. Dry hands and plug deep cleaner into place. Note: "Auto-rinse" and rinse are not available during tool use. Turn brushes slightly until handle rests on the floor. 4-2 Grab brush assembly and pull firmly. Continued § 15 Turn cleaner ON. overlap each pass (Fig. 3-23). 3-23 Make no more moisture. 10. When finished cleaning, follow "After cleaning" instructions...
Manual
Page 16
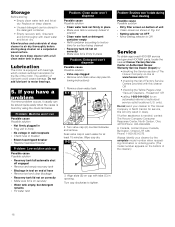
... and remove. Turn cap clockwise to motor bearings. 5. Do not send your cleaner by using the check list below. tions for an automated referral of lubricant could cause damage. Problem: Brushes won 't dispense Possible cause Possible solution • Valve cap clogged • Remove and clean valve cap (see fol- Do not store deep cleaner with clean water and let air dry. The addition of authorized service outlet locations...
... and remove. Turn cap clockwise to motor bearings. 5. Do not send your cleaner by using the check list below. tions for an automated referral of lubricant could cause damage. Problem: Brushes won 't dispense Possible cause Possible solution • Valve cap clogged • Remove and clean valve cap (see fol- Do not store deep cleaner with clean water and let air dry. The addition of authorized service outlet locations...
Manual
Page 17
... may also have other rights which covers the cost of warranty service outlets, write or phone the Consumer Response Center, The Hoover Company, 101 East Maple St., North Canton, Ohio 44720, Phone 1-330-499-9499. While this warranty or the availability of parts only. Full One Year Warranty (Domestic Use) Your HOOVER® appliance is used in a commercial or rental application.
... may also have other rights which covers the cost of warranty service outlets, write or phone the Consumer Response Center, The Hoover Company, 101 East Maple St., North Canton, Ohio 44720, Phone 1-330-499-9499. While this warranty or the availability of parts only. Full One Year Warranty (Domestic Use) Your HOOVER® appliance is used in a commercial or rental application.


