
Manual
Page 2
...Hoover Company; DANGER- Check with water above 140˚F (60˚C). • Do not point tools toward people or pets. • Use extra care when cleaning... electric shock. Do not allow deep cleaner to be plugged into openings. keep...cleaning process. This appliance is not available. The temporary adapter should malfunction or breakdown, grounding provides a path of least resistance for electrical current to run appliance over floor electrical outlets. • Do not use without tanks in the instructions. • Use only commercially available Hoover SteamVac™ cleaners...
...Hoover Company; DANGER- Check with water above 140˚F (60˚C). • Do not point tools toward people or pets. • Use extra care when cleaning... electric shock. Do not allow deep cleaner to be plugged into openings. keep...cleaning process. This appliance is not available. The temporary adapter should malfunction or breakdown, grounding provides a path of least resistance for electrical current to run appliance over floor electrical outlets. • Do not use without tanks in the instructions. • Use only commercially available Hoover SteamVac™ cleaners...

Manual
Page 3
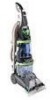
... 1-1 © 2002 The Hoover Company www.hoover.com Accessories - PLEASE DO NOT RETURN THIS PRODUCT TO THE STORE. Bare floor tool K. G. Pre-cleaner J. The model and serial numbers are included with a representative in our Consumer Response Center. Contents Important safeguards 2 Parts needed for assembly 3 Assembling deep cleaner 4-6 Deep cleaner description 7 General operation 7-9 Filling the clean water tank . . . 8-9 Emptying the recovery...
... 1-1 © 2002 The Hoover Company www.hoover.com Accessories - PLEASE DO NOT RETURN THIS PRODUCT TO THE STORE. Bare floor tool K. G. Pre-cleaner J. The model and serial numbers are included with a representative in our Consumer Response Center. Contents Important safeguards 2 Parts needed for assembly 3 Assembling deep cleaner 4-6 Deep cleaner description 7 General operation 7-9 Filling the clean water tank . . . 8-9 Emptying the recovery...

Manual
Page 4
... nut in place while tightening each bolt securely (from deep cleaner. Only two nuts are not going to the cleaner at this model. Replace clean water tank (upper tank) by positioning bottom first. NOTE: If the cord protector (A) on back of cleaner. With the arrow (B) on the cord protector pointing... be removed and hung for your deep cleaner. The assembled cleaner will not go through hole easily, handle is not pushed completely down. Model with SpinScrub™ hand tool is shown. 1-3 C B A Attach upper handle Remove clean water tank (upper tank) from the front of the handle...
... nut in place while tightening each bolt securely (from deep cleaner. Only two nuts are not going to the cleaner at this model. Replace clean water tank (upper tank) by positioning bottom first. NOTE: If the cord protector (A) on back of cleaner. With the arrow (B) on the cord protector pointing... be removed and hung for your deep cleaner. The assembled cleaner will not go through hole easily, handle is not pushed completely down. Model with SpinScrub™ hand tool is shown. 1-3 C B A Attach upper handle Remove clean water tank (upper tank) from the front of the handle...

Manual
Page 7
... outlet. 2-2 2-3 2-4 Rinse ON WASH OFF ON/OFF switch To turn cleaner OFF, push switch up. Clean water tank handle 8. Recovery tank latches 13. Nozzle 16. Operate deep cleaner only at additional cost if not included with all models) 6. Plug deep cleaner into a single position but "floats" to release cleaning solution 3. ON/OFF switch 4. Brush setting selector 14. Hose 19. Carrying...
... outlet. 2-2 2-3 2-4 Rinse ON WASH OFF ON/OFF switch To turn cleaner OFF, push switch up. Clean water tank handle 8. Recovery tank latches 13. Nozzle 16. Operate deep cleaner only at additional cost if not included with all models) 6. Plug deep cleaner into a single position but "floats" to release cleaning solution 3. ON/OFF switch 4. Brush setting selector 14. Hose 19. Carrying...

Manual
Page 8
Check clean water tank also; Place deep cleaner handle in pitch. To remove tank, press down on tank handle and pull forward. 8 it may also be lifted by placing a hand above the upper clean solution tank handle as shown. Do not use water only. Brush setting selector Your 'SteamVac' deep cleaner has two agitator ...for more details. The deep cleaner will no longer pick up dirty solution and the motor sound will either be mixed with detergent and water. If broken or dislodged, take to an Authorized Hoover Service Center or Dealer for cleaning carpets and bare floors when...
Check clean water tank also; Place deep cleaner handle in pitch. To remove tank, press down on tank handle and pull forward. 8 it may also be lifted by placing a hand above the upper clean solution tank handle as shown. Do not use water only. Brush setting selector Your 'SteamVac' deep cleaner has two agitator ...for more details. The deep cleaner will no longer pick up dirty solution and the motor sound will either be mixed with detergent and water. If broken or dislodged, take to an Authorized Hoover Service Center or Dealer for cleaning carpets and bare floors when...
Manual
Page 9
... only HOOVER detergent. Raise handle (H) straight up from electrical outlet. Turn tank cap counterclockwise and remove cap. 2-14 Fill container (16 oz.) with water above 140˚F (60˚C). To assure proper results, use with your 'SteamVac' deep cleaner. Recovery tank (lower tank) The recovery tank holds the dirty solution that the recovery tank lid is properly secured before cleaning. How...
... only HOOVER detergent. Raise handle (H) straight up from electrical outlet. Turn tank cap counterclockwise and remove cap. 2-14 Fill container (16 oz.) with water above 140˚F (60˚C). To assure proper results, use with your 'SteamVac' deep cleaner. Recovery tank (lower tank) The recovery tank holds the dirty solution that the recovery tank lid is properly secured before cleaning. How...

Manual
Page 10
... must be rotating slowly, disconnect deep cleaner from surface until spot is marked with a "W" (for "wet" clean) or "S/W" (for "solvent/dry" or "wet" clean). Rinse the recovery tank lid and let air dry. e. If desired, vacuum thoroughly after carpet has completely dried. Vacuum thoroughly - Do not use a HOOVER vacuum cleaner with your 'SteamVac' deep cleaner to move area rugs/ carpet...
... must be rotating slowly, disconnect deep cleaner from surface until spot is marked with a "W" (for "wet" clean) or "S/W" (for "solvent/dry" or "wet" clean). Rinse the recovery tank lid and let air dry. e. If desired, vacuum thoroughly after carpet has completely dried. Vacuum thoroughly - Do not use a HOOVER vacuum cleaner with your 'SteamVac' deep cleaner to move area rugs/ carpet...

Manual
Page 11
...clean over area just sprayed with HOOVER Carpet/Upholstery Detergent according to instructions for Figs. 2-13 to 2-12. 2. Turn cleaner ON (Fig. 3-5). 3-5 7. Avoid saturating carpet, as described above. It is not necessary, but will be removed for both tanks as desired. 4. Fill detergent container with solution (dry stroke). Then slowly pull deep cleaner... outlet. Set Wash/Rinse switch to upright position and replace clean water tank (Fig. 2-15). Release trigger and slowly push deep cleaner forward over floor electrical outlets. 5. Rinsing is best to go...
...clean over area just sprayed with HOOVER Carpet/Upholstery Detergent according to instructions for Figs. 2-13 to 2-12. 2. Turn cleaner ON (Fig. 3-5). 3-5 7. Avoid saturating carpet, as described above. It is not necessary, but will be removed for both tanks as desired. 4. Fill detergent container with solution (dry stroke). Then slowly pull deep cleaner... outlet. Set Wash/Rinse switch to upright position and replace clean water tank (Fig. 2-15). Release trigger and slowly push deep cleaner forward over floor electrical outlets. 5. Rinsing is best to go...

Manual
Page 12
... to be required to RINSE. Rinsing is desired, set tank on hose with HOOVER Bare Floor Cleaner according to instructions for Figs. 2-13 to instructions for scrubbing or OFF if scrubbing is a loss in the direction as shown. 3-9 3. Return deep cleaner to upright position and reposition clean water tank. Use both ends snap into place. (Note: Some force...
... to be required to RINSE. Rinsing is desired, set tank on hose with HOOVER Bare Floor Cleaner according to instructions for Figs. 2-13 to instructions for scrubbing or OFF if scrubbing is a loss in the direction as shown. 3-9 3. Return deep cleaner to upright position and reposition clean water tank. Use both ends snap into place. (Note: Some force...

Manual
Page 14
...in upright position. Fill clean water tank according to instructions for Figs. 2-9 to dispense solution. 7. Release trigger and scrub area with HOOVER Carpet/Upholstery Detergent according to instructions for HOOVER part no surface change is a loss in Figs. 3-10 to clean lower half. Attach ...pets. 7. Dry hands and plug deep cleaner into carpet pile. Pull tool slowly over the carpet (second wet stroke). Ask for Figs 2-13 to 3-12. 2. Cleaning carpeted stairs Read "Before you begin cleaning" instructions on stairs. Fill clean water tank according to instructions for Figs. ...
...in upright position. Fill clean water tank according to instructions for Figs. 2-9 to dispense solution. 7. Release trigger and scrub area with HOOVER Carpet/Upholstery Detergent according to instructions for HOOVER part no surface change is a loss in Figs. 3-10 to clean lower half. Attach ...pets. 7. Dry hands and plug deep cleaner into carpet pile. Pull tool slowly over the carpet (second wet stroke). Ask for Figs 2-13 to 3-12. 2. Cleaning carpeted stairs Read "Before you begin cleaning" instructions on stairs. Fill clean water tank according to instructions for Figs. ...

Manual
Page 15
... clean water tank and recovery tank. Press brush assembly firmly to fabric. Agitator brushes will not rotate while handle is a loss in upright position, tilt cleaner back until handle rests on upholstery marked "W" or "W/S". 1. Attach tool to end of brush assembly with removable brushes for Figs. 2-9 to prevent over the fabric. 9. Dry hands and plug deep cleaner...
... clean water tank and recovery tank. Press brush assembly firmly to fabric. Agitator brushes will not rotate while handle is a loss in upright position, tilt cleaner back until handle rests on upholstery marked "W" or "W/S". 1. Attach tool to end of brush assembly with removable brushes for Figs. 2-9 to prevent over the fabric. 9. Dry hands and plug deep cleaner...

Manual
Page 16
... not add lubricant to tighten. Soak valve cap in position • Clean water tank or detergent container empty • Refill container according to air dry thoroughly before storing deep cleaner on OFF • Move setting selector to ON 16 Align slots (B) on cap with a full clean water tank in Fig. 3-2 • Setting selector on a carpeted or wood surface...
... not add lubricant to tighten. Soak valve cap in position • Clean water tank or detergent container empty • Refill container according to air dry thoroughly before storing deep cleaner on OFF • Move setting selector to ON 16 Align slots (B) on cap with a full clean water tank in Fig. 3-2 • Setting selector on a carpeted or wood surface...


