Product Manual
Page 2
...Model MFG. Fri 8am- 7pm EST. Manufacturing code (Label located on bottom of cleaner) Contents Important Safety Instructions 3 Cleaner Assembly...5 How To Use...7 Cleaner Description 7 The Tanks ...8 Brush Speed Selector 9 Brush Indicator ...9 How To Clean...10 Before You Begin 10 Cleaning Carpet 10 Clean Surge...Troubleshooting...18 Helpful Reminders 19 Service...19 Cleaning Products...20 Warranty...21 If you for choosing a HOOVER® product. Mon- CODE Hint: Attach your HOOVER® product. Thank you need assistance: Visit our website at Hoover.com or call 1-800-944-9200...
...Model MFG. Fri 8am- 7pm EST. Manufacturing code (Label located on bottom of cleaner) Contents Important Safety Instructions 3 Cleaner Assembly...5 How To Use...7 Cleaner Description 7 The Tanks ...8 Brush Speed Selector 9 Brush Indicator ...9 How To Clean...10 Before You Begin 10 Cleaning Carpet 10 Clean Surge...Troubleshooting...18 Helpful Reminders 19 Service...19 Cleaning Products...20 Warranty...21 If you for choosing a HOOVER® product. Mon- CODE Hint: Attach your HOOVER® product. Thank you need assistance: Visit our website at Hoover.com or call 1-800-944-9200...
Product Manual
Page 3
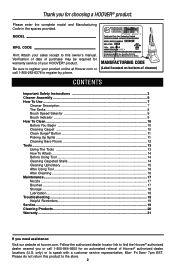
...toxic material with this manual.) • Use only on surfaces moistened by the cleaning process or small spills. Turn off all controls before unplugging. • Unplug before connecting the powered hand tool (available on select models). • Always disconnect cord from electrical outlet before servicing the carpet cleaner. ... children. WARNING: TO REDUCE THE RISK OF FIRE, ELECTRIC SHOCK OR INJURY: • To avoid internal component damage, use only Hoover® cleaning products intended for its intended use as described in the instructions. • Use only attachments recommended by...
...toxic material with this manual.) • Use only on surfaces moistened by the cleaning process or small spills. Turn off all controls before unplugging. • Unplug before connecting the powered hand tool (available on select models). • Always disconnect cord from electrical outlet before servicing the carpet cleaner. ... children. WARNING: TO REDUCE THE RISK OF FIRE, ELECTRIC SHOCK OR INJURY: • To avoid internal component damage, use only Hoover® cleaning products intended for its intended use as described in the instructions. • Use only attachments recommended by...
Product Manual
Page 5
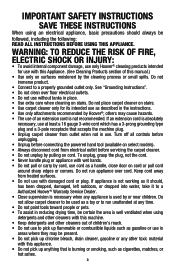
... nuts in place and use screw driver to back of carpet cleaner, push upper handle down . 1.2 Attach hose holder (Available on select models only) 1.3 Slide hose holder onto screws in back of handle, but do not add nuts yet. Push bolts into holes on select... vary from carton and identify each item shown. Attach handle 1.2 With cord hook to fasten. 1.3 5 Actual model may be purchased separately by visiting www.hoover.com. If bolts will not go through hole easily handle is not pushed completely down onto lower handle. 1. Cleaner ASSEMBLY Carton contents 1.1 A B C ...
... nuts in place and use screw driver to back of carpet cleaner, push upper handle down . 1.2 Attach hose holder (Available on select models only) 1.3 Slide hose holder onto screws in back of handle, but do not add nuts yet. Push bolts into holes on select... vary from carton and identify each item shown. Attach handle 1.2 With cord hook to fasten. 1.3 5 Actual model may be purchased separately by visiting www.hoover.com. If bolts will not go through hole easily handle is not pushed completely down onto lower handle. 1. Cleaner ASSEMBLY Carton contents 1.1 A B C ...
Product Manual
Page 6
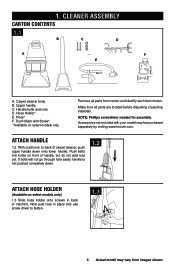
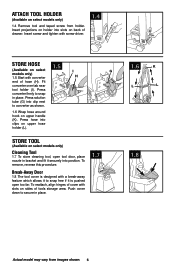
...Press solution tube (G) into slots on upper handle (K). To reattach, align hinges of hose (H). Fit converter over tab near tool holder (I G models only) 1.5 Start with converter H end of cover with screw driver. 1.4 Store Hose 1.5 (Available on select I ). Insert screw and tighten ...converter as shown. 1.6 Wrap hose around hook on back of tools storage area. Attach Tool holder (Available on select models only) Cleaning Tool 1.7 To store cleaning tool, open too far. To remove, reverse this procedure. Press converter firmly to snap free if it securely into...
...Press solution tube (G) into slots on upper handle (K). To reattach, align hinges of hose (H). Fit converter over tab near tool holder (I G models only) 1.5 Start with converter H end of cover with screw driver. 1.4 Store Hose 1.5 (Available on select I ). Insert screw and tighten ...converter as shown. 1.6 Wrap hose around hook on back of tools storage area. Attach Tool holder (Available on select models only) Cleaning Tool 1.7 To store cleaning tool, open too far. To remove, reverse this procedure. Press converter firmly to snap free if it securely into...
Product Manual
Page 7
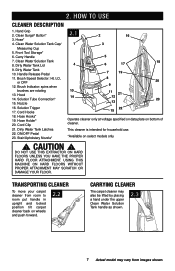
... and push forward. 2.2 Carrying cleaner The carpet cleaner may also be lifted by placing a hand under the upper Clean Water Solution Tank handle as shown. 2.3 7 Actual model may vary from images shown. Transporting cleaner To move your carpet cleaner from room to room put handle in upright... and locked position tilt carpet cleaner back on select models only ! Hose* 4. Carry Handle 7. Solution Trigger 17. Hose Hooks* 19. Dirty Water Tank Latches 22. Clean Surge® Button* 3. Dirty Water Tank Lid 9. Solution Tube Connection* 15. DO NOT ...
... and push forward. 2.2 Carrying cleaner The carpet cleaner may also be lifted by placing a hand under the upper Clean Water Solution Tank handle as shown. 2.3 7 Actual model may vary from images shown. Transporting cleaner To move your carpet cleaner from room to room put handle in upright... and locked position tilt carpet cleaner back on select models only ! Hose* 4. Carry Handle 7. Solution Trigger 17. Hose Hooks* 19. Dirty Water Tank Latches 22. Clean Surge® Button* 3. Dirty Water Tank Lid 9. Solution Tube Connection* 15. DO NOT ...
Product Manual
Page 8
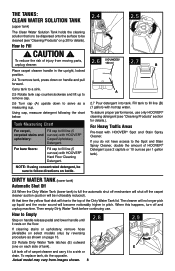
... bottle. 2.4 2.5 2.6 5 OUNCES/ 150 ml 2.7 B A 2.7 Pour detergent into tank. To assure proper performance, use only HOOVER® cleaning detergent (see "Cleaning Products" on handle and pull forward. At that is full the automatic shut off mechanism will shut off and unplug machine. Then empty... of carpet cleaner and carry it rests on the floor. 2.8 2.9 If cleaning stairs or upholstery, remove hose (Available on select models only) by reversing procedure as a measuring cup. Fill tank to fill line (B) (1 gallon) with HOOVER® Spot and Stain Spray Cleaner. CAUTION !
... bottle. 2.4 2.5 2.6 5 OUNCES/ 150 ml 2.7 B A 2.7 Pour detergent into tank. To assure proper performance, use only HOOVER® cleaning detergent (see "Cleaning Products" on handle and pull forward. At that is full the automatic shut off mechanism will shut off and unplug machine. Then empty... of carpet cleaner and carry it rests on the floor. 2.8 2.9 If cleaning stairs or upholstery, remove hose (Available on select models only) by reversing procedure as a measuring cup. Fill tank to fill line (B) (1 gallon) with HOOVER® Spot and Stain Spray Cleaner. CAUTION !
Product Manual
Page 9
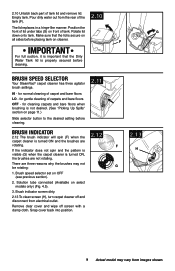
... carpet cleaner is secure on all sides before placing tank on OFF (see previous section). 2. Snap cover back into position. 2.13 H 9 Actual model may not be rotating: G 1. 2.10 Unlatch back part of the tank (F). 2.10 The lid replaces in a hinge-like manner. F IMPORTANT ...There are not rotating. Brush Speed Selector Your SteamVac® carpet cleaner has three agitator brush settings. for normal cleaning of carpets and bare floors OFF - Make sure that the Dirty Water Tank lid is properly secured before cleaning. 2.11 OAFgFitatoLrOSHpIeed 2.12 Brush indicator 2.12 The...
... carpet cleaner is secure on all sides before placing tank on OFF (see previous section). 2. Snap cover back into position. 2.13 H 9 Actual model may not be rotating: G 1. 2.10 Unlatch back part of the tank (F). 2.10 The lid replaces in a hinge-like manner. F IMPORTANT ...There are not rotating. Brush Speed Selector Your SteamVac® carpet cleaner has three agitator brush settings. for normal cleaning of carpets and bare floors OFF - Make sure that the Dirty Water Tank lid is properly secured before cleaning. 2.11 OAFgFitatoLrOSHpIeed 2.12 Brush indicator 2.12 The...
Product Manual
Page 10
... 3.1 Move speed selector to LO for gentle cleaning OAFgFitatoLrOSHpIeed or Hl for carpet or upholstery to be emptied and filled. Carpet Cleaning Fill Clean Water Solution Tank (upper tank) with white paper towel or cloth. Actual model may not be necessary if only high traffic ...absorbent cloth with clear water and let air dry. Use your HOOVER® SteamVac® carpet cleaner only if the upholstery fabric is removed; When cleaning entire floor, move area rugs/carpet to CLEAN Before you begin cleaning A. E. B. Mix detergent and water according to sink where ...
... 3.1 Move speed selector to LO for gentle cleaning OAFgFitatoLrOSHpIeed or Hl for carpet or upholstery to be emptied and filled. Carpet Cleaning Fill Clean Water Solution Tank (upper tank) with white paper towel or cloth. Actual model may not be necessary if only high traffic ...absorbent cloth with clear water and let air dry. Use your HOOVER® SteamVac® carpet cleaner only if the upholstery fabric is removed; When cleaning entire floor, move area rugs/carpet to CLEAN Before you begin cleaning A. E. B. Mix detergent and water according to sink where ...
Product Manual
Page 11
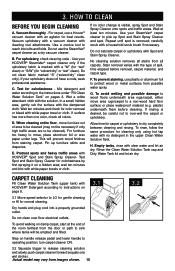
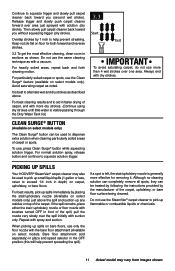
... nozzle with the bare floor attachment (Available on select models only). Do not use , press Clean Surge® button while squeezing solution trigger. Keep nozzle flat on carpet, upholstery, or bare floors. Picking up spills Your HOOVER® SteamVac® carpet cleaner may vary from images shown. For... as noted. To use the SteamVac® carpet cleaner to pick up any residue on select models only) The Clean Surge® button can be used to pick up spills on bare floors, use the Clean Surge® feature (available on select models. Continue to squeeze trigger and ...
... nozzle with the bare floor attachment (Available on select models only). Do not use , press Clean Surge® button while squeezing solution trigger. Keep nozzle flat on carpet, upholstery, or bare floors. Picking up spills Your HOOVER® SteamVac® carpet cleaner may vary from images shown. For... as noted. To use the SteamVac® carpet cleaner to pick up any residue on select models only) The Clean Surge® button can be used to pick up spills on bare floors, use the Clean Surge® feature (available on select models. Continue to squeeze trigger and ...
Product Manual
Page 12
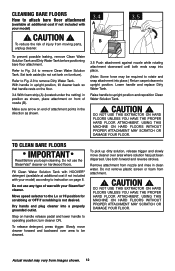
... OFF if scrubbing is not desired. Fill Clean Water Solution Tank with HOOVER® detergent (available at additional cost if not included with your model) ! Do not use the SteamVac® cleaner on hardwood floors. CAUTION ! Actual model may be cleaned. Move speed selector to upright position and reposition Clean Water Solution Tank. ! Refer to Fig. 2.9 to...
... OFF if scrubbing is not desired. Fill Clean Water Solution Tank with HOOVER® detergent (available at additional cost if not included with your model) ! Do not use the SteamVac® cleaner on hardwood floors. CAUTION ! Actual model may be cleaned. Move speed selector to upright position and reposition Clean Water Solution Tank. ! Refer to Fig. 2.9 to...
Product Manual
Page 13
...spots may vary from images shown. E Remove hose from moving parts, unplug cleaner. 4.2 D 34..230 E 4.2 To prevent possible leaking, remove Clean Water Solution Tank by pulling collar toward tube. 4.6 Open door on small carpet areas, 4.1 A carpeted stairs and upholstery. C. Slide converter halfway down...door. Rotate lid down firmly to cleaner, make sure black tabs are extended by pressing down opening until it is secure on select models only) ! Make sure lid is fully connected. 4.6 The tank replaces in place. 4.5 Before connecting tube (G) to ensure that ...
...spots may vary from images shown. E Remove hose from moving parts, unplug cleaner. 4.2 D 34..230 E 4.2 To prevent possible leaking, remove Clean Water Solution Tank by pulling collar toward tube. 4.6 Open door on small carpet areas, 4.1 A carpeted stairs and upholstery. C. Slide converter halfway down...door. Rotate lid down firmly to cleaner, make sure black tabs are extended by pressing down opening until it is secure on select models only) ! Make sure lid is fully connected. 4.6 The tank replaces in place. 4.5 Before connecting tube (G) to ensure that ...
Product Manual
Page 14
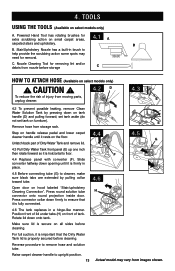
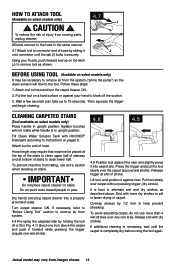
...turn the carpet cleaner ON. 2. Dry hands and plug carpet cleaner into carpet pile. Overlap strokes by 1/2 inch to end of stroke. Always end with HOOVER® Detergent according to 15 seconds). CAUTION ! Follow these steps: 1. Put the tool on stairs. Attach tool to help prevent streaking. If necessary, .... Turn carpet cleaner ON. It is in Fig. 4.1) about one inch above . How to Attach Tool (Available on select models only) It may be placed at the top of the stairs to clean upper half of stairway and at end of hose. Using your hand to block off the suction...
...turn the carpet cleaner ON. 2. Dry hands and plug carpet cleaner into carpet pile. Overlap strokes by 1/2 inch to end of stroke. Always end with HOOVER® Detergent according to 15 seconds). CAUTION ! Follow these steps: 1. Put the tool on stairs. Attach tool to help prevent streaking. If necessary, .... Turn carpet cleaner ON. It is in Fig. 4.1) about one inch above . How to Attach Tool (Available on select models only) It may be placed at the top of the stairs to clean upper half of stairway and at end of hose. Using your hand to block off the suction...

Product Manual
Page 15
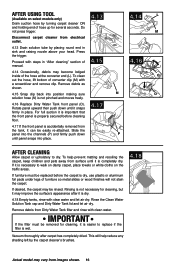
... available on select models only) 4.10 Be sure to check the cleaning code on your HOOVER® SteamVac® carpet cleaner only on upholstery marked "W" or "W/S". Fill Clean Water Solution Tank with the tool without pressing the trigger to remove air from system. 4.11 Gently press ... necessary, refer to "Before using the tool again. 4.10 Manufacturers tag 4.11 4.12 15 Actual model may be necessary to instructions on . overlap each pass. Use your upholstery. Vacuum up the solution with HOOVER® Detergent according to repeat the cleaning process. Make no more moisture.
... available on select models only) 4.10 Be sure to check the cleaning code on your HOOVER® SteamVac® carpet cleaner only on upholstery marked "W" or "W/S". Fill Clean Water Solution Tank with the tool without pressing the trigger to remove air from system. 4.11 Gently press ... necessary, refer to "Before using the tool again. 4.10 Manufacturers tag 4.11 4.12 15 Actual model may be necessary to instructions on . overlap each pass. Use your upholstery. Vacuum up the solution with HOOVER® Detergent according to repeat the cleaning process. Make no more moisture.
Product Manual
Page 16
... the panel into place. 4.13 4.15 4.17 4.14 L M 43.1260 O N O P After cleaning Allow carpet or upholstery to walk on damp carpet, place towels or white cloths on select models only) Drain suction hose by the carpet cleaner's brushes. 4.18 Actual model may improve the surface's appearance after carpet has completely dried. Proceed with...
... the panel into place. 4.13 4.15 4.17 4.14 L M 43.1260 O N O P After cleaning Allow carpet or upholstery to walk on damp carpet, place towels or white cloths on select models only) Drain suction hose by the carpet cleaner's brushes. 4.18 Actual model may improve the surface's appearance after carpet has completely dried. Proceed with...
Product Manual
Page 17
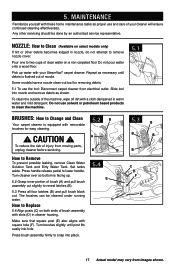
... C 5.3 B B B B C D F D 17 Actual model may vary from moving parts, unplug cleaner before servicing. To clean the outside of the machine, wipe off dirt with your cleaner will ensure continued cleaning effectiveness. To reduce the risk of your SteamVac® carpet cleaner. Turn cleaner over so bottom is equipped with ...debris becomes lodged in nozzle, do not attempt to Clean (Available on select models only) If lint or other servicing should be cleaned under running water. Some models have a nozzle clean-out tool for easy cleaning. ! How to lower handle. The brushes can...
... C 5.3 B B B B C D F D 17 Actual model may vary from moving parts, unplug cleaner before servicing. To clean the outside of the machine, wipe off dirt with your cleaner will ensure continued cleaning effectiveness. To reduce the risk of your SteamVac® carpet cleaner. Turn cleaner over so bottom is equipped with ...debris becomes lodged in nozzle, do not attempt to Clean (Available on select models only) If lint or other servicing should be cleaned under running water. Some models have a nozzle clean-out tool for easy cleaning. ! How to lower handle. The brushes can...
Product Manual
Page 19
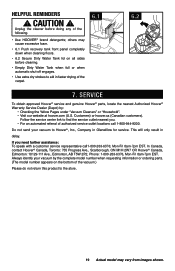
...For an automated referral of the following. • Use HOOVER® brand detergents; Always identify your vacuum to the store. 19 Actual model may cause excessive foam. • 6.1 Push recovery tank front panel completely down when cleaning floors. • 6.2 Secure Dirty Water Tank lid on... the bottom of the carpet. 6.1 6.2 7. In Canada, contact Hoover® Canada, Toronto: 755 Progress ...
...For an automated referral of the following. • Use HOOVER® brand detergents; Always identify your vacuum to the store. 19 Actual model may cause excessive foam. • 6.1 Push recovery tank front panel completely down when cleaning floors. • 6.2 Secure Dirty Water Tank lid on... the bottom of the carpet. 6.1 6.2 7. In Canada, contact Hoover® Canada, Toronto: 755 Progress ...


